It’s that time again!

Once again it’s Groundhogs Day and our CSA is open for orders. Place your orders now.

We ONLY sell chicken through our CSA, so don’t miss your chance to place your order.  And, spread the word to your friends and family so they don’t miss out. 

Our Base price is $4.86/lb, but CSA discounts levels apply, so you never pay full price. See details link below.

Place your order today.  Orders are first come, first serve and deposits are due once you’ve ordered.

CSA Details, including availability and pickup, can be found Here


Brothers M. MiM ’24 – Did It work – Week4

Brothers M. Mondays in May(MiM) is our tradition of sharing our excitement about our chickens every Monday in May.  This year’s Monday’s in May focus on Did it Work?  This week is the kids.

We started selling chickens as way for the kids to earn the things they wanted.  It was a good way to bridge the gap between those years from 12 until16 when it’s harder to find opportunities.   And it was a way to show them some responsibility.  All the kids have been involved and it’s currently Olivia’s main employment.

So did it work?  In my humble opinion I think it did; however, I can tell you they worked.

Brothers M. MiM ’24 – Did It work – Week3

Brothers M. Mondays in May(MiM) is our tradition of sharing our excitement about our chickens every Monday in May.  This year’s Monday’s in May focus on Did it Work? We’ll look at some of the things we’ve done and give an update on how well it worked.  This week is the portable coop floor.

For the portable chicken coop, I wanted an easy to clean floor.  I started out with a solid board with a laminate top so that I could easily scoop it clean.  This worked OK, but it was hard to get a shovel at the right angle to do a good scrape, it required cleaning often, and to really get a good clean I had to pull the board out, and it was heavy and unwieldy.

Floor

Then I went to a mesh flooring using 1x.5 inch wire, which I don’t have a picture of.  This didn’t work well at all, the .5″ was too small and droppings wouldn’t fall through.  And since stuff piled up, it wouldn’t clean easily by brushing with a push broom and needed cleaned by scraping with a shovel.  This one also had a 2×4 that went the length of the trailer that covered a support bar and 2×4 supports that spanned width.  These also caused droppings to quickly build up.  I did make some improvements by notching the frame where it was binding and cutting the width a little shorter so it slid in and out much easier.  Below is the next iteration, but you can see the center board and notch.

Floor1

Then I switched to a 1×1 mesh on the same frame and replaced the 2×4 that went the length of the trailer, pictured above.  I also replaced the 2x4s that spanned the frame with 2x2s.  This worked pretty good.  The chickens seemed to have no issues navigating the bigger mesh and more stuff fell through; however, the center bar that runs the length of the trailer, directly under the long 2×4 that I removed, would still get piled up quickly.   But mainly it was just the amount of poop a chicken does at night while on the roosting bars, which are over the long center bar, that caused problems keeping it clean.  Poop piled up and was quickly above the floor.  This floor was easier to clean with the broom, except for the areas where things backed up from below the wire mesh.  Then I had to pull it out and use a shovel to scrape it and clean off the center bar too.   Still not what I wanted.

Floor2

The current iteration happened by chance.  A piece of the wire mesh under the perches rusted and I didn’t want to deal with it in the winter time, so I threw a heavy board over it.  During the next couple cleanings, I realized that I might be on to something.  I cut a long narrow board that just sits under the perches; the heavy poop area.  Now, It works really well to pull the board out and scrape it off and the rest is usually easily cleaned by a push broom.  I added some straping to the end of the board on the bottom to give me an easier way to pull it out. I’ve been using this for a few months now and it’s looking like this will be the solution I stay with.

Floorstrap

Back to Portable Chicken Coop Main Page

Brothers M. MiM ’24 – Did It work – Week2

Brothers M. Mondays in May(MiM) is our tradition of sharing our excitement about our chickens every Monday in May.  This year’s Monday’s in May focus on Did it Work? We’ll look at some of the things we’ve done and give an update on how well it worked.

Today we’re again talking about waterers and it’s less of a ‘did it work’ and more of a ‘what works for us’.  I’ve been eyeballing the plastic 5 gallon waterers for a while now wondering if they’d work better for us.  Well this year I needed one and the only kind my favorite farm store had was plastic so I got a chance to try one out.

Waterers

The metal dual wall waterers are traditional and well proven.  They are also super convenient to fill with a 5 gallon bucket because the opening is so large and all you have to do is pull the top cover off, I only twist and hook the tops when I’m carrying them empty so it’s easy to pull straight up when filling.  However, they are a bit harder to clean, I use a small kitchen brush to clean the trough.   They are also more cumbersome to carry when they have water as you have to take the top cover off and carry them by the sturdy inside handle.  They have a “plunger” that prevents water from flowing out, but some always seep out anyway and will overflow until you can replace the top cover.

Metal

The plastic waterer is easily carried by the handle on top and there’s a small cap that you place over the bottom hole to prevent water from coming out as you carry it or while you are filling it.  The bottom tray comes off, so it’s easier to clean too.  Filling the plastic waterer is more difficult as the lid/handle is hard to unscrew, at least for the first little bit.  The hole is not very wide and the flow of water from a 5 gallon bucket tends to be wider than the hole and harder to hit.  You also have to place the small cap over the hole to prevent losing water while filling, then return it to the top where there’s a convenient place to keep it.

Plastic

What made the decision easy for me happened the second evening.  I was relaxing in the house and started questioning if I had removed the black cap off the fill hole.  I went back out to the field only to confirm yes I had done it right.  SO…  I know how forgetful kids are, and this was just a recipe for disaster.  With the metal waterers,  I’ve never questioned whether myself or my kids put the covers back on the waterer.  A big metal cover is just too obvious and much harder to miss.

Brothers M. MiM ’24 – Did It work

Brothers M. Mondays in May(MiM) is our tradition of sharing our excitement about our chickens every Monday in May.  This year’s Monday’s in May focus on Did it Work? We’ll look at some of the things we’ve done and give an update on how well it worked.

PVC Trash

This week we’re looking at the PVC nipple waterers. I created 2 PVC watering systems, one for the portable chicken coop and one for our Chicken tractors. As you can probably tell by the picture, one of these didn’t work too well.
PVC tractor
In the chicken tractor, I used a 10 foot length of 4 inch PVC with a shorter piece of 1 1/4 inch under it with nipples in it. This was attached to the side of the Chicken tractor for the chickens to drink from. The thought was that since it was attached to the tractor, we wouldn’t have to remove the waterer before moving the tractor.

We were able to train chickens to drink from it, but most still preferred the regular round waterer. The extra weight did make the chicken tractor heavier and a bit harder to move. Moving forward wasn’t too bad; however, without a cap on the open end of the pipe, moving backward just poured the water out when we raised the back of the chicken tractor with the dolly. Filling the water via the 4″ mouth hanging on the wall was also a pain. I scrapped them this year when I rebuilt 2 of the chicken tractors.
CoopPVC
I also used an 8 foot length of 3 inch PVC to create a watering system on the portal chicken coop. It narrows down to a 1 1/4 pipe that goes under the side door and to a watering station around the wheel. I also added a 3 inch to 4 Inch elbow to the fill end to make it easier to fill the water.

This one works really well. I don’t raise the front of the coop high enough to allow the water to pour out and even if some did, I only move the coop once a week so it wouldn’t be a big problem. The main drawback of this is that the 3″ PVC doesn’t hold as much water as I’d like, and I should have put the fill farther out so it’s not under the roof. I think I’ll fix both of these with one of the 4″ PVC pipes from the chicken Tractor.

Guess what day it is?

Groundhogs Day!  AND the open of our 2024 season.  Our season is now open and we’re taking orders!

We ONLY sell chicken through our CSA, so don’t miss your chance to place your order.  And spread the word to your friends and family so they don’t miss out. 

Our Base price is $4.72/lb, but CSA discounts levels apply, so you pay less. See details link below.

Place your order today.  Orders and deposits should to be received by March 31st.

CSA Details, including availability and pickup, can be found Here

Brothers M. MiM ’23 – Fun Fun

Brothers M. Mondays in May is our tradition of sharing our excitement about our chickens every Monday in May.

This year’s Monday’s in May ended up focused on “mechanics” of raising chickens. For some reading this, that’s exactly the desired information. Others just want to know what sets our chickens apart. I say what makes our chickens good is the “mechanics” of how we raise them. All the time, thought, and care that goes in to how we raise our chickens makes the difference.

We started MiM this year with the ‘not so much fun’ stuff. We’ll end with some “fun” pictures from this year. The picture of the chicken sunning itself leaves a warm spot in my heart, although the sun went away by the time I went and got my camera and I love ‘Mr. Nice Guy chicken. However, the best part for me has been/is watching the growth and maturity of the kids while taking care of our chickens.

PS, Monday got away from me.  Sorry this is late.

Brothers M. MiM ’23 – We like to Move it, Move it

Brothers M. Mondays in May is our tradition of sharing our excitement about our chickens every Monday in May.

It’s easiest to have a long enough piece of pasture that you can run the chicken tractors in one direction from start to finish.  Our pasture is long enough to do this; however, the contour of our pasture makes it better for the chickens to start near middle.  So we have to change direction midway through the growing season.

Our pasture is high near the middle, highest maybe 1/3 it’s length toward the road end.  The slop near the road is a gentle slope and the house end is more aggressive.  This makes the road end a marshy area in the early spring when all the rains come and the house end a river. Neither are good for young chickens in the cold nights of spring.

Moving1-1Our solution is to start the chicken tractors on the high ground and head toward the road, then reverse direction and head back toward the house.   This means we need a wider area to run the chicken tractors so we don’t overlap where they’ve already been.  Basically 6 lanes, 3 forward, 3 reverse.

It’s easy to move the chicken tractors in either direction, but moving over out of the previous track has proven harder than it sounds, at least for me.

My first thought was to sit the tractor on four 1 1/4″ PVC pipes and just sliding it over.  It was easy to slide the tractor over, but since PVD pipes come in 10′ lengths and the chicken tractor boards are 10′ 1.5″ apart, I needed extra sections of pipe. Additionally, the chickens were confused about which way to move and it’s harder to convince them to move sideways.  Overall this was more labor intensive and frustrating.

moving2-3Next I played around with turning the chicken tractor hard in one direction.  Either way I tried this, it always took more distance than I thought to get the tractor on the right path.  When doing a hard turn it’s difficult to push and the side aprons bend under the chicken tractor and you have to pull them out.  Again, the chickens are used to going forward and you have to be careful not to run over them with the side of the tractor.

The method on the right in this illistration wasn’t too bad, but this method took up a lot of space with wise.  Our pasture has a V shape and drains down the middle, so we only have enough “smooth” area for the 6 paths plus the “river” in the middle during heavy rains.   Also the first move in the reverse direction was pretty long, so I didn’t like this method either.

Moving4-1
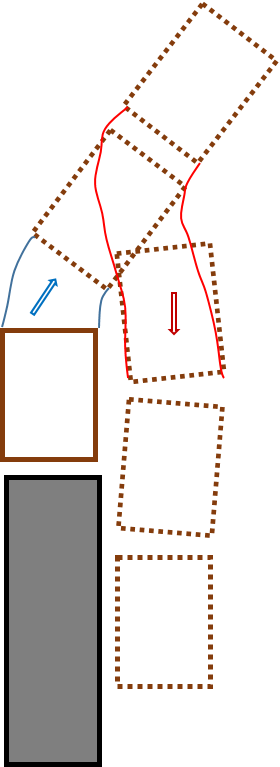
Finally I did a LONG walk forward with a medium turn to the side, then reversed direction with another medium turn and this worked much better.  I modified it so instead of a LONG walk, I do a generous move of the chicken tractor twice, then reverse direction.  The first reverse move is a little longer than normal, but not a Long walk. Occasionally a little corner of the previous path overlaps, but it’s under the front cross member and not a problem.

I consider myself decent at geometry and puzzling things together and these moving patterns may seem obvious; but, there’s nothing like doing a hard turn forward with a chicken tractor, then doing a hard turn in the opposite direction just to realize you’re basically where you started.    Also, my drawings are not the best and may not be completely accurate, but I CAN tell you the last one is the one that’s easiest for me even if I cannot exactly explain/demonstrate what was wrong with the others.

Brothers M. MiM ’23 – Feeding Frenzy

Brothers M. Mondays in May is our tradition of sharing our excitement about our chickens every Monday in May.

Sharks get all the attention for their ferocious feeding frenzies, but chickens frenzy too.  Chickens are not ferocious, but they can injure each other as they are trying to get to the food.

Feeding
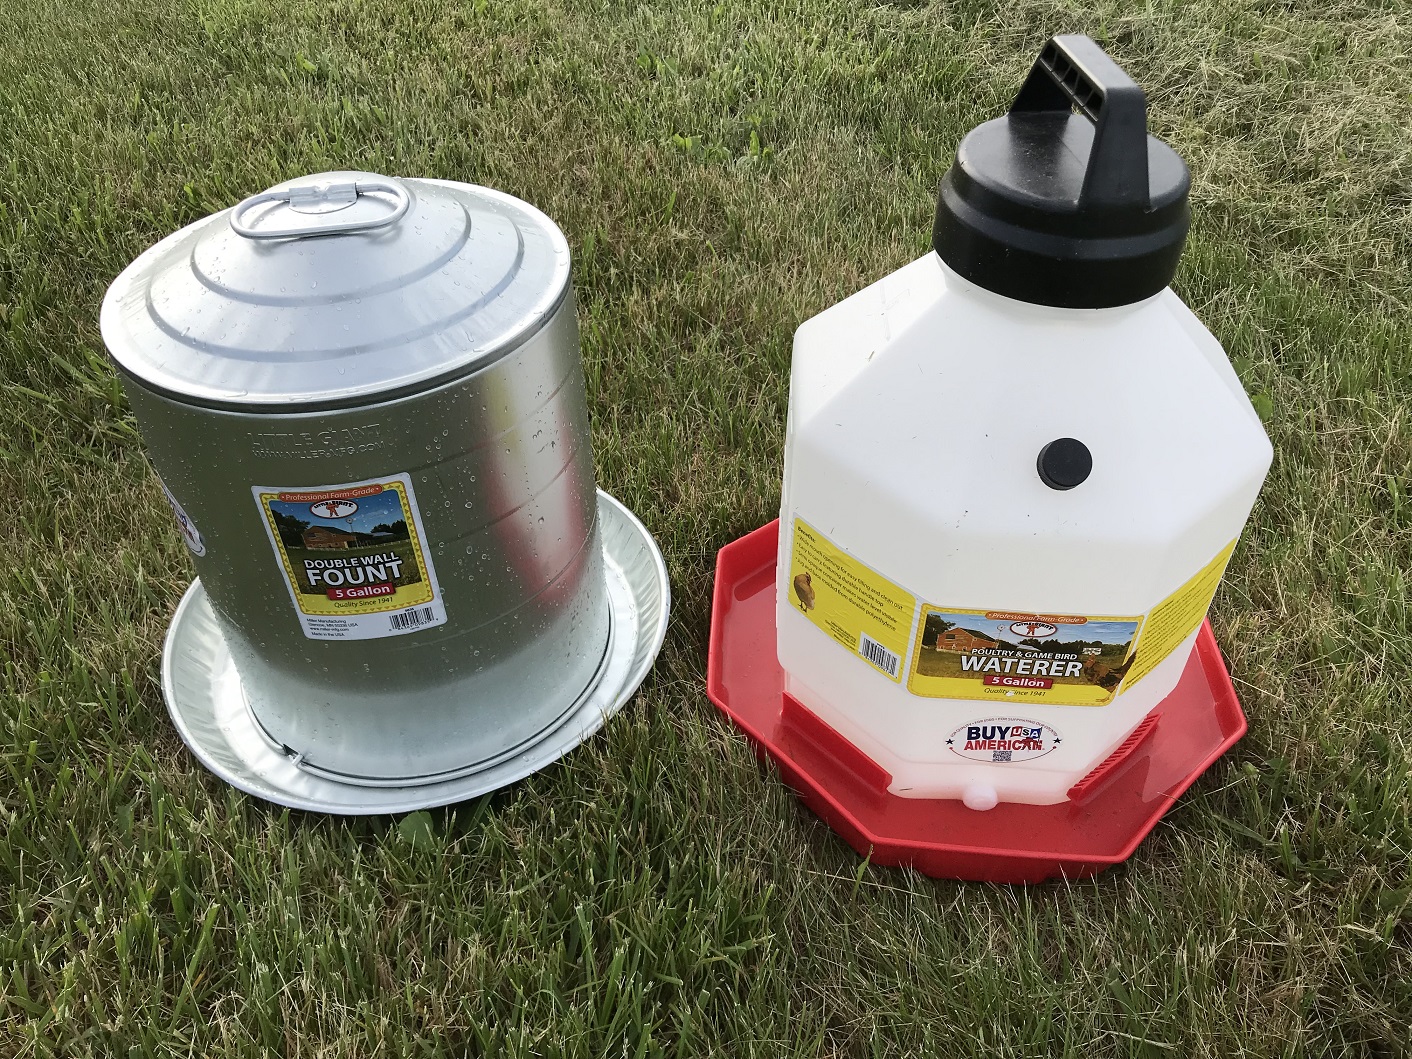
In the early years, I adopted the line of thought of keeping food always available to the chickens.  This meant 2 feeders were adequate to feed all the chickens, because they were not all hungry at one time.

Now I’ve grown to adopt a twice a day feeding method.  The birds seem healthier and more energetic when they are not allowed to eat constantly.  They also seem to forage more in between feedings. This requires more feeders to accommodate more birds “at the table”, and to hold more food, but the results are worth it.

Brothers M. MiM ’23 – Chicken Tractor Life Expectancy

Brothers M. Mondays in May is our tradition of sharing our excitement about our chickens every Monday in May.

As I said in the last post, more on wire rusts and wood rots.  Ten years ago I built 2  chicken tractors and this year some of the chicken wire is rusted beyond protection and the rest is questionable.  So to cut to the chase, 9 years is how long my chicken tractor lasted.

NewWireOne of the two tractors developed holes in the chicken wire late last year, I think from birds landing on it, so I knew I needed to replace some of the wire this year.  What I didn’t know was that ants had destroyed the front board of that tractor.  Here’ a picture of what I replaced at the 11th hour to get me through this year, one section of wire over the top, new front board, and new chicken wire on the front.  The 2nd tractor didn’t have holes yet, so I just added some fencing over the same area I replaced on the first.  That will get us through the growing season.

Most of the wood frame could probably go another year or two.  There’s evidence that ants have started homes in the wood, but most of it still seems solid.  Where I went wrong was that I added a board to the front of this chicken tractor because there was a big knot where we pull from.  The ants crawled between the boards and got a foot hold.  Also, I think the board I added may not have been treated. I probably meant to replace it and forgot.WoodAnts

rusted wireRust is the main factor in rebuilding the chicken tractors.  All the chicken wire needs replace.  Some would easily break off while the rest is getting there. Here’s a flattened pile of the wire.  The top, is the worst place, but the sides are not too far behind.  I think next time once it appears the wire may start rusting, I’ll treat it with some anti rust spray.

As I said, I’m not going to repair the old ones, it’s too much work just to get a couple more years.  I’ll spray and re-use the cattle panels, re-use the old doors as they have already been replaced once and are easy to replace, but the rest will be new.

Here’s a picture of the back of the tractor so you can see how well the pallet planks held up.  Really not bad considering the age.

TractorBack

Here’s a link to my ‘How to build a Chicken Tractor’ page.