Once again it’s Groundhogs Day and our CSA is open for orders. Place your orders now.
We ONLY sell chicken through our CSA, so don’t miss your chance to place your order. And, spread the word to your friends and family so they don’t miss out.
Our Base price is $4.86/lb, but CSA discounts levels apply, so you never pay full price. See details link below.
Place your order today. Orders are first come, first serve and deposits are due once you’ve ordered.
CSA Details, including availability and pickup, can be found Here
Groundhogs Day! AND the open of our 2024 season. Our season is now open and we’re taking orders!
We ONLY sell chicken through our CSA, so don’t miss your chance to place your order. And spread the word to your friends and family so they don’t miss out.
Our Base price is $4.72/lb, but CSA discounts levels apply, so you pay less. See details link below.
Place your order today. Orders and deposits should to be received by March 31st.
CSA Details, including availability and pickup, can be found Here
Once again, we are ONLY selling chicken through our CSA, meaning we will NOT be selling chicken at the Farmers Markets. Please spread the word to your friends and family so we can continue to grow.
Our Base price is now $4.72/lb, but CSA discounts levels apply, so you pay less. See chart below.
Place your order today. Orders need to be received by March 31st.
CSA Details, including availability and pickup, can be found Here
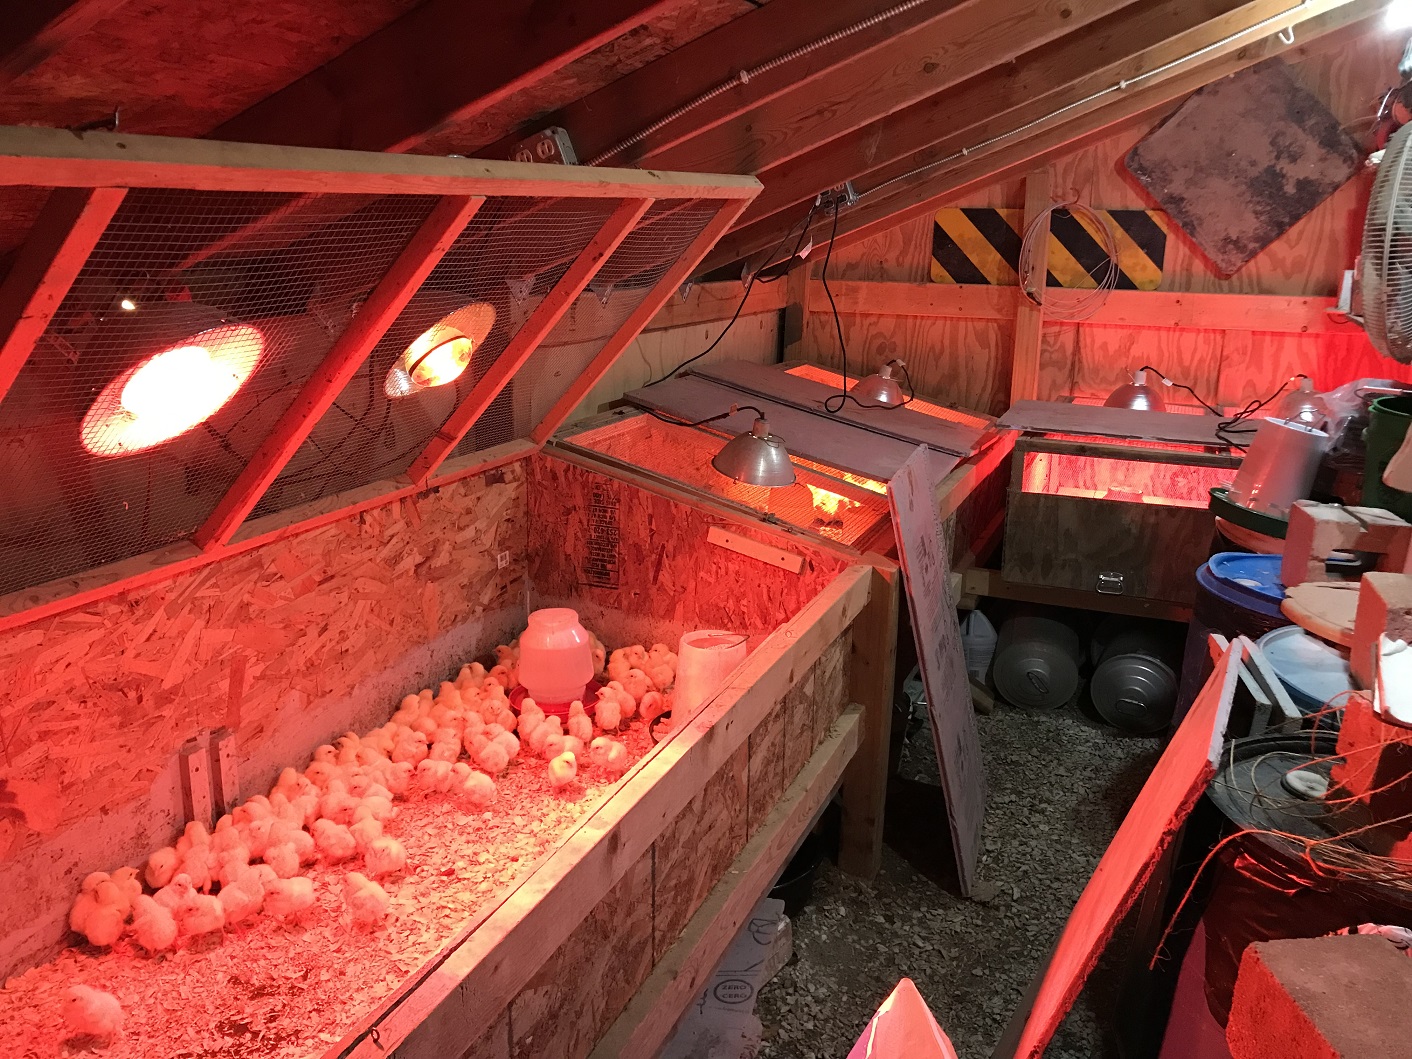
It’s gearing up to be the coldest week/weekend of the month, so you know that that means. The chicks have arrived. But don’t worry, they’ll be safe and warm in the brooders. BTW, if you’re interested in brooders, this year’s Brothers M. Monday’s in May will be a series on the evolution of our brooders.
Looking forward to seeing everyone when we deliver chicken this year. Huge THANK YOU to everyone who ordered. I wasn’t sure if going to a CSA only model would be feasible, but we completely sold out this year. Thanks again.
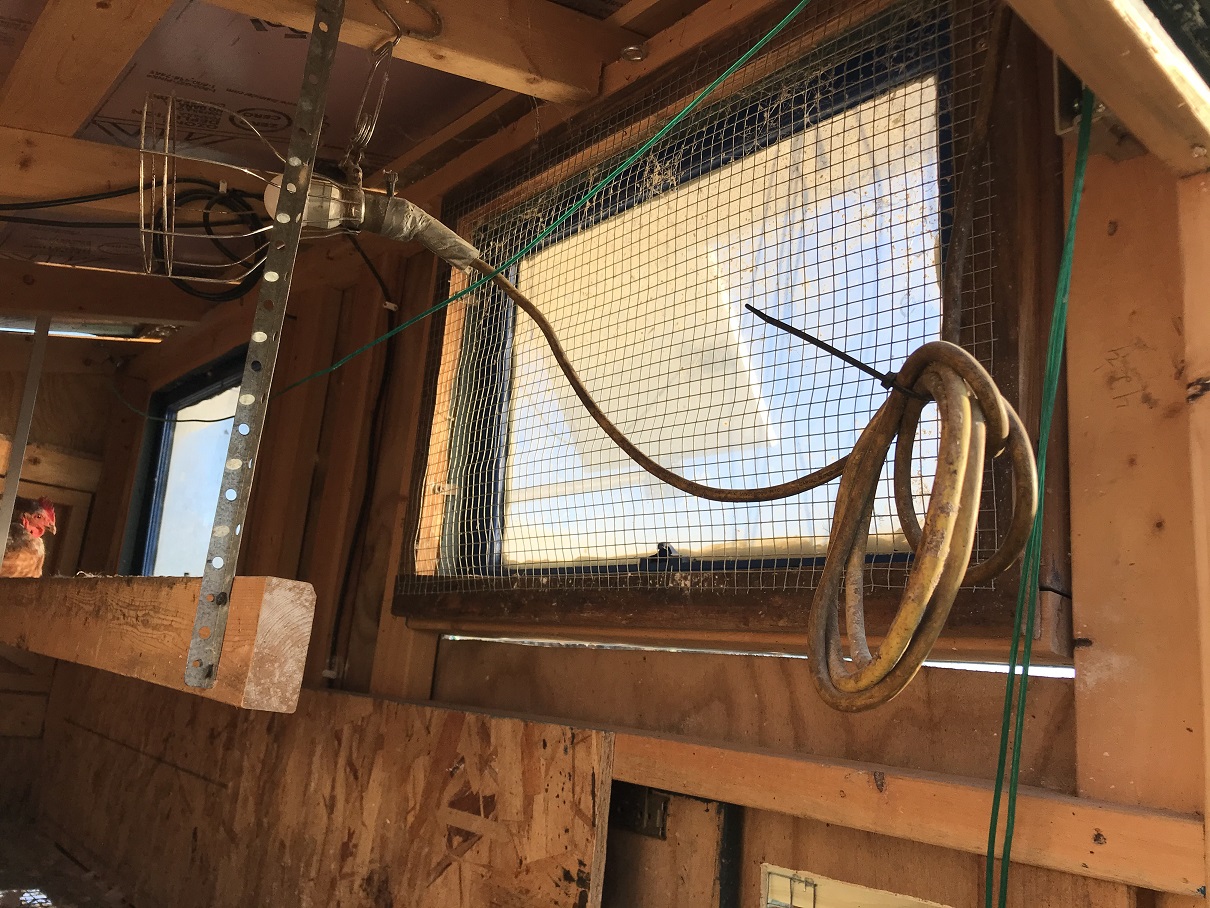
I touched on the light for the Portable Chicken Coop in the Electronics post, which really was just putting my previous Supplemental Light setup in the new coop. Given how quickly the battery can be drained in the short overcast days of winter, I wanted to revisit the lighting to see if I could improve the lighting, while reducing the wattage to extend the battery life.
The main goal of this redesign is to do away with the single 5w E26 LED Bulb (I bought a 2 pack, but only used 1) and reduce the wattage required for lighting. To do this, I looked at these 1w G4 LED bulbs. These have a clear glass, where the 5w bulb had a diffused plastic cover. They are also a daylight bulb, where the 5w was warm light. I expected both these factors to mean I could use less and get more or the same light.
I purchased a pack of G4 bases and started my build. I decided on doing a strip with 3 lights. Hopefully I could pull one bulb out and get away with just 2 lights. Either way, that would reduce my wattage from 5w to either 3w or 2w based on the number of bulbs.
My initial thought was to use PVC and run the wire inside the pipe and have the bulbs exposed on the outside. It was tough getting the wires soldered and back through the small opening needed for the base of the bulb, but I did it. However, after I drilled the holes for the screws and started attaching the base, I realized how fragile the porcelain bases were.
I broke the edges of the first base, but managed to get it secured. When the 2nd base broke, I decided to rethink my design. Obviously the flanged wood screws I was using would put pressure on the base promoting breaking, but I was being careful not to put too much pressure. And all but one of the base breaks happened before I got the head down to the base.
For my redesign, I decided to use a strip of wood. It’s more forgiving and would allow me to have open access to the wires on the back side for easy soldering and such. One of the main issues with breaking the bases was that I struggled getting the right angle drilled for the screws on the round pipe. A flat piece of wood should allow me better control on the angle.
Looking around my basement, I found a scrap strip of OSB, apparently just waiting for me to make a light strip out of it. I drilled the holes for the wires and was pleased that the bases went on much easier. Still using wood screws, I had to be careful on how tight I tightened the screws, basically just lightly touching the base.
Originally, I wasn’t planning on any protection for the lights, thinking the light was high enough on the ceiling that it wouldn’t get hit. However, when I did a fit on the lights, the clearance really wasn’t’ that high, so I decided to make some protectors. I had sections of 1/2 x 1inch chicken floor that I replaced with 1×1 wire. I cut 3 pieces of this, curled the wire ends so I could attach it with screws and voilà protected lights.
Yes, you may notice the receptacle in the photo with the light strip. I used an old electrical cord for the wiring, so I decided to add a household receptacle to plug it into so it’s easier to remove if I need to fix anything. Also, I ended up using all 3 lights; the chickens seem to lay better that way.
I used this strip all winter and it was only in the late winter that I had any issues with having to swap batteries a couple of times to recharge them, which was a huge improvement. I only have a 20w solar panel, so that upgrade is next on my list.
Brothers M. Mondays is our way of showing you how excited we are for the first Seymour Farmers Market
Since it’s still the Easter season, I thought we’d start out with this post.
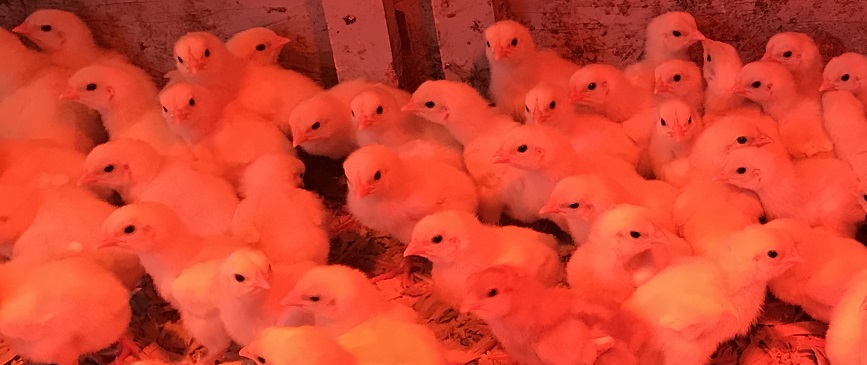
I went out to the brooder to check on our new chickens, who had arrived the prior day. When I looked in, their resemblance to marshmallow Peeps was striking. They were all lined up with one eye on me. The pictures don’t do the initial pose justice as they moved around a bit when I lifted the lid to grab a pic, but you can still see what I’m talking abouth.
While these youngsters may look like they have a marshmallow center, I assure you they’ll grow into high quality protein.
This really doesn’t need to be a separate post, but I didn’t want to combine it with my solar tire tub post since I consider that a failure.
My father-in-law gave me these feeders, so I decided to use them in the initial phase of the coop build. My thought was to build a PVC feeder system that we could add feed from outside the coop. This was because roosters are mean to little girls.
Now, we no longer have a rooster and I’ve grown to like the door feeders. Having to open the door to feed the chickens is a bit more work. And a time or two a chicken has escaped, as referenced in my aviary post; however, at this point I’m no longer interested in perusing a PVC solution .
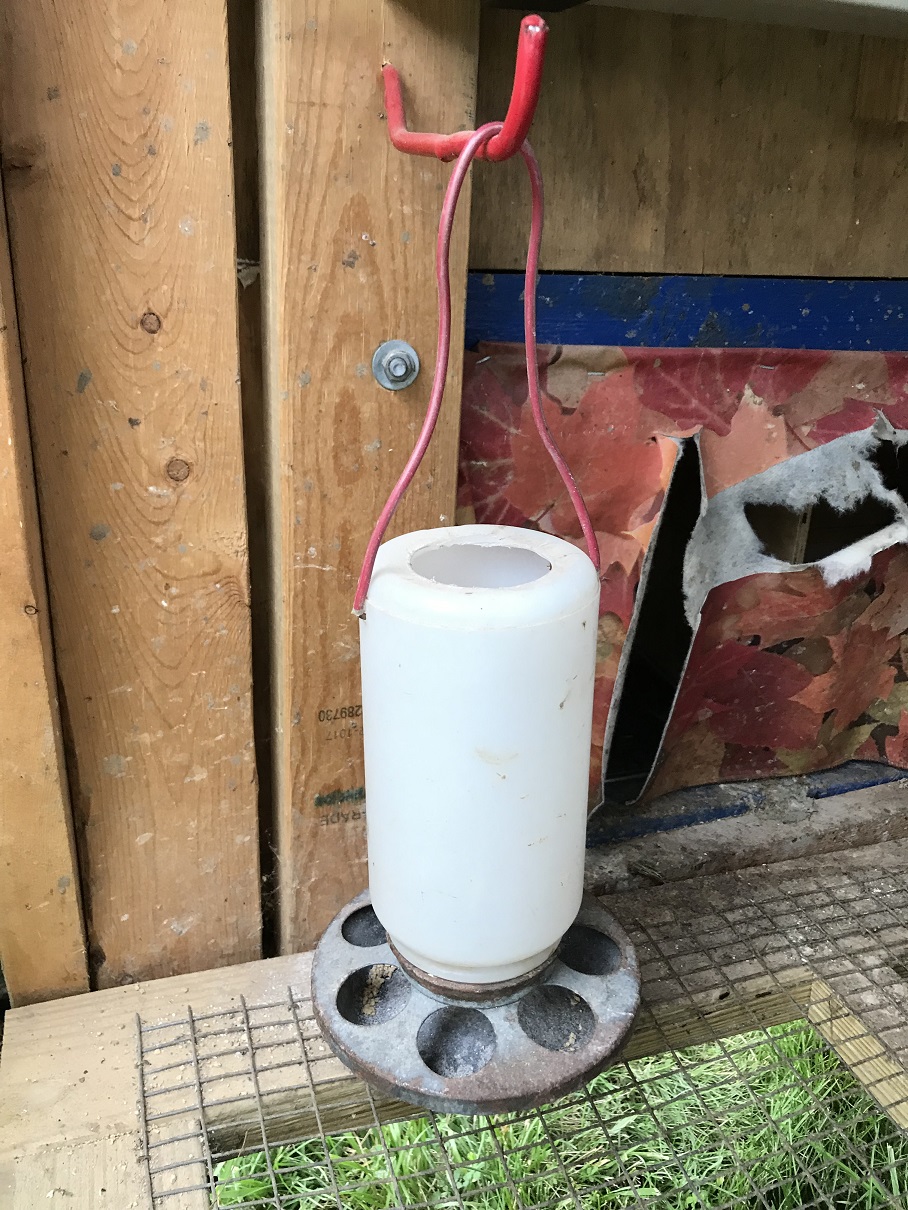
As a bonus item, here’s my solution for providing calcium for the chickens. I like the idea of providing a second feeder that they can get the calcium at-will instead of adding it directly to their feed. For this I repurposed a broken brooder waterer and an old brooder feeder base I picked up. The plastic waterer was cracked and not holding water, so I cut open the top to be able to fill it from the top, and drilled two holds for the hanger. A scrap piece of house wire inserted into two drilled holes acts as a hanger.
Recently I realized I didn’t do a post on my solar tire waterer and that it’s on the outline for my initial build. In my opinion it was a failure and I guess why I overlooked it. But, I want others to be able to learn from both my successes and failures so here goes.
I researched ways to keep water from freezing and the tire idea intrigued me so I built one. I thought I had an ace up my sleeve, I’ll explain.
So I got a tire and put a board across the bottom for the pan to sit on. This was to insulate the pan from the ground. The instructions said to fill the tire with insulating material, plastic seemed to be the most common material so I filled the tire with old tarp scraps. I got a black plastic oil pan that fit the tier pretty well and I was off to the races.
And my ace in the hole? One of our small blue-ice bottles, unfrozen obviously. I saw people putting a dark ball in the water to move the water and attract heat, thus helping to keep it from freezing. If figured if my “ball” was also partly filled with salt water, which freezes at a lower temperature, it would help keep the water from freezing even more.
The results. The chickens roosted on the tire during the day, frequently butt side toward the water, and made a mess in the water. It was hard to keep the water clean. The tire setup did help keep the water from freezing, a little. It was fairly easy to dump frozen ice out of the pan or to melt it with hot water. The blue ice bottle seemed to help, but I’m not sure if or how much better than just adding a ball.
Marshmallow seems to be my common companion
The end result was I finished the winter with it and moved back to a standard ground waterer as soon as I could. The tire was thrown in a corner, pan and all, and I didn’t touch it until I grabbed a picture the following February for the solar water post. It’s still sitting unused.
For a better solution, check out what I used last winter. This is the best solution I’ve found.
This was a part I didn’t plan out in great detail, but I’m used to that. Even the well thought out plans I made for this coop got modified as I built. Typically I’m building with various material, used and new, and I incorporate what I have to make what I want. I like to think I’ve developed pretty decent system around this building process.
Just so happens, I watched this video on being more productive the morning I was going out to work on the Aviary. It made me feel better about building the Aviary from just an idea in my mind. Early in the video, I like when he said “I think it’s easy to stand around and talk about how to do something better, when if you simply put your head down and went to work, it would be done, and well done, when discussion on the best possible method was just beginning to slow up enough for somebody to begin to pick up a tool. Now I’m overstating that, but productivity is important.”
I also, I enjoyed the Frost poem, and finally CS Lewis’s quote, “Two of a trade, never agree.” and his interpretation that Everyone does it different, so learn new things from that.
What’s Up? Chicken Butt. Laugh when you see it.
But on to the Aviary…
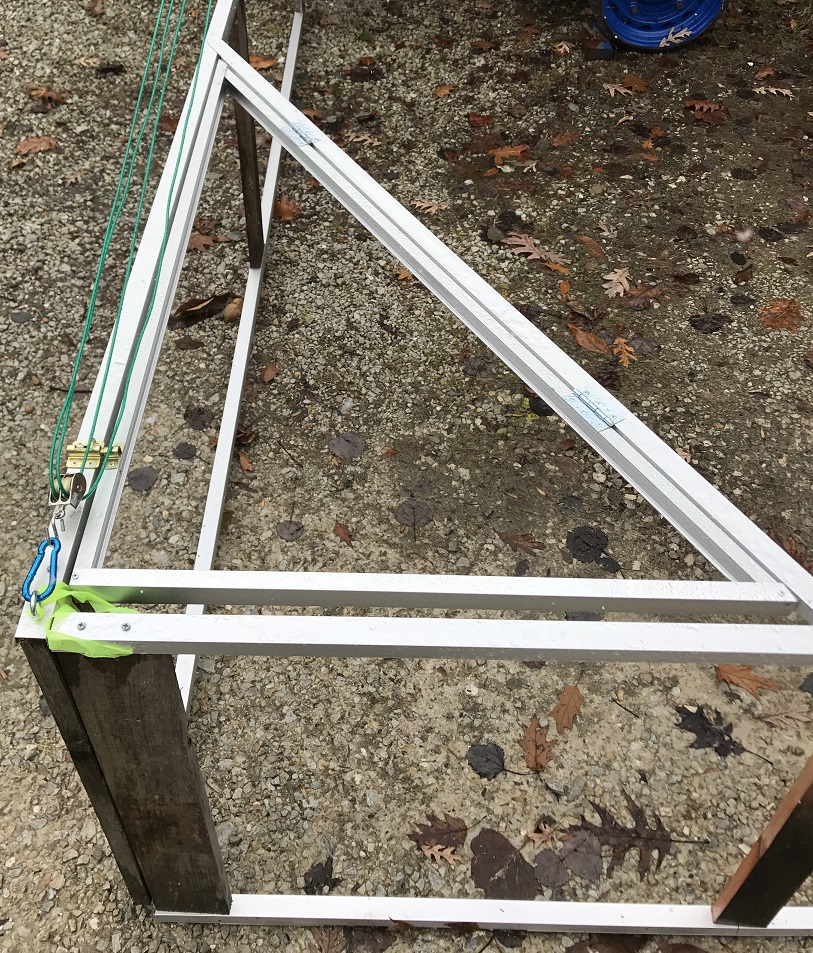
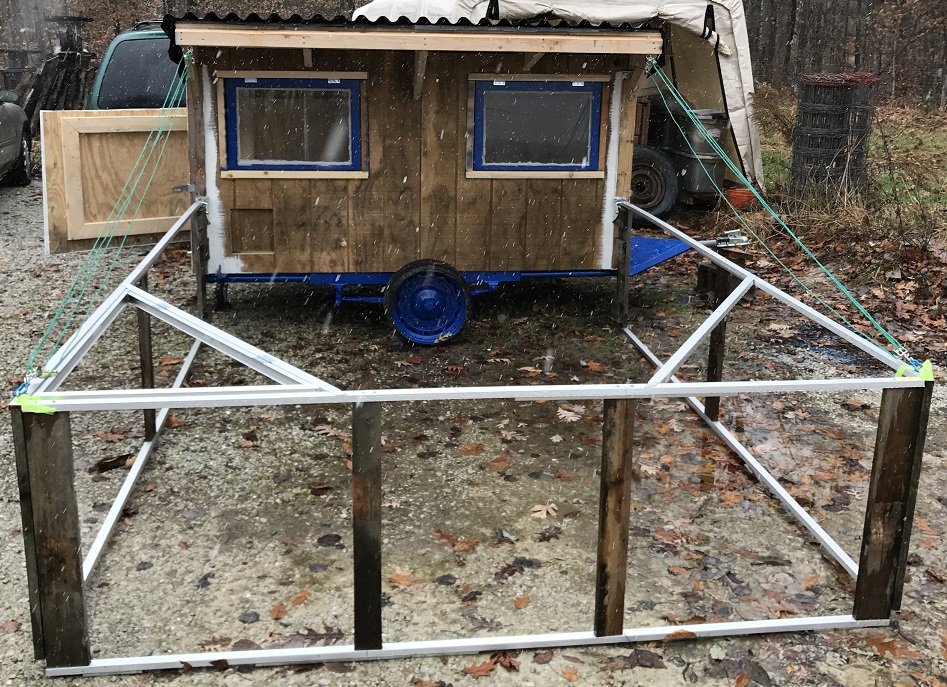
Building a coop on a trailer meant coming up with an aviary that can be lifted for movement. I don’t have permanent perimeter fencing around the pasture to keep and protect the flock, so an aviary is necessary.
The aviary is easily detachable at the pivot/hinge, made from a caster with the wheel removed. This is for three reasons. I may use the coop with portable fencing as some point and not want the aviary attached. The corners of the aviary drag when moving, so if I’m moving over large distances, removing the aviary makes the move easier. It’s also necessary for me to use the windows as access portals to remove chickens when they are roosting in the middle, removing the aviary gives me access to the windows.
Nice to have a friend around when you work
Most of the frame is made out of some scrap aluminum wire track I picked up. This helps keep it light. The wooden pallet boards are for extra strength at the corners and pivot point, and to make it easier to tie everything together. Chicken wire is zip tied to the frame and stapled to the wood where appropriate.
I turned one corner of the frame into a hatch. This mainly allows us to water the chickens. We’ve been using ground waterers in the warm months and my new solar heated waterer in the cold months. I recently setup a PVC nipple system, but the weather turned cold before I could try it out; more to come on that.
My helper with running the cable.
The initial plan was to use a pulley system attached to the aviary to raise and lower it like a drawbridge and attach a motor or winch to raise and lower it. Even though it’s pretty light, it a pretty hard pull to raise. This is due to the shallow angle of lift I have from the roof and that I used cheap pulleys. Even with double pulleys, it’s a struggle to lift by pulling the cables.
Currently, I raise the aviary by hand, prop it up with a bucket, then pull the slack out of the cable and tie it down, using a cleat hook on the inside. I’m thinking I may scrap the whole pulley system and just have one cable on each end that is right length to hold the frame up once I’ve raised it on the bucket.
I’ve been told I should have designed the coop so that the aviary drags behind the coop when I move it. This sounds like a good idea; however, it doesn’t make backing up easy and I’ve already built the coop. I do think a redesign is in order, I have some ideas, so more to come when I’m finished.
Yes, she’s outside. The devil escaped while filling the food.


 I touched on the light for the Portable Chicken Coop in the
  I purchased a pack of
 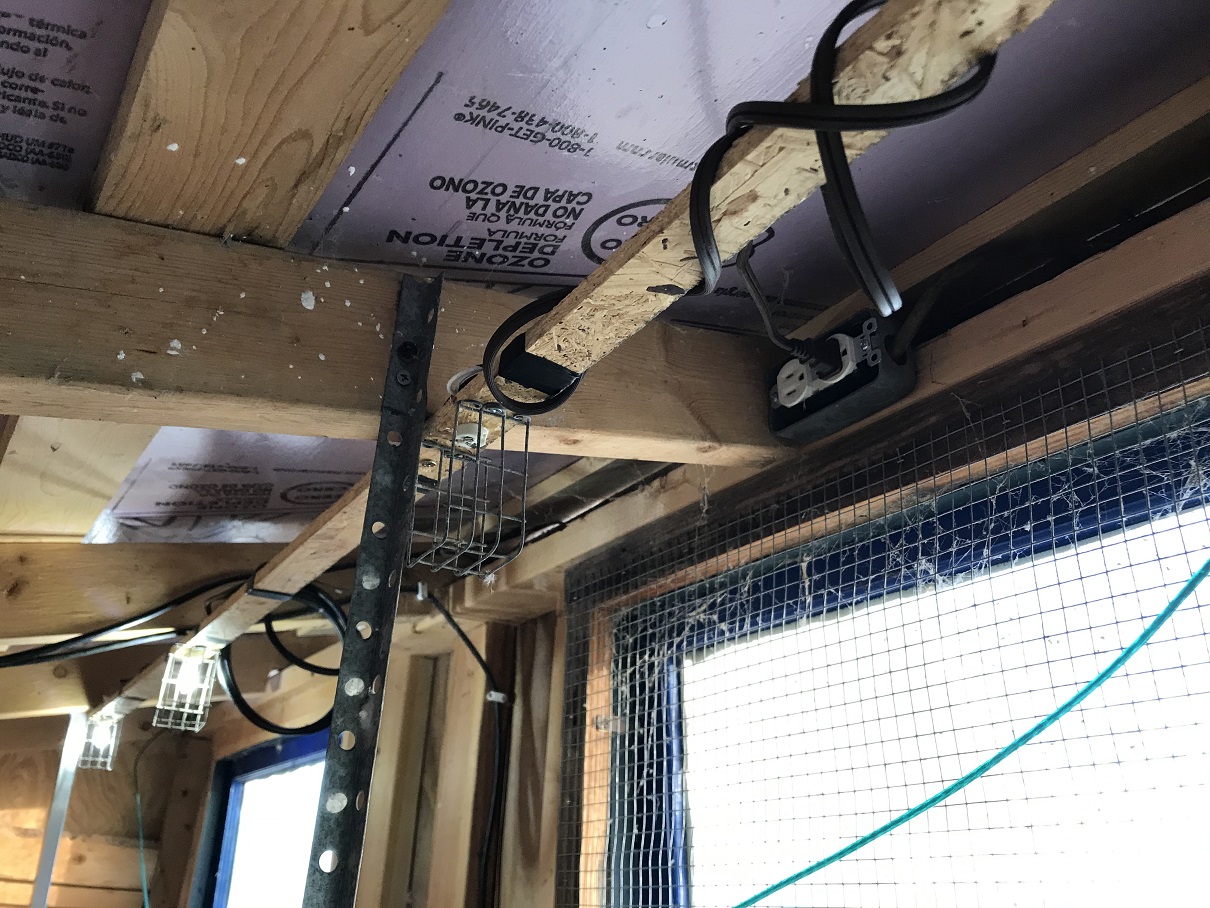 access to the wires on the back side for easy soldering and such. One of the main issues with breaking the bases was that I struggled getting the right angle drilled for the screws on the round pipe. A flat piece of wood should allow me better control on the angle.
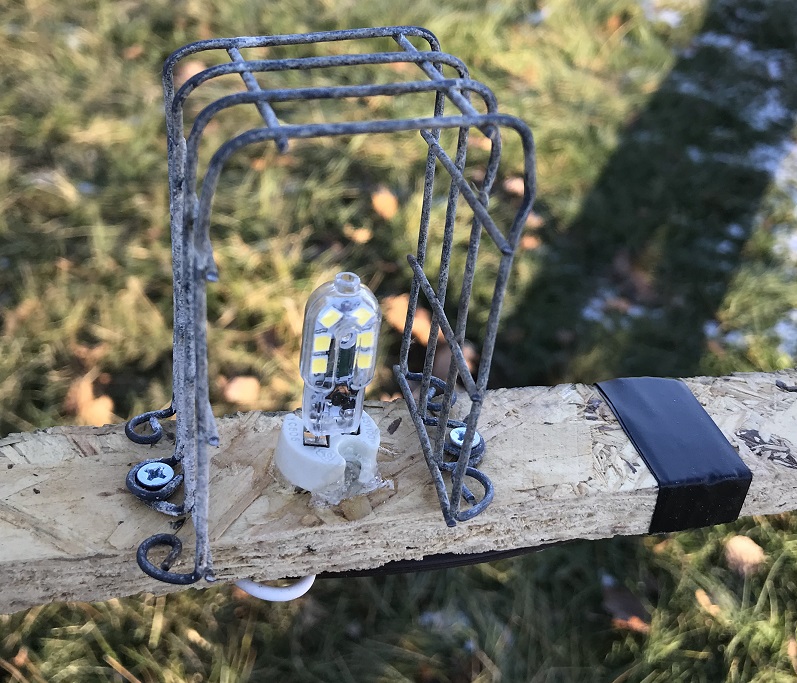 Originally, I wasn’t planning on any protection for the lights, thinking the light was high enough on the ceiling that it wouldn’t get hit. However, when I did a fit on the lights, the clearance really wasn’t’ that high, so I decided to make some protectors. I had sections of 1/2 x 1inch chicken floor that I replaced with 1×1 wire. I cut 3 pieces of this, curled the wire ends so I could attach it with screws and voilà protected lights.