Brothers M. Mondays in May(MiM) is our tradition of sharing our excitement about our chickens every Monday in May. This year’s Monday’s in May focus on Did it Work? This week is the kids.
We started selling chickens as way for the kids to earn the things they wanted. It was a good way to bridge the gap between those years from 12 until16 when it’s harder to find opportunities. And it was a way to show them some responsibility. All the kids have been involved and it’s currently Olivia’s main employment.
So did it work? In my humble opinion I think it did; however, I can tell you they worked.
Brothers M. Mondays in May(MiM) is our tradition of sharing our excitement about our chickens every Monday in May. This year’s Monday’s in May focus on Did it Work? We’ll look at some of the things we’ve done and give an update on how well it worked. This week is the portable coop floor.
For the portable chicken coop, I wanted an easy to clean floor. I started out with a solid board with a laminate top so that I could easily scoop it clean. This worked OK, but it was hard to get a shovel at the right angle to do a good scrape, it required cleaning often, and to really get a good clean I had to pull the board out, and it was heavy and unwieldy.
Then I went to a mesh flooring using 1x.5 inch wire, which I don’t have a picture of. This didn’t work well at all, the .5″ was too small and droppings wouldn’t fall through. And since stuff piled up, it wouldn’t clean easily by brushing with a push broom and needed cleaned by scraping with a shovel. This one also had a 2×4 that went the length of the trailer that covered a support bar and 2×4 supports that spanned width. These also caused droppings to quickly build up. I did make some improvements by notching the frame where it was binding and cutting the width a little shorter so it slid in and out much easier. Below is the next iteration, but you can see the center board and notch.
Then I switched to a 1×1 mesh on the same frame and replaced the 2×4 that went the length of the trailer, pictured above. I also replaced the 2x4s that spanned the frame with 2x2s. This worked pretty good. The chickens seemed to have no issues navigating the bigger mesh and more stuff fell through; however, the center bar that runs the length of the trailer, directly under the long 2×4 that I removed, would still get piled up quickly. But mainly it was just the amount of poop a chicken does at night while on the roosting bars, which are over the long center bar, that caused problems keeping it clean. Poop piled up and was quickly above the floor. This floor was easier to clean with the broom, except for the areas where things backed up from below the wire mesh. Then I had to pull it out and use a shovel to scrape it and clean off the center bar too. Still not what I wanted.
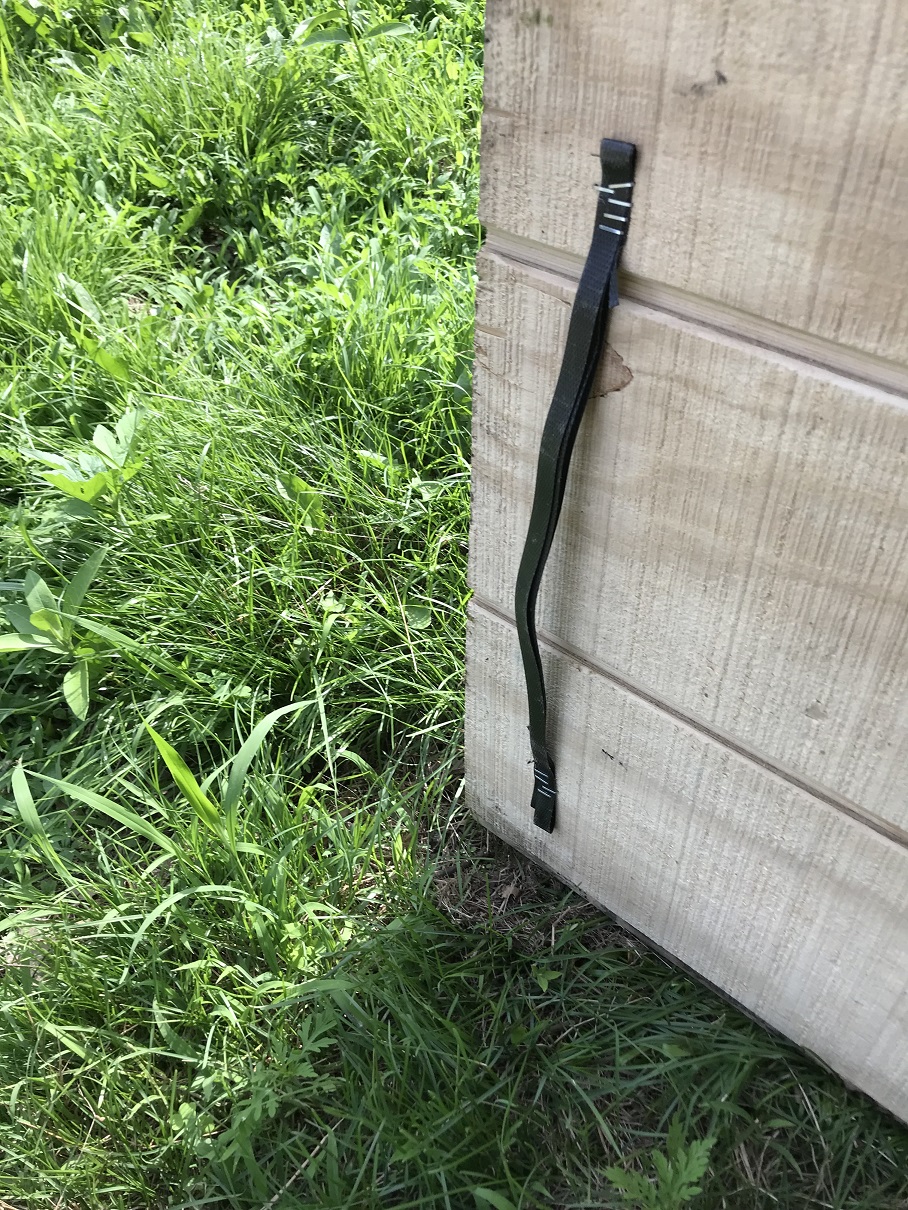
The current iteration happened by chance. A piece of the wire mesh under the perches rusted and I didn’t want to deal with it in the winter time, so I threw a heavy board over it. During the next couple cleanings, I realized that I might be on to something. I cut a long narrow board that just sits under the perches; the heavy poop area. Now, It works really well to pull the board out and scrape it off and the rest is usually easily cleaned by a push broom. I added some straping to the end of the board on the bottom to give me an easier way to pull it out. I’ve been using this for a few months now and it’s looking like this will be the solution I stay with.
Brothers M. Mondays in May(MiM) is our tradition of sharing our excitement about our chickens every Monday in May. This year’s Monday’s in May focus on Did it Work? We’ll look at some of the things we’ve done and give an update on how well it worked.
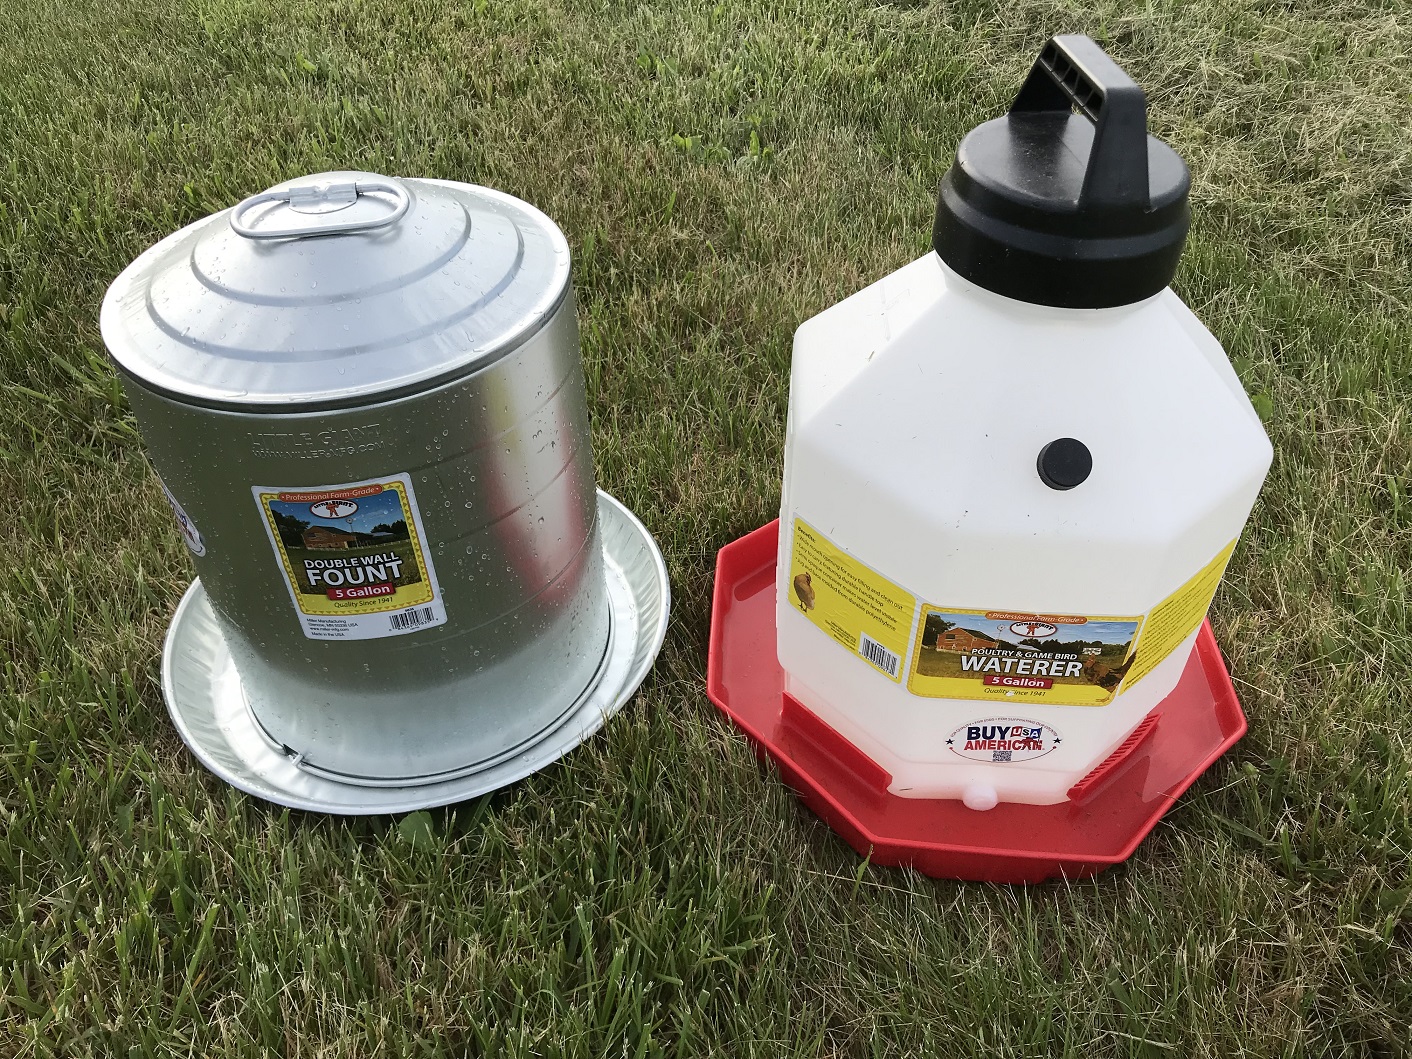
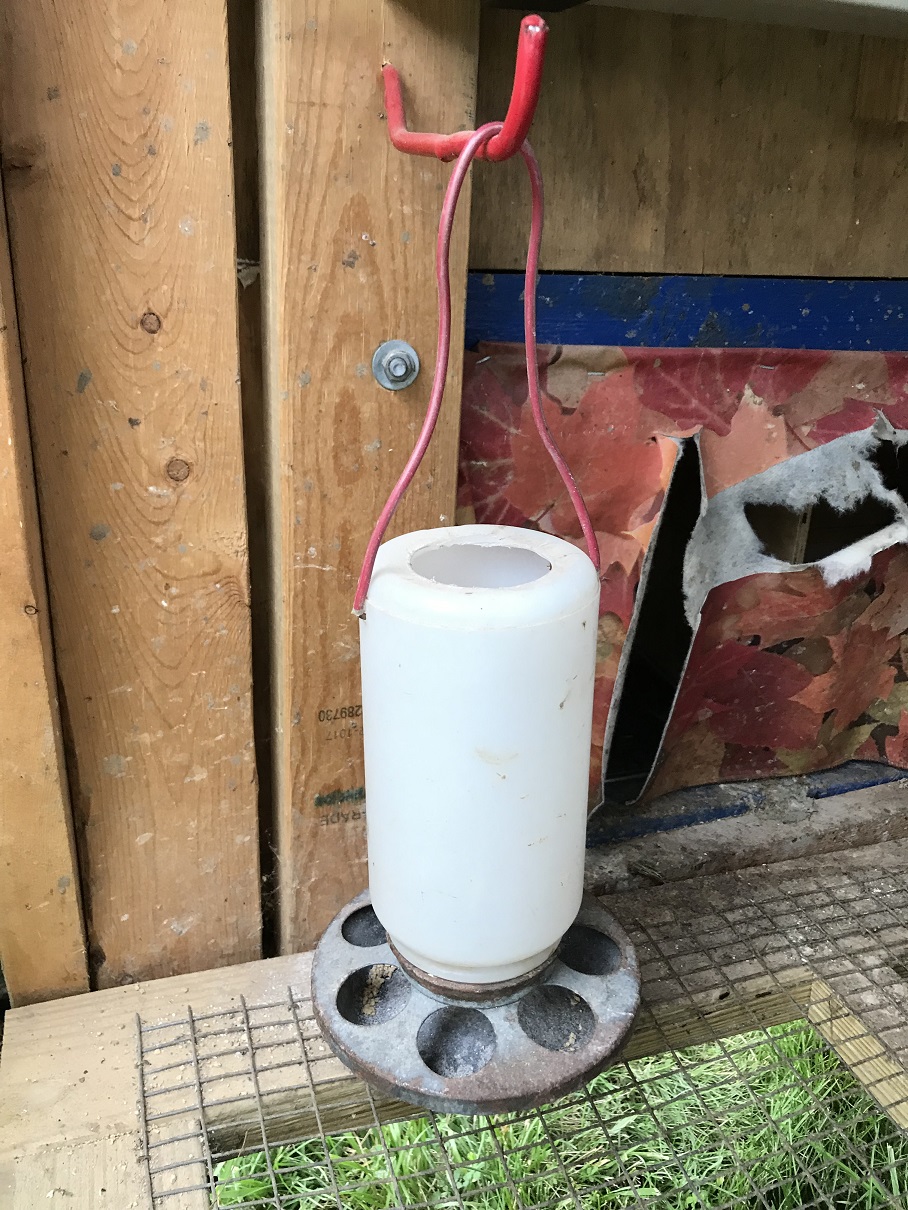
Today we’re again talking about waterers and it’s less of a ‘did it work’ and more of a ‘what works for us’. I’ve been eyeballing the plastic 5 gallon waterers for a while now wondering if they’d work better for us. Well this year I needed one and the only kind my favorite farm store had was plastic so I got a chance to try one out.
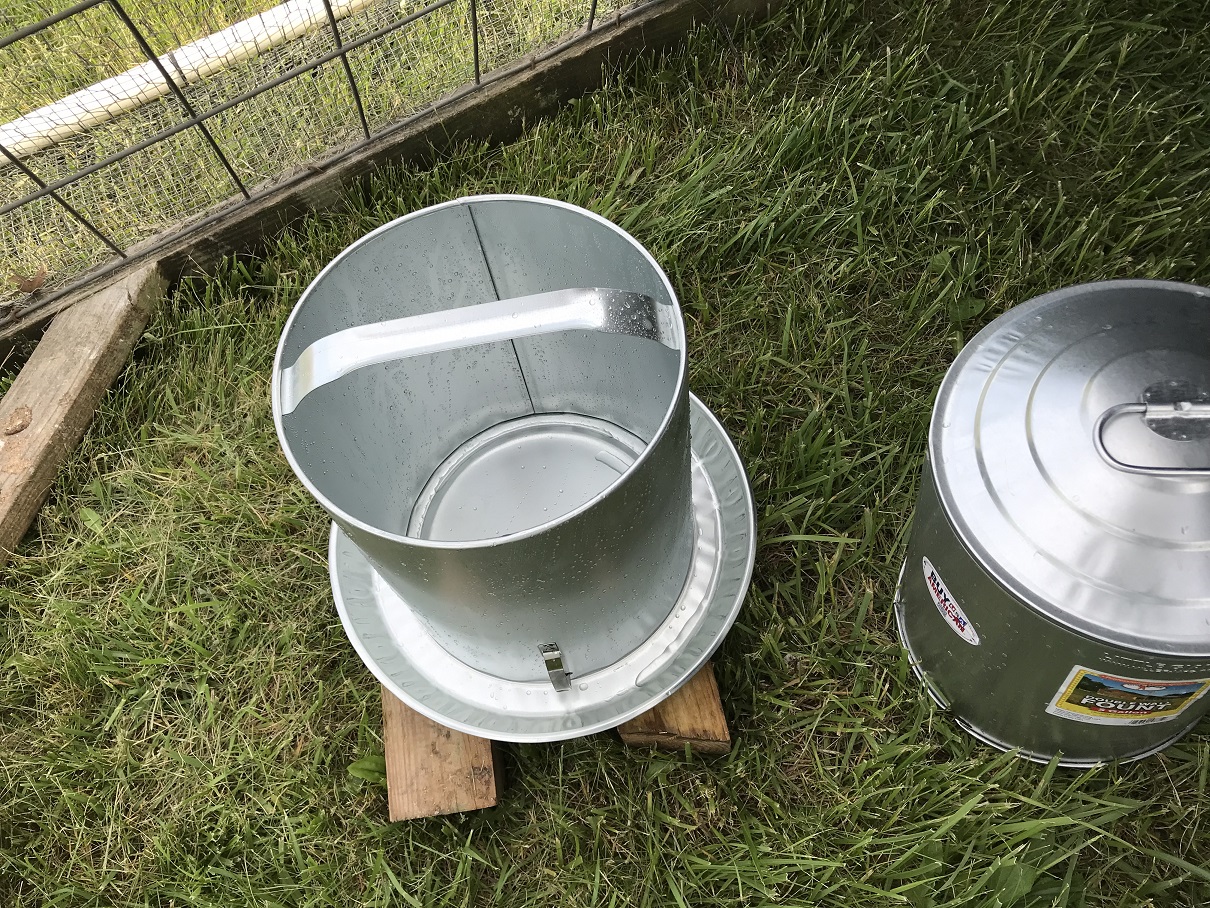
The metal dual wall waterers are traditional and well proven. They are also super convenient to fill with a 5 gallon bucket because the opening is so large and all you have to do is pull the top cover off, I only twist and hook the tops when I’m carrying them empty so it’s easy to pull straight up when filling. However, they are a bit harder to clean, I use a small kitchen brush to clean the trough. They are also more cumbersome to carry when they have water as you have to take the top cover off and carry them by the sturdy inside handle. They have a “plunger” that prevents water from flowing out, but some always seep out anyway and will overflow until you can replace the top cover.
The plastic waterer is easily carried by the handle on top and there’s a small cap that you place over the bottom hole to prevent water from coming out as you carry it or while you are filling it. The bottom tray comes off, so it’s easier to clean too. Filling the plastic waterer is more difficult as the lid/handle is hard to unscrew, at least for the first little bit. The hole is not very wide and the flow of water from a 5 gallon bucket tends to be wider than the hole and harder to hit. You also have to place the small cap over the hole to prevent losing water while filling, then return it to the top where there’s a convenient place to keep it.
What made the decision easy for me happened the second evening. I was relaxing in the house and started questioning if I had removed the black cap off the fill hole. I went back out to the field only to confirm yes I had done it right. SO… I know how forgetful kids are, and this was just a recipe for disaster. With the metal waterers, I’ve never questioned whether myself or my kids put the covers back on the waterer. A big metal cover is just too obvious and much harder to miss.
Brothers M. Mondays in May(MiM) is our tradition of sharing our excitement about our chickens every Monday in May. This year’s Monday’s in May focus on Did it Work? We’ll look at some of the things we’ve done and give an update on how well it worked.
This week we’re looking at the PVC nipple waterers. I created 2 PVC watering systems, one for the portable chicken coop and one for our Chicken tractors. As you can probably tell by the picture, one of these didn’t work too well.
In the chicken tractor, I used a 10 foot length of 4 inch PVC with a shorter piece of 1 1/4 inch under it with nipples in it. This was attached to the side of the Chicken tractor for the chickens to drink from. The thought was that since it was attached to the tractor, we wouldn’t have to remove the waterer before moving the tractor.
We were able to train chickens to drink from it, but most still preferred the regular round waterer. The extra weight did make the chicken tractor heavier and a bit harder to move. Moving forward wasn’t too bad; however, without a cap on the open end of the pipe, moving backward just poured the water out when we raised the back of the chicken tractor with the dolly. Filling the water via the 4″ mouth hanging on the wall was also a pain. I scrapped them this year when I rebuilt 2 of the chicken tractors.
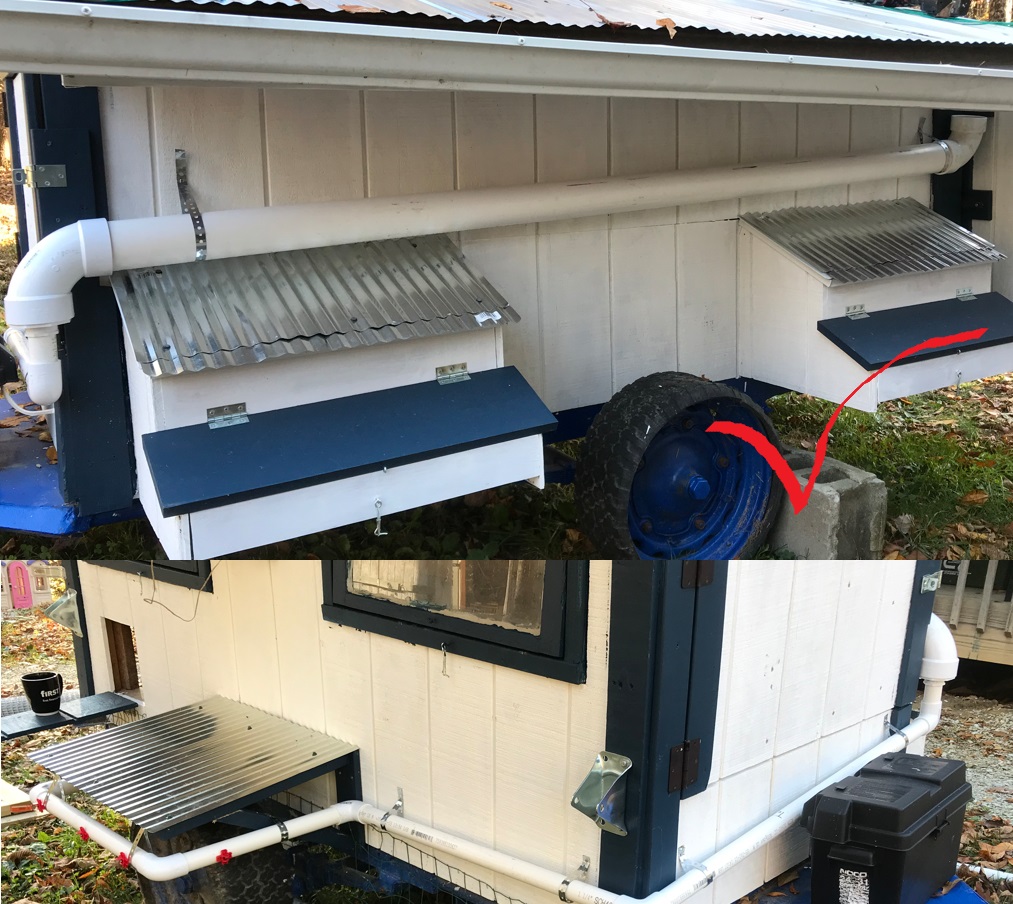
I also used an 8 foot length of 3 inch PVC to create a watering system on the portal chicken coop. It narrows down to a 1 1/4 pipe that goes under the side door and to a watering station around the wheel. I also added a 3 inch to 4 Inch elbow to the fill end to make it easier to fill the water.
This one works really well. I don’t raise the front of the coop high enough to allow the water to pour out and even if some did, I only move the coop once a week so it wouldn’t be a big problem. The main drawback of this is that the 3″ PVC doesn’t hold as much water as I’d like, and I should have put the fill farther out so it’s not under the roof. I think I’ll fix both of these with one of the 4″ PVC pipes from the chicken Tractor.
This really doesn’t need to be a separate post, but I didn’t want to combine it with my solar tire tub post since I consider that a failure.
My father-in-law gave me these feeders, so I decided to use them in the initial phase of the coop build. My thought was to build a PVC feeder system that we could add feed from outside the coop. This was because roosters are mean to little girls.
Now, we no longer have a rooster and I’ve grown to like the door feeders. Having to open the door to feed the chickens is a bit more work. And a time or two a chicken has escaped, as referenced in my aviary post; however, at this point I’m no longer interested in perusing a PVC solution .
As a bonus item, here’s my solution for providing calcium for the chickens. I like the idea of providing a second feeder that they can get the calcium at-will instead of adding it directly to their feed. For this I repurposed a broken brooder waterer and an old brooder feeder base I picked up. The plastic waterer was cracked and not holding water, so I cut open the top to be able to fill it from the top, and drilled two holds for the hanger. A scrap piece of house wire inserted into two drilled holes acts as a hanger.
Recently I realized I didn’t do a post on my solar tire waterer and that it’s on the outline for my initial build. In my opinion it was a failure and I guess why I overlooked it. But, I want others to be able to learn from both my successes and failures so here goes.
I researched ways to keep water from freezing and the tire idea intrigued me so I built one. I thought I had an ace up my sleeve, I’ll explain.
So I got a tire and put a board across the bottom for the pan to sit on. This was to insulate the pan from the ground. The instructions said to fill the tire with insulating material, plastic seemed to be the most common material so I filled the tire with old tarp scraps. I got a black plastic oil pan that fit the tier pretty well and I was off to the races.
And my ace in the hole? One of our small blue-ice bottles, unfrozen obviously. I saw people putting a dark ball in the water to move the water and attract heat, thus helping to keep it from freezing. If figured if my “ball” was also partly filled with salt water, which freezes at a lower temperature, it would help keep the water from freezing even more.
The results. The chickens roosted on the tire during the day, frequently butt side toward the water, and made a mess in the water. It was hard to keep the water clean. The tire setup did help keep the water from freezing, a little. It was fairly easy to dump frozen ice out of the pan or to melt it with hot water. The blue ice bottle seemed to help, but I’m not sure if or how much better than just adding a ball.
Marshmallow seems to be my common companion
The end result was I finished the winter with it and moved back to a standard ground waterer as soon as I could. The tire was thrown in a corner, pan and all, and I didn’t touch it until I grabbed a picture the following February for the solar water post. It’s still sitting unused.
For a better solution, check out what I used last winter. This is the best solution I’ve found.
This was a part I didn’t plan out in great detail, but I’m used to that. Even the well thought out plans I made for this coop got modified as I built. Typically I’m building with various material, used and new, and I incorporate what I have to make what I want. I like to think I’ve developed pretty decent system around this building process.
Just so happens, I watched this video on being more productive the morning I was going out to work on the Aviary. It made me feel better about building the Aviary from just an idea in my mind. Early in the video, I like when he said “I think it’s easy to stand around and talk about how to do something better, when if you simply put your head down and went to work, it would be done, and well done, when discussion on the best possible method was just beginning to slow up enough for somebody to begin to pick up a tool. Now I’m overstating that, but productivity is important.”
I also, I enjoyed the Frost poem, and finally CS Lewis’s quote, “Two of a trade, never agree.” and his interpretation that Everyone does it different, so learn new things from that.
What’s Up? Chicken Butt. Laugh when you see it.
But on to the Aviary…
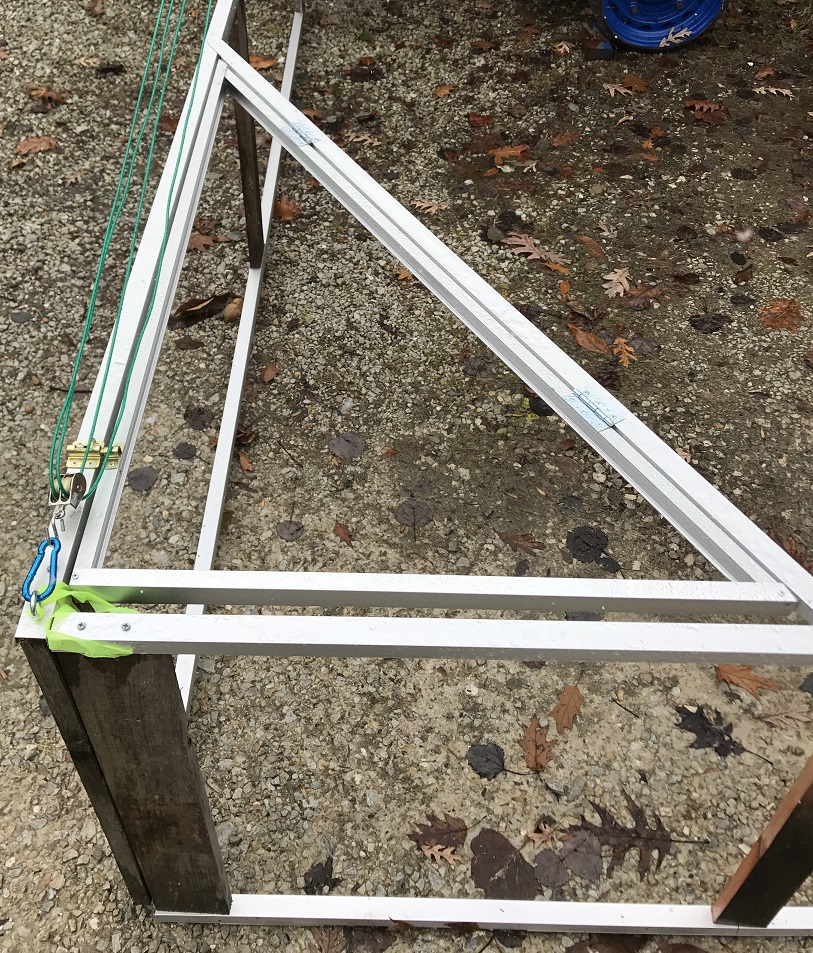
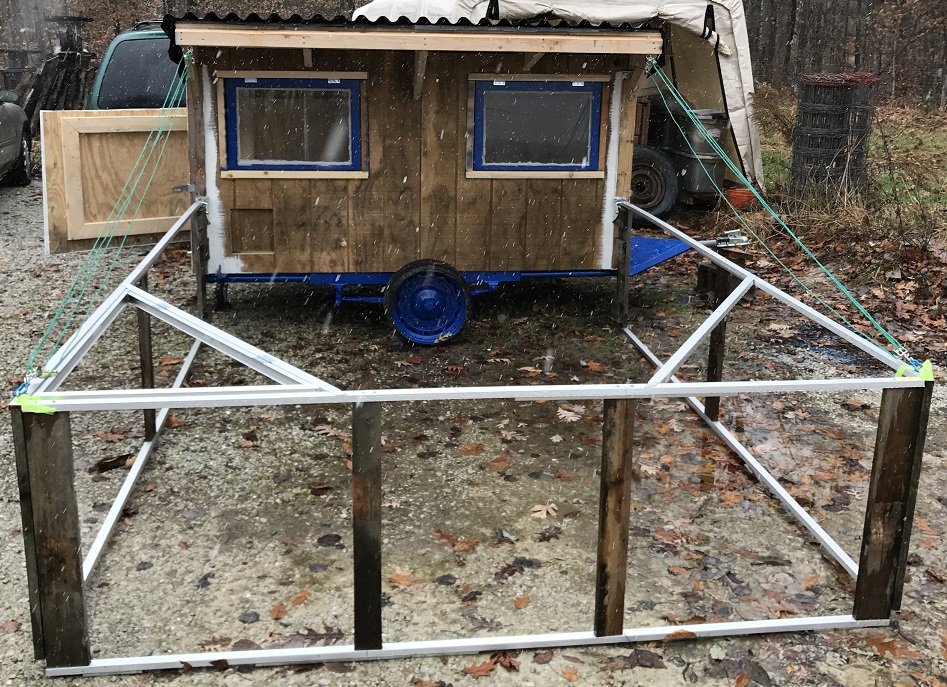
Building a coop on a trailer meant coming up with an aviary that can be lifted for movement. I don’t have permanent perimeter fencing around the pasture to keep and protect the flock, so an aviary is necessary.
The aviary is easily detachable at the pivot/hinge, made from a caster with the wheel removed. This is for three reasons. I may use the coop with portable fencing as some point and not want the aviary attached. The corners of the aviary drag when moving, so if I’m moving over large distances, removing the aviary makes the move easier. It’s also necessary for me to use the windows as access portals to remove chickens when they are roosting in the middle, removing the aviary gives me access to the windows.
Nice to have a friend around when you work
Most of the frame is made out of some scrap aluminum wire track I picked up. This helps keep it light. The wooden pallet boards are for extra strength at the corners and pivot point, and to make it easier to tie everything together. Chicken wire is zip tied to the frame and stapled to the wood where appropriate.
I turned one corner of the frame into a hatch. This mainly allows us to water the chickens. We’ve been using ground waterers in the warm months and my new solar heated waterer in the cold months. I recently setup a PVC nipple system, but the weather turned cold before I could try it out; more to come on that.
My helper with running the cable.
The initial plan was to use a pulley system attached to the aviary to raise and lower it like a drawbridge and attach a motor or winch to raise and lower it. Even though it’s pretty light, it a pretty hard pull to raise. This is due to the shallow angle of lift I have from the roof and that I used cheap pulleys. Even with double pulleys, it’s a struggle to lift by pulling the cables.
Currently, I raise the aviary by hand, prop it up with a bucket, then pull the slack out of the cable and tie it down, using a cleat hook on the inside. I’m thinking I may scrap the whole pulley system and just have one cable on each end that is right length to hold the frame up once I’ve raised it on the bucket.
I’ve been told I should have designed the coop so that the aviary drags behind the coop when I move it. This sounds like a good idea; however, it doesn’t make backing up easy and I’ve already built the coop. I do think a redesign is in order, I have some ideas, so more to come when I’m finished.
Yes, she’s outside. The devil escaped while filling the food.
Providing unfrozen water in the winter can be a challenge and time consuming. Since we pasture the chickens “tractor” style with the portable coop, power to heat the water is the issue. I believe I’ve finally figured it out.
First year we started with multiple plastic waterers that we swapped out multiple times a day. This works decently, but the water still freezes, it’s labor intensive, and someone needs to be around during the day to swap waterers.
The next year we steped it up by heating the waterers with a light bulb. This worked pretty good, but required us to keep the coop within extension cord distance of an outlet and periodically water would freeze in the top of the waterer.
I did not do a post on the tire waterer. It was disappointing and it was easy to find info on it. However, I still had the tire and pan laying around so I threw together a quick pic for reference.
Last year I built a tire waterer to try and keep the chicken water from freezing. I put a board inside the tire on the bottom side, stuffed the inside of the tire with old tarps for insulation, and fitted a plastic pan in the tire. My experience with that was poor and I do not recommend it. The biggest issue was that the chickens would stand on the tire and mess in their water all day. By the time I got home to change it, it was pretty bad. It did help slow down the freezing process; however, being open air, it still allowed the water to eventually freeze solid, especially overnight.
I’ve been playing with an idea of an enclosed PVC and nipple system. Basically building an insulated box and filling it with 3″ tubes of PVC, shown in the graphic. There would be a cutout of frame and insulation in one top corner to allow access to add water. One bottom corner would have a smaller PVC tube that protruded through the box with a water nipple on the end. The front would be Twinwall Polycarbonate glazing to let the sun in and the inside would be painted black to absorb as much heat as possible.
It was getting cold this year and I needed to get a waterer made for the chickens so I decided to not build the PVC waterer for the following reason. One, my chickens are not trained to a nipple system yet. I’m having trouble figuring out how to attach the PVC box to the ‘Pequod’ chicken coop, especially since it’s going to be heavy and need decent support. The 3″ PVC fittings are expensive and I have concerns the metal part of the nipple would still freeze and cause issue.
I was basing the PVC system on principals I learned from this solar horse tank. Then it hit me, how about trying to replicate the horse tank at a chicken waterer size! Since the amount of water would be significantly less, I wouldn’t want to leave the top exposed, but chicken heads are small, so I took a gamble that they’d stick their heads through a hole instead.
My first thoughts were to use a bucket, but I didn’t like the clearances nor dealing with bending and attaching the polycarbonate glazing. So I decided to use a tote, black obviously so it will absorb the heat from the sun.
Using similar principals as the solar horse tank. I first put 2″ foam on the bottom to have an insulated base to sit the water on. I measured from the top of the foam to the bottom of the lid and subtracted 2 inches for the foam that would be attached to the lid. This gave me the height for the foam sides and Twinwall Polycarbonat glazing
Next I added the 2″ foam to the sides. I looked at the shape of the tote and measured across the end where I could fit a straight piece of foam. The bottom of the tote is narrower than the top, measured top and bottom and cut sloped pieces of foam.
I measured from the floor to top and between the insides of the sides to cut a rectangle out of the front of the tote for the window. I cut a piece of polycarbonate glazing slightly larger, about 1/2 to 3/4 inch, than the hole on the sides and bottom so that the foam could help hold it in place. I used duct to hold and seal the polycarbonate glazing in place; this also sealed the tubes. I put the scrap piece of plastic from the side on the floor in front of the window to try and suck in more heat.
On the other side, I placed the water bowl in the tote and used the top of the bowl to mark the bottom of the drinking opening. Using a hole saw, I cut two overlapping circles to make the oval shaped opening for the chickens to sick their head in to drink, cleaning up the oval edges with a utility knife.
I thought it would be better to use a thinner foam where the hens stick their heads in, so I cut a piece of 1/2 inch foam, from scrap I had, to cover this side, removing the same oval. I used duct tape to hold the foam pieces together and seal the seams. I also used several pieces of duct tape to secure the foam to the hole and prevent the chickens from rubbing the foam.
Next I cut the 2″ foam for the lid making it fit snug when placed in the tote, but not too snug as it’ll need to be opened and shut frequently. With the foam in the tote and the lid on, I drilled 4 sets of 2 holes so I could use zip ties to secure the foam to the lid. I also cut some small squares of plastic from something in the recycling to prevent the zip ties from digging into the foam and pulling through.
From the drinking hole, I wanted to minimize the surface area of the incoming air over the bowl. I used 2″ foam to make a bridge over the bowl, then added 1/2 foam on either side of the hole to create a smaller cavity where the outside air had direct contact with the water.
At this point I put the waterer into action; however, I forgot chicken peck. I’m not sure why I thought they wouldn’t peck the foam bridge, but I did and they did, effectively destroying the bridge.
So… I redid the bridge. I used corrugated plastic from an old ‘For Sale’ sign I had on all the pecking sides of the bridge and plenty of duct tape to hold it in place. The 2″ foam was replace with 1/2″ foam over the bowl. I didn’t account for needing to remove the bowl to clean it and the 2″ foam made it so I had to tip the bowl to get it out. Now I don’t have to.
How well does it work? Great. Basically, overnight at 15-19 degrees Fahrenheit I had about 1/8 inch of ice frozen on the top of the bowl. Down in the teens is a bit thicker. In the morning if the bowl was full of water, pull the bowl out and bang it upside down on the ground to remove the ice. If it’s half or less, then fill it with warm water from the tap and melt the ice that way.
During the day, in the teens and twenties the water stays unfrozen, especially if there is sun, but even on overcast days, there should be enough solar to keep it unfrozen. Unfortunately, we only had a few days this winter where it stayed below freezing night and day for 2 or more days, so I cannot give accurate results for long cold spells; however, given what I’ve seen so far it should work great. The heat from the warm water in the morning in conjunction with the passive solar heat should keep the water from refreezing during the day.
With all my scraps, this was a pretty cheap build and worth every penny. $6 for the tote and $10 for the rubber bowl, and $20 for the polycarbonate glazing. (the link isn’t the one I purchased, but this is a similar 5 pack) I had 2″ and 1/2″ foam left over from insulating the basement and other projects.
Electronics were a must for me. Probably the best thing I liked about keeping the birds in the chicken tractor was not having to open and shut a coop door each day. Therefore an automated coop door was a requirement for this build.
When I started the electronics, it became a “give a mouse a cookie” event. Automated door meant battery, battery meant solar panel, and since we have a solar panel, let’s do lights. And for grins, I’m toying with adding a winch to raise and lower the aviary, so let’s add something for that.
I already had the battery, lights, and timer from the A-Frame build. However I wanted to add solar to charge the battery instead of manually charging it 1-2 times a week. I looked at some kits online and chose a cheep 20W panel and charger off Amazon. The door automation took more thought.
I looked online and saw people using car antenna motors to open and shut the door. I like this idea. It would limited the amount of push pressure when shutting the door, which would prevent birds from getting caught, but this could also end up leaving the door open if the door got in a slight bind. The biggest con for me not to use this was that, for my build, constant power would need to be applied when the antenna was extended, which would be during the nighttime when the door was pushed closed. This would cause a draw on the battery; however, it would be a slight draw because it’s not running the motor.
Liner actuators are the other main way I see coop doors automated. These are on when moving, then switch off once extended or retracted. To reverse the direction, you reverse the polarity. So they only draw power twice a day when opening or closing. They also have a lot more push/pull torque. This would prevent the door staying open at night because of a slight bind in the door; however, poses a danger if a chicken is in the way. I was leaning toward the linear actuator when once again my father-in-law helped out and gave me one he had.
The actuator requires a DPDT relay to reverse the polarity. In the end, the power draw from the power antenna was probably a wash with the relay draw; however, the way I architected my door, the relay draws power during the day and the antenna would be drawing at night. Theoretically there should be less draw on the battery as the solar panel will power the relay during the day. Again, the draw is slight and probably not worth worrying about, but I do.
I’ll still have a constant phantom power draw from the photocell (circled in red in the picture of the solar panel) that’s used to trigger the door at morning and night, but that’s used for either method. I like the photocell because it changes with the season and will be more consistent with morning and night than trying to use a timer.
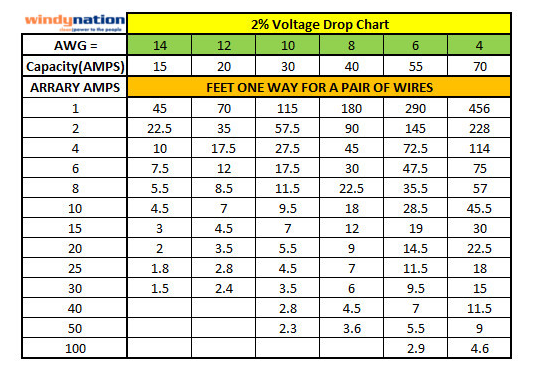
I spent some time to determine the correct wire for the distance. Based on this chart, the battery distance of 12′ with 5A puts me at 12 gauge. I decided to use 12 AWG to the battery and 16 AWG to everything else to achieve a 2% voltage loss. I save old appliance cords that are long, like from vacuum cleaners, and used these for the rest of the connections. They are 16/17 gauge and should keep me in the 2% drop range based on a combination between the previous chart and this chart. As with the power draw of the antenna, I may be over thinking/engineering this for a chicken coop.
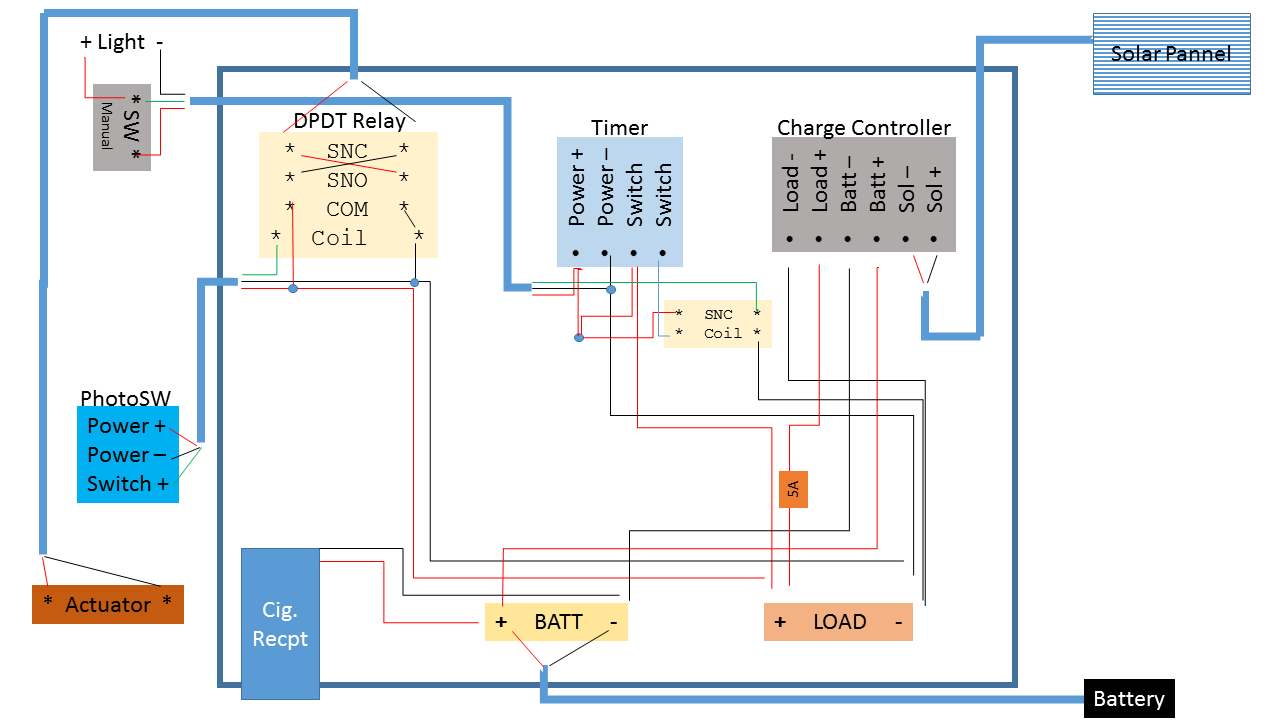
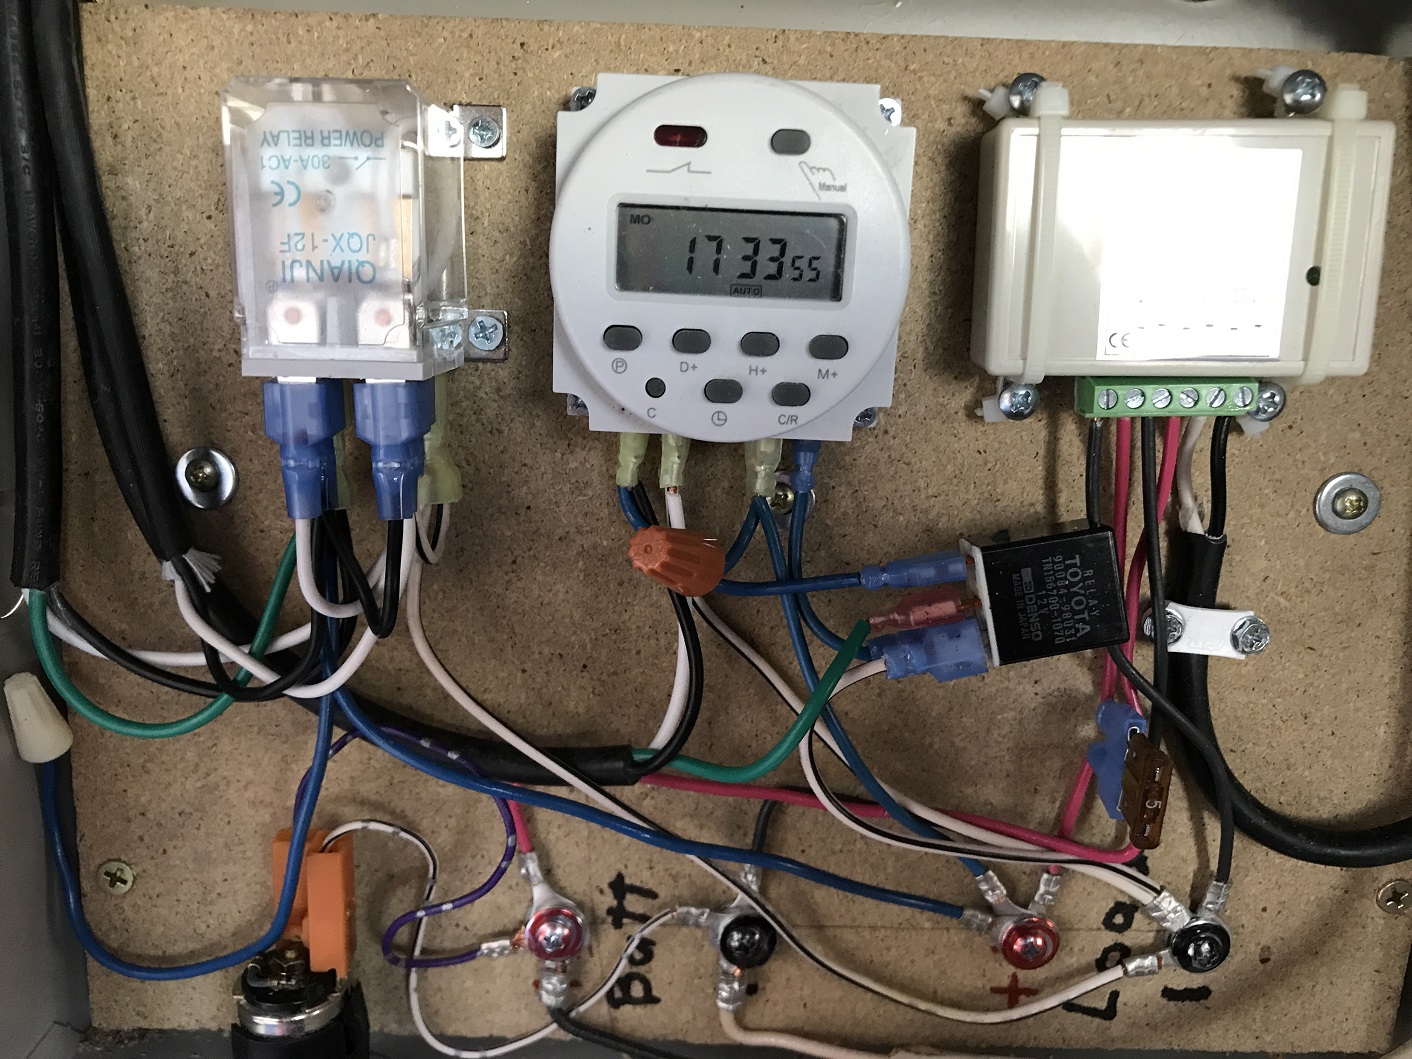
Finally, I had picked up an old electrical panel box somewhere and I used it to house all brains of the electronics. I added a board to help me mount everything in the box. Here’s how it fits together.
Battery
First I bring the battery wires into the box to a couple of terminals. This allows me to connect things directly to the battery and bypass the solar charger, which is rated for 3A. My first add-on is a cigarette lighter that I mounted in the bottom of the box.
Solar
Then I attached the solar charge controller to the battery terminals. The Solar panel connects into the charge controller. Finally I take the load from the charge controller to two more terminals that I’ll connect everything else to. Connecting solar is pretty simple using a charge controller, especially compared to the wiring for the lights and door.
Lights
As I mentioned in my previous post on the lights, I need a relay for the timer to power the lights. I could not power my light directly through the light switch. I also used 3 wires going to the light so I could add a flip switch to override the timer and turn the lights on. These two items make the wire diagram look like spaghetti, but hopefully you can follow it.
**If you’re comparing the diagram to the photograph, the diagram has positive in red and negative in black. That does not correspond to the wires I actually used so I list the color of the wire in the photograph in (parentheses).
Power(positive) comes from the load terminal to the switch side of the timer, a jumper wire goes to a wire nut that ties to the run side of the timer, which also jumpers with the power(black) wire to the light, and the switch side of the relay. All these connections have power full time. The other side of the relay switch goes to the switched wire(green) to the light. And the other switch side of the timer connects to the coil side of the relay.
Negative goes from the load terminal to the relay coil and run side of the timer, where it’s jumpered with the negative(white) wire to the light. This provides the 3 wires going to the light as Black=always on positive, Green=switched power from the timer, white=negative(common). Because I’m using wire commonly used for AC, I switched to AC Black/white color standards when I attached the wire or when I ran out of Red/black wire. It makes sense to me since I’ve dealt with both.
At the light switch, negative(white) goes straight to the light. Positive(Black) goes to one side of the switch. Switched(green) goes to the other side along with a jumper wire to the positive side of the light. So if the light switch is on, it provides power to the green side that’s jumpered to the light and the light comes on. Turned off and the light is off, UNLESS the time is on and sending power through the Green wire, which in turn will power the light.
Door
Hooking up the DPDT relay to switch the polarity for the actuator is fairly simple if you look at it in my diagram. You have two COM posts that you hook positive and negative to. Each one of those two posts will connect to 2 more post, one if the relay coil has power (SNO), the other if it doesn’t (SNC). To reverse the polarity connect the 4 posts in a crisscross pattern. The wire going to the actuator will connected to the 2nd pair. If the direction of the actuator is wrong, just revers the actuator connection.
To connect the coil side of the relay you add in the photo cell so you are providing power to the coil in the day time and not at night. You need 3 wires going to the photocell, power(black) and Negative(white) connect to the load termnals and switched(Green) will return from the photocell and connect to the coil.
To reduce the number of wires coming from the load terminals I jumpered the negative wire with the COIL and COM terminals on the relay and the (white) wire to the photocell. I jumpered the positive wire between the COM on the relay and the (black) wire going to the photocell.
** To really confuse things, I accidentally jumpered in an extra (blue) wire with the positive connections. I didn’t need, but didn’t want to re-do the connection so I just capped it off (white cap_.
Actuator and door
Due to the window, I wanted my door to slide sideways open and shut. I had 2 keyboard tray slide rails which would worked perfect. They allow the door to slide 1.5 inches. The actuator moves 10.55 inches, so I just needed to add a little play in the connections and all is good.
I started with framing where the door would slide. I framed is so the actuator and most of the rails could be enclosed with a piece of OSB (red outline with arrow pointing to the OSB) to prevent dirt and droppings from getting on them since the perch was close by. I cut a door that’s wide enough to cover the door opening and slide behind a piece of wood that will prevent the rails from being bent back allowing a predator to squeeze through the door. I attached the door and rails.
Here’s a video of the door opening and me demonstrating how to manually shut the door.
I cover my initial build of the boxes, including covering the paint trays, for the A-frame here. As I mention, I really like this type of box. And to follow-up from my first post, yes the new ISA Brown flock is consistently laying only in the boxes as I had hoped and expected.
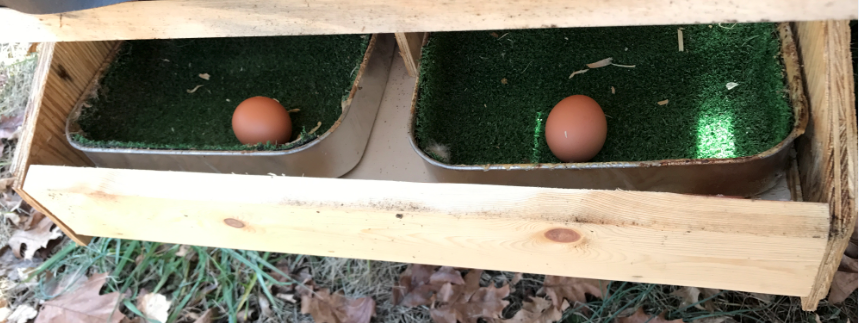
The boxes for this coop are completely on the outside of the coop. This gives me more room on the inside of the coop for roosting and waste/droppings management. I put the boxes level with the floor. I’m getting bedding shavings in the trays, which can prevent eggs from rolling down. I’m not sure if higher tray would fix the issue, but I’m planning to move to a mesh floor without any shaving anyway, so the issue should resolve itself with the new floor.
The dimension of the boxes are mainly to accommodate the paint trays, but I think are good for any box. I typically do not oversize my boxes, especially in height. I’ve read that keeping the boxes smaller and shorter discourages “parties” in the boxes that lead to droppings in the box. So far that’s not been an issue in any of my boxes. Additionally I use an old table cloth to make a divider to give the hens more privacy, which they really seem to like.
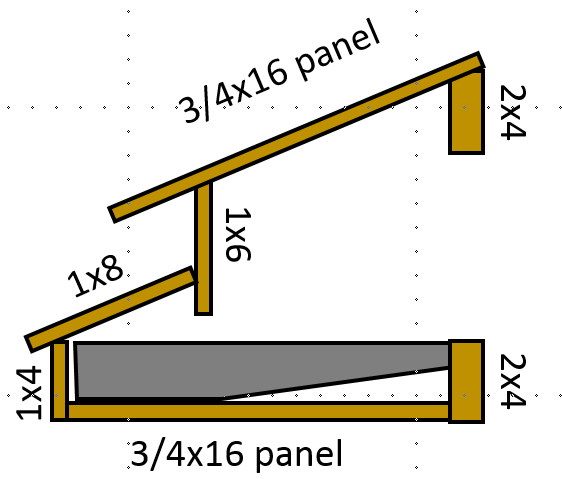
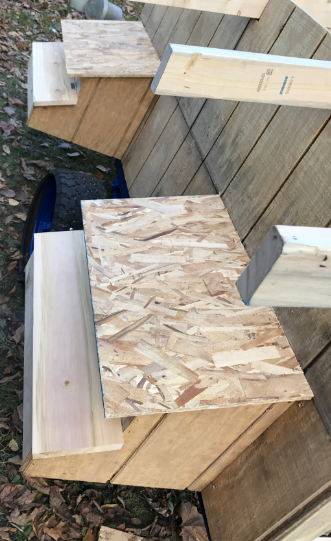
I started by marking the ends according to the blueprints, putting each board on the marks to ensure I had the right dimensions, then cutting out the end shape. I then cut all the horizontal boards to the proper length. I used standard 1″ & 2″ sizes and laid out the paint tray on the boards to ensure proper dimensions before I cut them. The larger floor and roof I used scrap OSB and a an old shelf board I had on hand.
I took the roof angles from the ends used them to ripped an angle on the 3 boards that meet the roofs. I could have just left them square and lowered them to the level of the roof, but I like the way the angle looks.
Then I sat the ends upright and started fastening the horizontal boards to the ends. I have a staple gun which makes building boxes like this much easier. It could probably be done without it, but I’ve come to rely on how well the staples work in edges of narrower pieces of wood.
I slid the paint trays in to view the heights. The 1×6 that I used for the back of the nesting box did not go down as far as I liked. It gave the chickens too much room to access the bottom of the pan. I ripped a spare board in half and used it to add to both boxes.
I cut and stapled the center in place. I have a staple gun which makes building boxes like this much easier. It could probably be done without it, but I’ve come to rely on how well the staples work in edges of narrower pieces of wood. I also ripped the appropriate angle on the board that covers the egg area so it sits flush on the hinge side, but did not attach it yet.
Next I fastened the boxes to the frame using carriage bolts in the top to hold the weight then wood screws at the bottom to hold the box against the frame. The frame had a lip that was perfect to rest the box on and use a clam to hold it in place while I fastened it.
Finally, I attached the roof sections. The top one I just stapled down, the bottom one is hinged so t raises for gathering eggs. Since I used OSB, the top roof has tar paper for now and will get a either shingles or a metal roof. The bottom roof/door is a 1×8 and will just get stained.


 Providing unfrozen water in the winter can be a challenge and time consuming. Since we pasture the chickens “tractor” style with the portable coop, power to heat the water is the issue. I believe I’ve finally figured it out.


