Wow, what a month February was. It’s been a little over a month since we kicked off the 2020 CSA season and our CSA slots are almost full. A huge thank you is in order for everyone who’s supporting us by ordering.
If your considering a CSA order, we have a couple slots open so let us know what you want.
Thanks again for getting 2020 off to a great start.
Providing unfrozen water in the winter can be a challenge and time consuming. Since we pasture the chickens “tractor” style with the portable coop, power to heat the water is the issue. I believe I’ve finally figured it out.
First year we started with multiple plastic waterers that we swapped out multiple times a day. This works decently, but the water still freezes, it’s labor intensive, and someone needs to be around during the day to swap waterers.
The next year we steped it up by heating the waterers with a light bulb. This worked pretty good, but required us to keep the coop within extension cord distance of an outlet and periodically water would freeze in the top of the waterer.
I did not do a post on the tire waterer. It was disappointing and it was easy to find info on it. However, I still had the tire and pan laying around so I threw together a quick pic for reference.
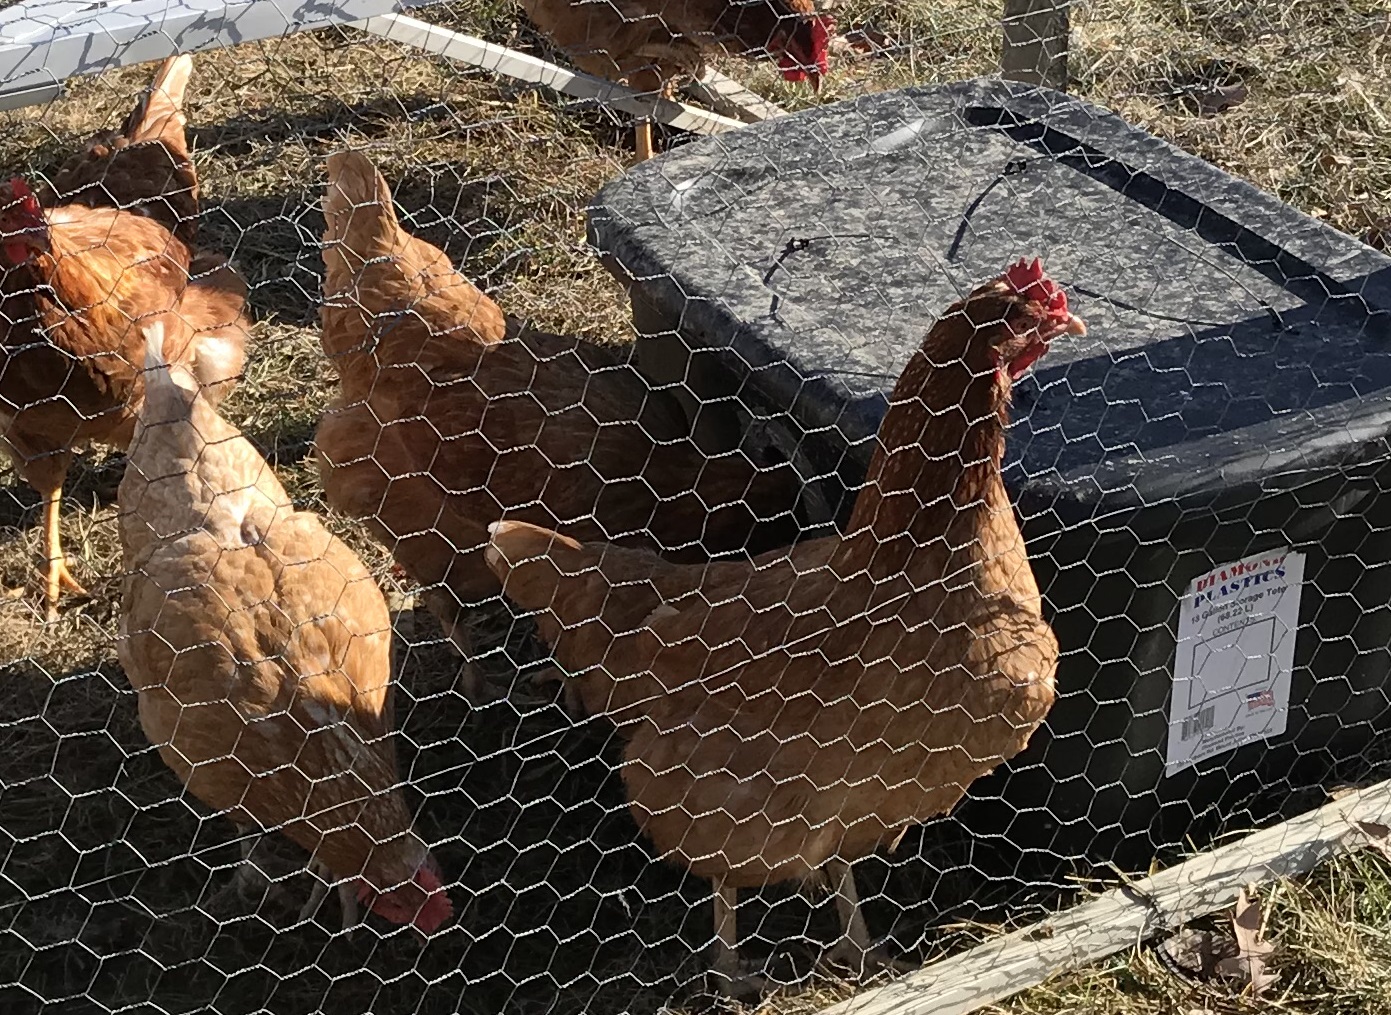
Last year I built a tire waterer to try and keep the chicken water from freezing. I put a board inside the tire on the bottom side, stuffed the inside of the tire with old tarps for insulation, and fitted a plastic pan in the tire. My experience with that was poor and I do not recommend it. The biggest issue was that the chickens would stand on the tire and mess in their water all day. By the time I got home to change it, it was pretty bad. It did help slow down the freezing process; however, being open air, it still allowed the water to eventually freeze solid, especially overnight.
I’ve been playing with an idea of an enclosed PVC and nipple system. Basically building an insulated box and filling it with 3″ tubes of PVC, shown in the graphic. There would be a cutout of frame and insulation in one top corner to allow access to add water. One bottom corner would have a smaller PVC tube that protruded through the box with a water nipple on the end. The front would be Twinwall Polycarbonate glazing to let the sun in and the inside would be painted black to absorb as much heat as possible.
It was getting cold this year and I needed to get a waterer made for the chickens so I decided to not build the PVC waterer for the following reason. One, my chickens are not trained to a nipple system yet. I’m having trouble figuring out how to attach the PVC box to the ‘Pequod’ chicken coop, especially since it’s going to be heavy and need decent support. The 3″ PVC fittings are expensive and I have concerns the metal part of the nipple would still freeze and cause issue.
I was basing the PVC system on principals I learned from this solar horse tank. Then it hit me, how about trying to replicate the horse tank at a chicken waterer size! Since the amount of water would be significantly less, I wouldn’t want to leave the top exposed, but chicken heads are small, so I took a gamble that they’d stick their heads through a hole instead.
My first thoughts were to use a bucket, but I didn’t like the clearances nor dealing with bending and attaching the polycarbonate glazing. So I decided to use a tote, black obviously so it will absorb the heat from the sun.
Using similar principals as the solar horse tank. I first put 2″ foam on the bottom to have an insulated base to sit the water on. I measured from the top of the foam to the bottom of the lid and subtracted 2 inches for the foam that would be attached to the lid. This gave me the height for the foam sides and Twinwall Polycarbonat glazing
Next I added the 2″ foam to the sides. I looked at the shape of the tote and measured across the end where I could fit a straight piece of foam. The bottom of the tote is narrower than the top, measured top and bottom and cut sloped pieces of foam.
I measured from the floor to top and between the insides of the sides to cut a rectangle out of the front of the tote for the window. I cut a piece of polycarbonate glazing slightly larger, about 1/2 to 3/4 inch, than the hole on the sides and bottom so that the foam could help hold it in place. I used duct to hold and seal the polycarbonate glazing in place; this also sealed the tubes. I put the scrap piece of plastic from the side on the floor in front of the window to try and suck in more heat.
On the other side, I placed the water bowl in the tote and used the top of the bowl to mark the bottom of the drinking opening. Using a hole saw, I cut two overlapping circles to make the oval shaped opening for the chickens to sick their head in to drink, cleaning up the oval edges with a utility knife.
I thought it would be better to use a thinner foam where the hens stick their heads in, so I cut a piece of 1/2 inch foam, from scrap I had, to cover this side, removing the same oval. I used duct tape to hold the foam pieces together and seal the seams. I also used several pieces of duct tape to secure the foam to the hole and prevent the chickens from rubbing the foam.
Next I cut the 2″ foam for the lid making it fit snug when placed in the tote, but not too snug as it’ll need to be opened and shut frequently. With the foam in the tote and the lid on, I drilled 4 sets of 2 holes so I could use zip ties to secure the foam to the lid. I also cut some small squares of plastic from something in the recycling to prevent the zip ties from digging into the foam and pulling through.
From the drinking hole, I wanted to minimize the surface area of the incoming air over the bowl. I used 2″ foam to make a bridge over the bowl, then added 1/2 foam on either side of the hole to create a smaller cavity where the outside air had direct contact with the water.
At this point I put the waterer into action; however, I forgot chicken peck. I’m not sure why I thought they wouldn’t peck the foam bridge, but I did and they did, effectively destroying the bridge.
So… I redid the bridge. I used corrugated plastic from an old ‘For Sale’ sign I had on all the pecking sides of the bridge and plenty of duct tape to hold it in place. The 2″ foam was replace with 1/2″ foam over the bowl. I didn’t account for needing to remove the bowl to clean it and the 2″ foam made it so I had to tip the bowl to get it out. Now I don’t have to.
How well does it work? Great. Basically, overnight at 15-19 degrees Fahrenheit I had about 1/8 inch of ice frozen on the top of the bowl. Down in the teens is a bit thicker. In the morning if the bowl was full of water, pull the bowl out and bang it upside down on the ground to remove the ice. If it’s half or less, then fill it with warm water from the tap and melt the ice that way.
During the day, in the teens and twenties the water stays unfrozen, especially if there is sun, but even on overcast days, there should be enough solar to keep it unfrozen. Unfortunately, we only had a few days this winter where it stayed below freezing night and day for 2 or more days, so I cannot give accurate results for long cold spells; however, given what I’ve seen so far it should work great. The heat from the warm water in the morning in conjunction with the passive solar heat should keep the water from refreezing during the day.
With all my scraps, this was a pretty cheap build and worth every penny. $6 for the tote and $10 for the rubber bowl, and $20 for the polycarbonate glazing. (the link isn’t the one I purchased, but this is a similar 5 pack) I had 2″ and 1/2″ foam left over from insulating the basement and other projects.
The goal is to create a portable chicken coop to pasture our egg layers. I’ve seen a lot of ‘the best coops’; however, I believe the best coop is matched to the individuals needs/wants. I’ve not seen any coop that does exactly what I want to do. So my Best Coop is going to be unique to me. Here’s the attempt to make MY best coop.
I started this project late in the year and winter was approaching. I wanted to get the layers in to a new home and not be building outside in sub freezing weather. So wanting to get something workable quickly, I’m building this project in phases. How quickly all the phases get done depends on the weather, but I’m expecting late spring/summer before I get it all done and the kinks worked out.
There will be several blogs in this series, so this will be a jump page to get to all the blog posts from one spot. Posts will be linked once they are written.
Desired results:
For me, the result should provide a coop that’s easy to move and requires minimal effort to care for a flock of 7-20 birds. It will be like a chicken tractor and include an enclosed aviary. Every touch-point of caring for chickens will be examined to determine the best solution for the birds that also fits our principles and lifestyle.
Here are the details on the areas of the build that I’ll use as the jump page
What to do when you have chicken(s) pecking eggs? I’ve tried several things with minimal success including adding extra calcium to their diet, ceramic eggs in the box, and separating who I guessed the culprit(s) were. All of these had minimal success and required more resources.
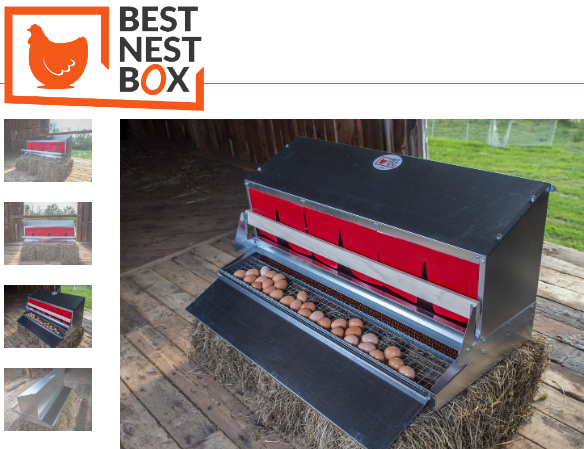
Then I found these boxes.
I really liked these boxes and there are many different DIY types/variations of the roll away nesting box. The basic principal is that the egg rolls to an area that’s hard or impossible for the chickens to peck. I looked at various DIY types and liked the paint tray version the best. It’s easy to make, would fit into my existing boxes with minimal remodeling, and are easy to remove and spray out when they get dirty.
Making them wasn’t too hard. I bought the largest paint try that would fit into my existing boxes. Besides fitting, the 10.75×15.5 tray seems to be a good size in general. I bought a strip of outdoor grass carpet, created a pattern with the first piece of carpet, and used it as my template for cutting the rest. It may be overkill, but I used outdoor carpet glue to adhere the carpet to the tray. I wanted something that would withstand a strong spray of water for cleaning.
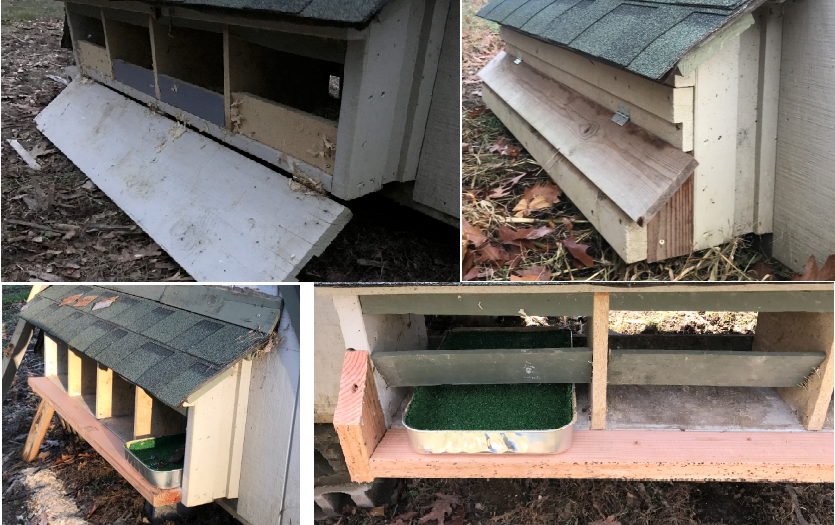
Top left and clockwise: Old box with drop down lid, Finished box with lift lid, Added 2×4 and blocker boards with paint tray example, Side view added 2×4 with tray example.
The refit of the boxes on the A-frame worked out good. The previous door to collect eggs worked fine, but I would have preferred to have a lid that lifted instead of a door that flops down.
The existing boxes were too short to fit the tray, but it was easy to add length to the outside which also created the protected area for the eggs. A 2×4 length worked great and I cut the old door and used to fill in the new wall sections of the new enclosure.
I added the green blocker boards inside the boxes where at the start/end of the deep part of the try. This is to prevent the chickens from being able to reach the eggs that roll down and collect in the bottom of the tray.
The refit also gave me the lifting lid I wanted. In the pictures, I used a 1×6 I had laying around for the lid, but I intend on using a 1×8 to cover it better and give me an area to lock it down.
We’ve used these boxes for over 8 months and it’s great to see eggs under the lid. They are peck free and much cleaner. Our current layers are fickle and tend to lay in the corner of the coop instead of the boxes; however, we do get frequent eggs in the boxes too. Our new ISA Brown flock is laying consistently in their temporary boxes. I look forward to them using the roll away boxes.
As I’ve mentioned in my Chicken Tractor Guide, you can use the chicken tractor design for layers. So this summer and fall we’ve used our idle chicken tractors to house the new flock of layers while the old layers are in the A-frame coop and being phasing out.
Layer Boxes
Since this was temporary, I did not fasten the layer box to the back wall, but you could easily make a light weight set of 2-3 boxes to hang off the back wall. Instead we used a double box I made out of scrap 2x wood for another project. It’s heavy but works good.
Tractoring
Optimal moving depends on the stocking density. For our 8 birds I’d say about every 3-5 days. We’ve gone as longer during busy spells, leaving the ground looking like a post-apocalyptic movie scene. I reconciled staying in one place so long with the fact that using good feed and the pasture has plenty of time to recover before next year.
Their foraging area is much smaller than the A-frame; however, that can be mitigated with more frequent moving. Also, I’ve already experienced that this lighter breed can fly over the chicken wire fence we use for the A-frame.
A final note. This ISA Brown flock really dug into the soil much more than my previous breeds leaving many deep holes when we removed the tractor. I say deep, but the deepest was about 4-5 inches. They seem to digging shallower holes as time passed, which may be a factor of us moving them more frequently or just age.
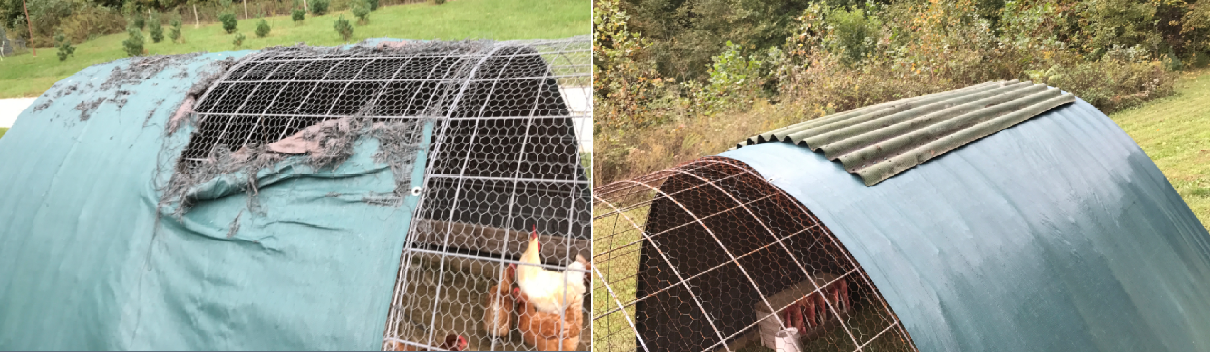
Supplemental roofing for the tractor
Since we have roosting poles already in our tractors, we only had one real issue, the tarps. The tarps are medium duty and will typically last until the fall, sometimes longer, unless you have birds resting on them as we do. Last year it was the crows that tore up the tarps. This year it’s our flock of Guinea fowl. Check out what a week of roosting can do to a tarp.
Fortunately I had an old piece of roofing laying around that I could attach to the top. The boys just held some scrap pieces of wood on the inside of the coop that I fasten the roof to with screws. This will protect the tarp and ensure a dry area underneath for the food dispensers.
Winter
October came and I decided not to move the chickens to the A-frame. A chicken escaped the tractor during feeding and we caught her that night perched on the fence that keeps my Rainbow flock contained around the A-frame. It’s really nice having them in the tractor, not needing to open and shut the coop each day and not worrying about them flying over the fence or aerial predation.
The cold of winter is my biggest concern. I would want some better protection than the tarp and windbreak. These are hearty birds and I’m think I could design a suitable shelter area in the tractor; however, snow is problematic for moving and requires some more thought.
The future of the layer flock
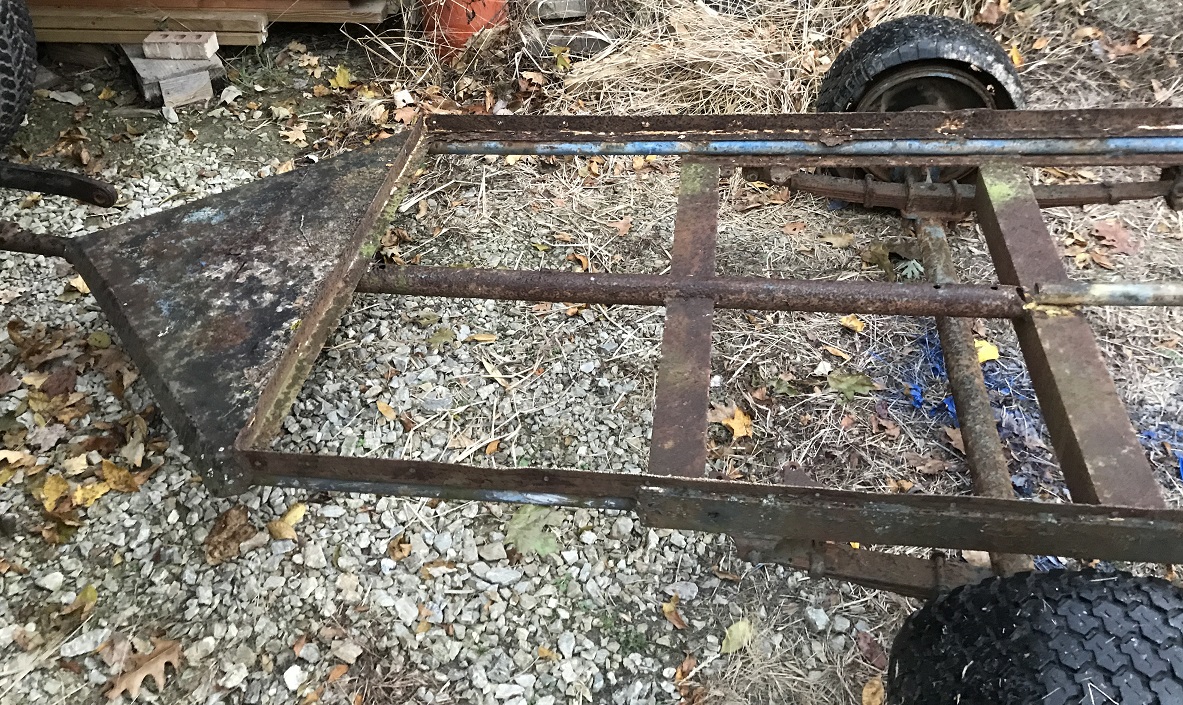
This experiment got me thinking about building a new chicken coup on a trailer frame and incorporating the best feathers of the A-frame, chicken tractor, and more. Something very portable, versatile, and low maintenance.
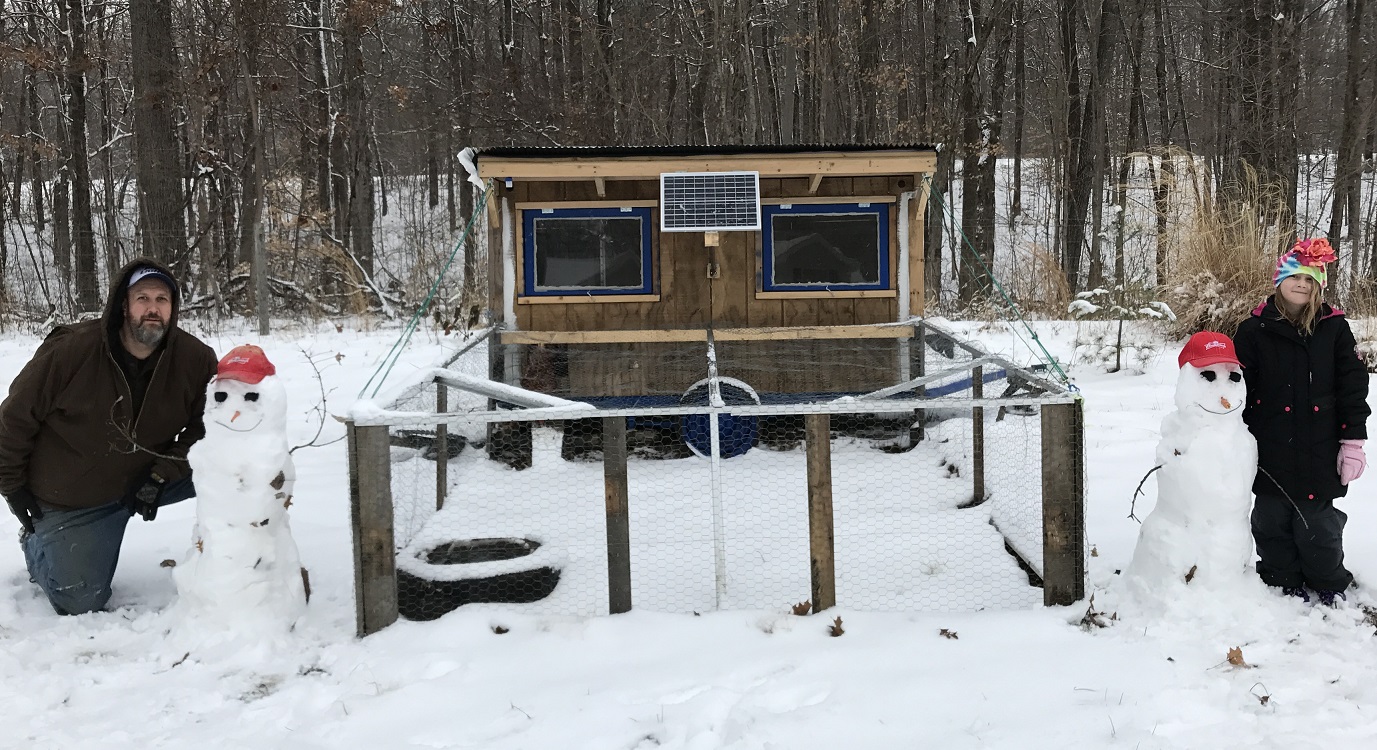
Keep an eye out for the results of my new coop idea. I’ll add a link to the new post here when it’s ready. Until then, here’s a teaser.
In fall of 2014 I decided I wanted to raise some dual-purpose chickens. My focus is on a breed that lays good eggs which can be incubated to raise “panfry” broilers, pre-Cornish-Cross size meat birds. So how about an update on how I move the coop.
I tried to keep the size of the coop minimal so that it could be easily moved. It’s still heavy and challenging to move. My initial thought was to add permanent retractable wheels to one end and add some sort of a trailer type tongue to the other end for lifting an pulling. Due to the weight, the tongue never happened. Instead I still used the retractable wheels, but also put a sledge under the opposite “tongue” end and pulled it like a sled.
This wasn’t optimal. The coop was too heavy for the retracting mechanism I made for the wheels. It was also hard to lift the coop to put the sledge under the other end to drag it with. Additionally, in the spring I had to use the tractor to move it because the garden tractor would get stuck, #1 The Coop.
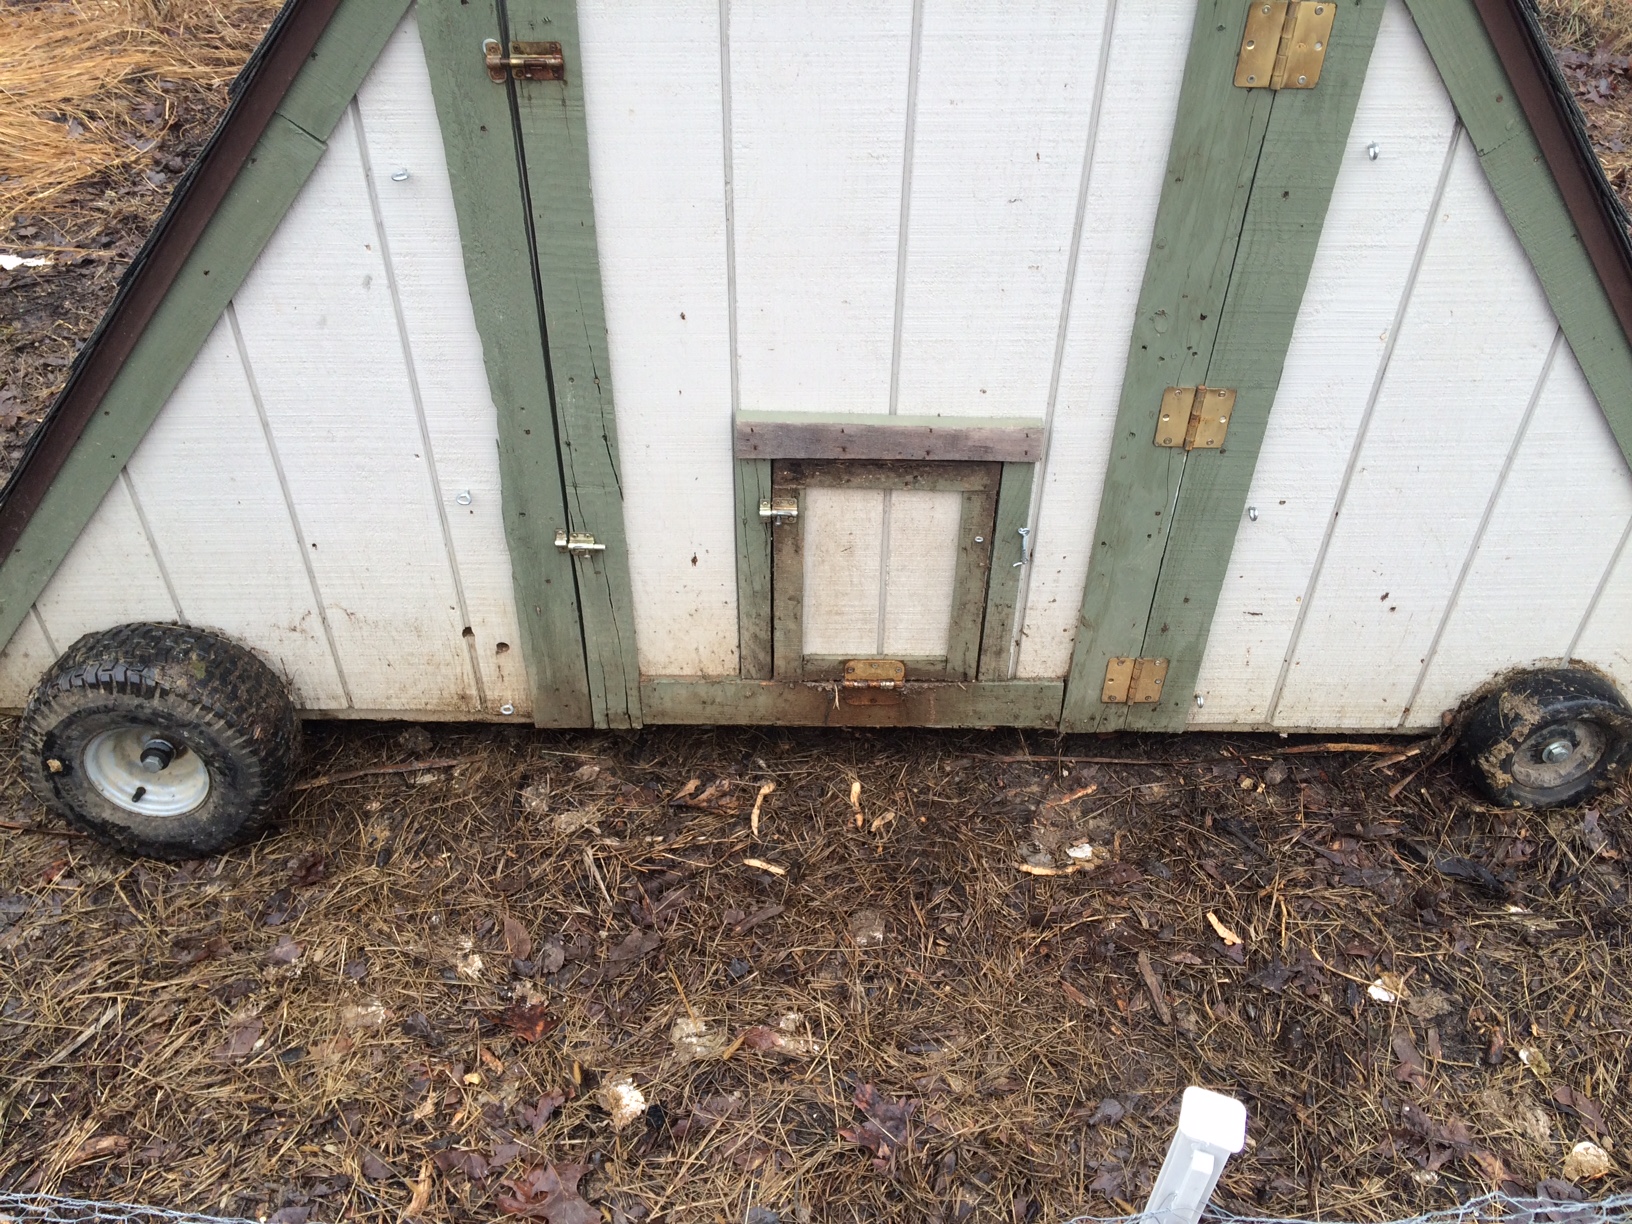
So I scrapped the contraption I made for the extendable wheels and decided to use temporarily attached wheels instead. I scavenged two more wheels from the front of a dead riding lawn mower. For axils, I use 8″ bolts that are the same diameter as the original wheel axils. I drilled holes through the coop’s 4×4 bottom frame and just slide the wheels and bolds right on. I added some spacers between the wheel and wood to prevent rubbing.
This works well. Our winter area can get mucky, as you can probably tell by the picture to the right; however, the wheels still allow us to pull/push the coop by hand. A small scrap piece of chain added to one end helps us to pull or allows us to use the garden tractor for longer distance hauls.
The main downside of this method is that it requires at least two people to tip the coop and put the wheels on. You could use a lever or jack to raise each side, but since I have two boys, it takes just a few minutes to tip the coop each way and add the wheels.
In fall of 2014 I decided I wanted to raise some dual-purpose chickens. My focus is on a breed that lays good eggs which can be incubated to raise “panfry” broilers, pre-Cornish-Cross size meat birds. So, how do I provide supplemental light for consistent laying?
The 3 breeds I’ve raised so far, Buff Orpingtons, Delaware, and Rainbows, are sensitive to the amount of “daylight” they get in relation to egg laying. In the seasons when the days are shorter, they stop laying. I’ve heard some breeds are not as sensitive and will keep laying, but these breeds slowed down and almost stopped on me before I added light to extend their “day”.
Since I do want year round laying, I have to supplement the daylight with artificial light. When the coop is near an electrical outlet, it’s easy enough to use a standard multi-time timer to power a CFL bulb in the coop. However, we normally only bring the coop near an outlet in the cold part of winter and the birds still need supplemental light in the fall and spring when no outlets are near the coop.
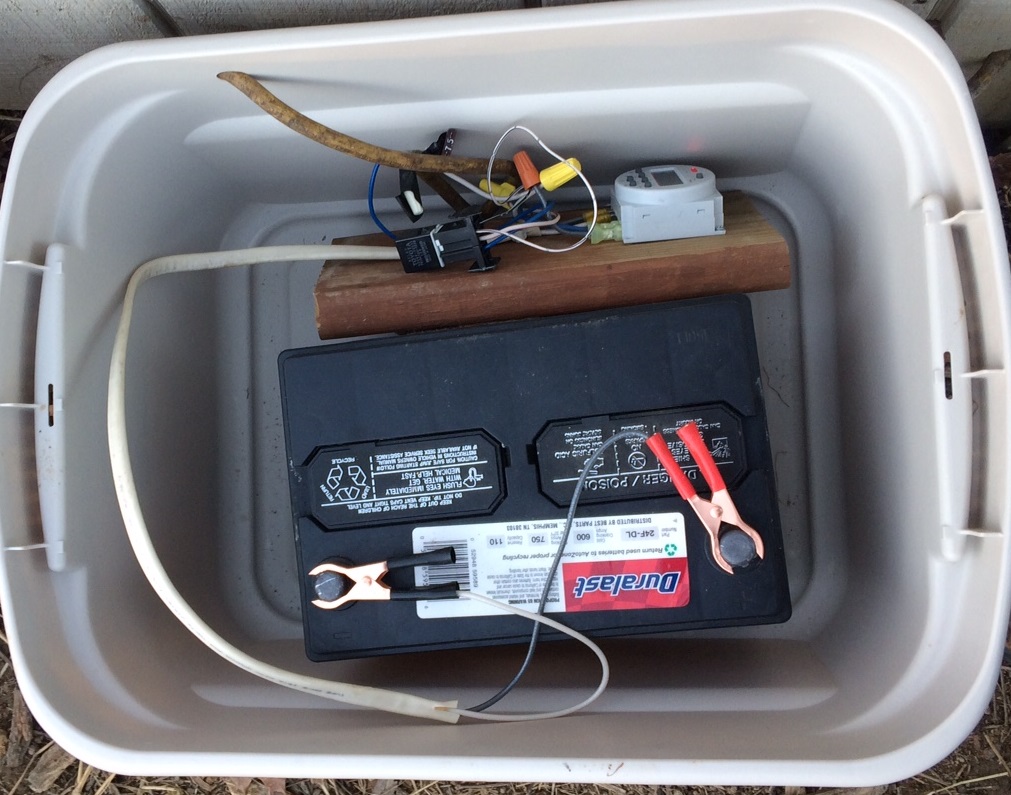
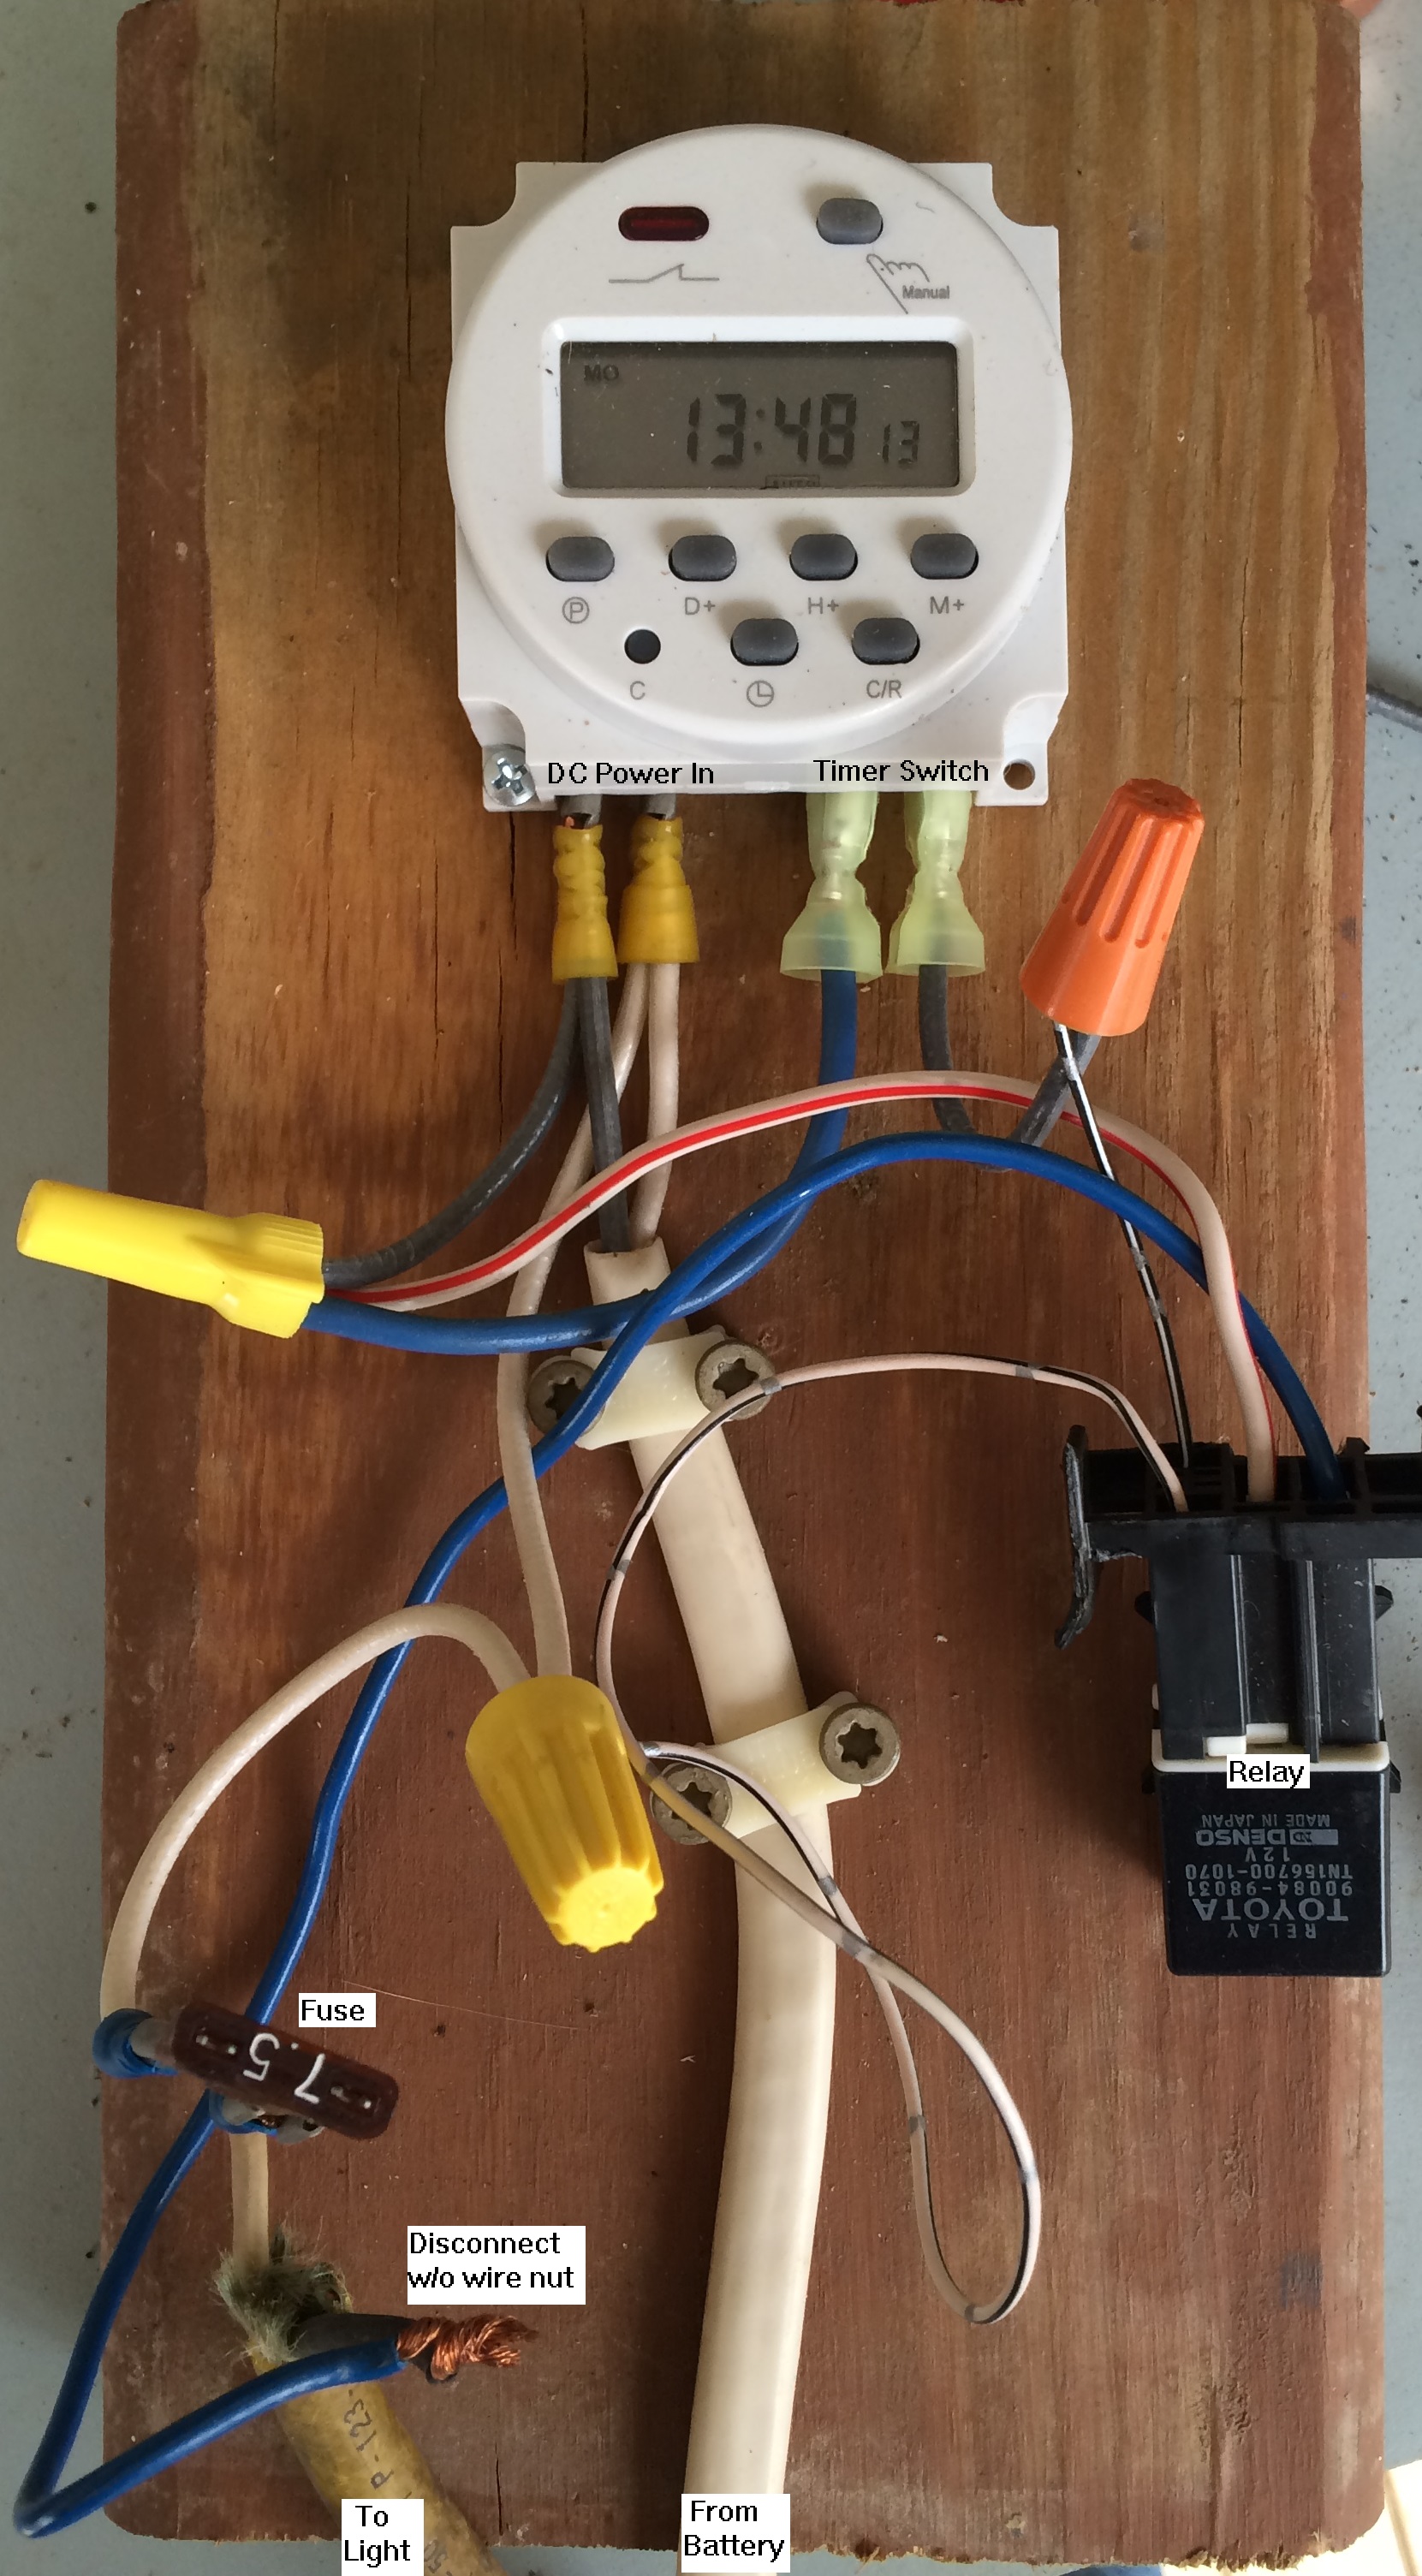
To solve this, I built a DC light box. For the light, I ordered a 12VDC LED bulb that plugs into a standard receptacle. I took the plug off a hanging lamp and stripped the wires to attach them to unit. I purchased a $10 DC timer that has 16 programmable on/off times. And I alternate deep cycle batteries for the power supply.
I followed the instructions to hook up the timer; however, the switch on the timer wouldn’t handle the amperage of the light if I ran it through the timer switch. So instead, I ran a car relay off the timer switch and wired the light through the relay. I added a fuse in as well, mainly because I already had the female spade connector cramped on and also wanted an easy disconnect in that spot anyway. It may not be pretty, but it works.
To run the light into the coop, I disconnect the lamp wire and feed it through a hole I drilled in the coop and another hole in plastic tote that houses all the electronics.
This setup works pretty good. I have two light cycles programed, one in the morning and another one at night. I can get at least 5 days off one battery charge running 4-6 hours of light a day. Below are the descriptions and links to the bulbs and timer I used for your reference.
In fall of 2014 I decided I wanted to raise some dual-purpose chickens. The main focus was on incubating my own birds to raise as “panfrys”, traditional meat birds frequently used in pan frying. Now I want eggs.
In between my incubation sessions, we were getting 6-7 eggs average a day from the 9 hens. We had built up a rotation of almost 8 dozen eggs in the fridge when we started having issues.
First I noticed some eggs were broken. I determined it was a chicken pecking eggs, but which one? While I was trying to figure out how to catch the egg eater, first one, then two of the Buff Orpington hens went broody on me. At first they were in the nesting boxes, but as I kept kicking them out of those, they took up corners in the coop. I managed to dissuade one of them by continually kicking her out, but the other was to stubborn.
In the mean time, I thought I had found my egg eater. I saw a Buff running around with a broken egg shell. I separated her, but by now between the broody hens taking all the eggs and the egg eater we were only getting 1-2 eggs a day. This went on for almost 6 weeks while I “studied” the birds and waited for a chicken tractor to be freed so I could start isolating the birds to get to the bottom of what was going on.
The Buff I separated wash sharing the tractor with my dual-purpose meat birds. However, she was rejoined the flock after two weeks as the loss of eggs had not lessoned and she started laying in the tractor without pecking the eggs. The birds that were in the tractor with her graduated, but we restocked the tractor with Brother’s M chickens and I did not want to the layer hens with the Brother’s meat birds. Finally we emptied the chicken tractors; however, we were leaving for vacation in a week. I didn’t want to complicate things for my caretaker, so almost two months passed with little to no eggs.
When we returned from a vacation, I immediately separated the Delaware and Buffs by putting the Buffs in an empty tractor. Within a week the buffs started laying 2-3 eggs again while the Delawares produced none. So I started introducing Delaware hens with the Buffs to identify the egg eater. The first one I introduced ran past me and started pecking the Buff eggs as I was trying to gather them. Found her! The other two were introduced 3 days apart and we did not loose any more eggs.
But now, I was losing daylight and the birds were not laying well. I moved the coop up by the house and installed a light on a timer. Production picked up, until… more pecked egg. This time I noticed a Delaware hanging out in the coop and separated her. No missing eggs for a week. Then …. More pecked eggs. I took the third and last Delaware out of the flock, one had disappeared during the summer, and now had just 5 Buffs.
Months later and still no pecked eggs. The 5 Buffs are producing an average of 3 eggs a day.
In fall of 2014 I decided I wanted to raise some dual-purpose chickens. The main focus was on incubating my own birds to raise as “panfrys”, traditional meat birds frequently used in pan frying. So let’s do some hatching.
Spring was rocking and rolling. The nine hens were producing 6-7 eggs on average and it didn’t take me long to fill all 27 slots in my incubator. I had purchased an INCUVIEW incubator off a recommendation from TSP Podcast 1373. I really like this incubator as it’s almost “set it and forget”. Periodic checking the humidity and straightening the rows of eggs are all that’s needed. The last 10 days of my 5th run went unattended while we were on vacation.
The Delaware/Buff mix produced a 74% hatch rate. Having never hatched chickens before we spend hours watching the chicks work their way out of the eggs.
Then off to the brooder to be raised like the other meat birds. This part of my plan went smoothly.
In fall of 2014 I decided I wanted to raise some dual-purpose chickens. The main focus was on incubating my own birds to raise as “panfrys”, traditional meat birds frequently used in pan frying. So I need some chickens.
After doing some research, I decided to try 2 breeds, Delaware and Buff Orpington. I was really partial to the Delaware breed as they were initially bread to be a meet bird, but were quickly overshadowed by the current Cornish-X breeds. However, I’d raised some Buff Orpingtons the year before. I liked them so decided to try both.
I purchased 4 hens and 2 roosters of each, along with 2 guinea hens that I also wanted for hatching eggs. That gave me 8 new layers, plus and extra leftover Buff hen from 2014. Having two of each rooster would allow me a chance to choose a well behaved rooster of either breed. By spring I had decided to keep a Delaware rooster based on having local resources to get more Buffs and the desire to really give the Delaware breed a try.
In early spring, the guineas decided to gang up on a hen. Ganging up is apparently typical behavior for guineas, but given my limited number of hens, I was unwilling to risk losing birds so the young guineas became dinner. I local store also started carrying guinea chicks to replace our dwindling free range flock, so I wasn’t too concerned about not having eggs for hatching.
So by the end of spring, I had my established flock, a Delaware rooster with 4 hens and 5 Buff hens. I was ready to hatch some eggs.
 Wow, what a month February was. It’s been a little over a month since we kicked off the 2020 CSA season and our CSA slots are almost full. A huge thank you is in order for everyone who’s supporting us by ordering.
 Providing unfrozen water in the winter can be a challenge and time consuming. Since we pasture the chickens “tractor” style with the portable coop, power to heat the water is the issue. I believe I’ve finally figured it out.


 4 I decided I wanted to raise some dual-purpose chickens. The main focus was on incubating my own birds to raise as “panfrys”, traditional meat birds frequently used in pan frying. Now I want eggs.


