Brothers M. Monday is our way of sharing our excitement about our chickens.
We still needed more brooder area, but I really didn’t want to dedicate more area to just brooders so I came up with the idea of fold up brooders that hang on the wall.
I made two 2’x4′ hinged brooder boxes. The bottom is hinged to the wall so it folds down, the two sides fold into the floor, and the front is hinged to Fold under the bottom. The lid had hinge pins so you could take it off and hang it on the folded down brooder or store it someplace else.
To support the front of the folding brooder, I hung chains from the rafters with S hooks on either end to unhook from the brooder and remove from the rafter to store the chains away.
I liked the boxes, but because of their size, they didn’t hold many chicks after I added the feeder and waterer, about 15, 20 max. Also, I only folded them down when I had to have the space and they stayed up most of the time.
So, I decided to take them out and make a 4×4 in the back corner. A family member made a similar brooder to this one and gave me the idea. The idea is that it’s 4’x4’x1′ so you can make it out of one 4×8 sheet. I made mine a bit taller and added a strip of wire mesh, this was to give me a little more height for waterers and feeders, and I thought I might make more and stack them for transporting the full grown grown chickens, the latter never really panned out.
Even though this makes getting to the back corners of the two brooders in the back of the lean-to, I really prefer this brooder over the 2 hanging brooders. It worked well this year.
Brothers M. Mondays is our way of sharing our excitement about our chickens.
I decided we should have a dedicated brooder area so I cleared out my 8’x16′ lean-to and enclosed it. I lined one long wall with 2 3’x8′ brooder boxes. The back is 3′ high and the front is 2′ high. I chose 3′ wide to make it easy to reach the birds in the back; likewise, that’s why the front is shorter. The back is higher so I can fit a 3gal waterer under the lid. Additionally, I started out needing clearance for the lights which hung from the lid.
The lid is 2×2 frames with 1/4 hardware cloth, hinged in the back so it lifts up. I use safety hooks to fasten it down so raccoons cannot unhook it. I put additional eyehooks in the roof rafters so we can use the safety hooks to hold the lid up.
I switched the lights to sit on top the lid vs hanging because the chickens kept knocking the lights and they would fail; we lost several birds one night because of that. So instead I sat the lights on top the lid, and attached the shroud to with pieces of wire. I had to cut a hole in the lid to allow the lamp to protrude through since it sticks out further than the shroud. This also comes in handy when I need to change a bulb.
Used pickle barrels line the opposing wall and make a safe place to store the feed. These brooders will hold 100 chicks each.
Brothers M. Mondays(on Tuesday this week) is our way of sharing our excitement about our chickens.
We have a 3 1/2′ x 7′ wooden trailer, which became our next brooder. I added a lid to it so we could use it to take the chickens to our processor. It doubled as a pretty good brooder. My biggest concern was that predators would breath through the lid, it’s made out of a 1×3 frame and 1/4 inch hardware cloth. It’s pretty sturdy for travel when it’s locked down, but not really meant to keep something from chewing and pulling at the corners.
Turns out I should have been more concerned about how secure the heat lamps were attached via the squeeze handle. One fell off and burned a hole in the floor of the trailer. Fortunately the conditions were right and it only smoldered a hold the size of a basketball instead of starting a fire. Unfortunately I cannot find my picture of the hold. After that I fastened the lights securely to the lid, which looked pretty ominous from outside the tent.
The down side of the trailer was running off an extension cord, how deep the trailer was for reaching onto it, and we outgrew it once we started raising more than 100 birds at a time.
Since I was worried about predators, I setup a trail-cam during one run. Here’s a bonus video I made out of it, hope it makes up for the delayed post.
Brothers M. Mondays is our way of sharing our excitement about our chickens.
Our very first brooder box was thrown together with a lamp and a plastic tote for 20 guinea fowl we bought. But for the meat chickens, I needed something better and bigger. I converted a pallet crate into a brooder. I enclosed the crate on the outside with 2×4 wire fence to keep predators from breaking in. I used some scrap composite wood flooring for the floor, I was a little short so there were a couple places I filled in with scrap wood. The crate didn’t have a top or lid, so I used a regular pallet with 2×4 fence attached for the top. It wasn’t attached, but was heavy enough critters couldn’t move it.
I lined the inside with pink 1/2″ foam board insulation. On the sides I attached some scrap Formica sheets to protect the foam board from being pecked and eaten, it didn’t protect all the way to the top, but that was only a problem when I temporarily hosed a grown bird in the brooder. I had a piece of foam board that covered almost the complete top, then I sat the pallet top/lid on to of that.
An attached light to the side and a waterer and feeder and it was ready for chickens. This worked pretty good. But we quickly outgrew it, I think the max was about 30-35 birds.
Brothers M. Mondays is our way of sharing our excitement about our chickens.
I’ve recently received a couple questions about starting chicks, so this year for Brother M. Monday’s in May I’m doing a Brooder series
Starting out, here’s some general brooder basics I use:
Length – In general, the chicks can leave the brooder as soon as they are feathered out. Anecdotal wisdom is that the sooner the chicks eat pasture grass, the sooner they build immunities.
Starting in early spring, mine usually go out near the end of 3 weeks. After that they start crowding the brooder. When raising them in the summer, I like to get them out around the end of the 2nd week, assuming we’re having warm weather, during a cold spell, I’d still wait another week.
Heat – I subscribe to a “normalizing” heat method using heat lamps. This means I supply the heat and rely on the chicks to self-regulate their temperature by moving closer if they’re cold and further away if they are hot. This method means you have to be observant to what the chickens are doing.
In the spring I use 250w bulbs and switch to 120w in the summer. When the temperature drops low enough that the chickens are crowding the light, I use foam insulation and some blankets to cover the tops of the brooder, leaving appropriate space around the lights to prevent fire and allow air flow.
Bedding – I use the deep bedding method of bedding the chicks. This means I layer in bedding as it gets soiled. This method results in several inches of bedding, which gets sent to the compost pile when the chicks are done.
I use medium wood chips for bedding, don’t use cedar. Fine chips will work, but you use a lot more in this method and there’s more dust which isn’t great for the chickens.
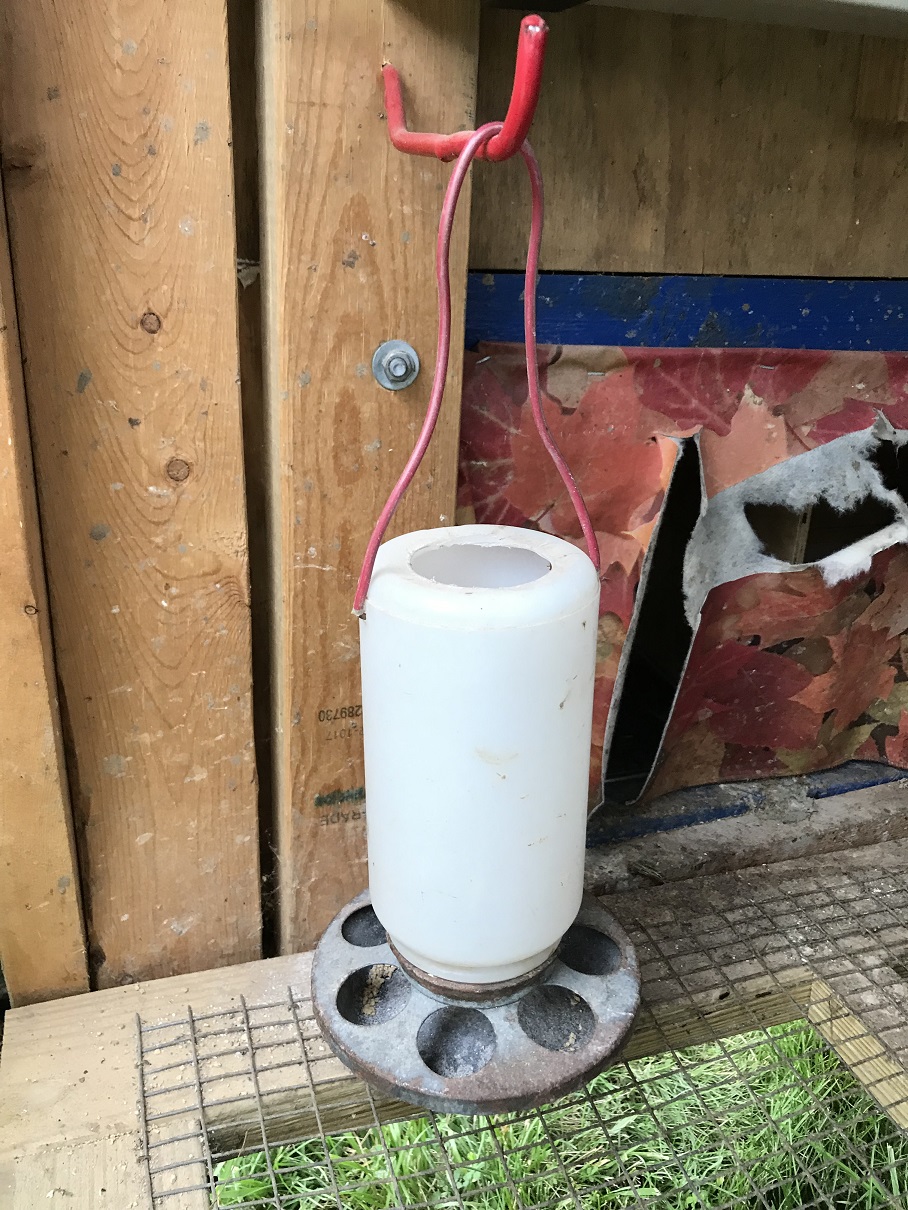
Water – I started out with plastic 1gal waterers, then switch to metal 3 gallon, well actually I started out with a couple quart waterers, but we outgrew them really quick. I used the one gallon waterers because I initially sectioned off my big brooder into 4 sections and the 1gal worked well in that space. I removed the dividers so I had 2 larger 3×8 brooders and switched to using the same 3gal metal waterers I use in the chicken tractor.
In the future I plan to switch to a nipple water system.
Feed – I started out with chick feeder troughs and quart feeders, but they didn’t hold enough food and were too cumbersome to keep up with. I switched to using the same 7lb feeders that I hang in the chicken tractors, just sitting on the bedding. I also set them on a piece of scrap deck board to help prevent wood chips from getting into them.
Space/segregation – I’ll mention the capacity of each brooder as I post them. Initially I subscribed to more separation, 50 per brooder, but today feel that 100 per brooder works well. The reason for separation is to prevent crowding, as chicks will trample each other. However, my problem with separation is the lack of redundancy and the loss of brooder space for the equipment.
In my personal experience, with the brooder divided, I could only have one heat lamp per brooder. When a bulb failed one night, I lost almost a dozen chicks due to cold and crowding for warmth. After removing the divider, there are two lamps offering redundancy in a failure, I experience a similar failure, but only lost a couple chickens due to the redundant light. FYI, I think I got a bad batch of bulbs that year as I had several new bulbs fail.
Plus, using the one 3 Gallon waterer in the center instead of the two 1gal waterers gives the chicks more room. It’s not necessarily about the actual space the waterer takes up, but the placement in the center. In the divided brooder, the waterer always ended up near a corner which uses up more space.
I hope some of this info on how I do things is useful. Stay tuned for the rest of the posts on the various brooders I’ve tried.
Brothers M. Mondays is our way of showing you how excited we are for the first Seymour Farmers Market.
It was awesome to see all the smiling faces Saturday at the marker. A bit cold, but awesome.
Since the last Monday in May is a bit of a sneak and just snuck in on the last day, I thought a I’d post this picture. One of these chickens is a sneak, it’s not like the others. Due to a shipping issue we received a few layers this year with our regular Brothers order. Can you find the layer in this picture?
I’ve been very pleased with ISA Browns. They are gentile, except we don’t seem to have good luck with Roosters; I’ve been told meanness is common in the light colored roosters. The egg production has been great. Longevity seems to be on par with what I’d read, 2 years being the peak for egg laying.
But what about winter laying of ISA Brown chickens, especially supplemental light?
In my review of the Buff Orpingtons and the Rainbow breeds as Dual purpose birds, one of the things I mentioned was that artificial light was needed to keep these breeds laying in the winter. From what I’ve read, breeds that are bread for egg laying will lay through the winter without additional lighting. I’ve even heard first hand of Rhode Island Reds laying through the winter without additional light.
I’ve not had that luck with my chickens, including the ISA Browns. Last year I did not provide extra light and they stopped laying. I could not pin down for sure if it was the light, stress, cold, or water conditions, detailed in my solar tire saga.
This year, winter 2020/2021, when egg production started dropping off, and basically stopped, I was again having predators stressing the birds, including even losing some birds. However, cold and water were not an issue, see best solar water. So I went ahead and introduced artificial lighting in the mornings and evening to ensure the birds were getting 12+ hours of light. To my satisfaction, egg production not only increased, but our egg production returned to normal. Of course, the predator situation was also taken care of; however, after a couple more months of good production, I really think it was the light.
The down side to this is that I didn’t size the solar panel and battery to accommodate running the light this much. The solar panel does help, and for now I’ve ended up adding an additional deep cycle battery and swap batteries every 5-7 days if it’s been overcast, not as hands off as I wanted. I haven’t done any calculations, but I’m considering a larger solar panel, but in the summer it would be extreme overkill just to run the automatic door. In the meantime, it’s still better than how frequently I had to change batteries without a solar panel.
Another note about the cold. Our chickens don’t seem to be bothered by the cold. The research I’ve done indicates that if you’ve chosen a cold hearty breed, which I have, then as long as you provide a dry area that’s out of the wind, the chickens will be fine. The worst thing for them is to be wet in the cold. Our coop has an open floor, but 4 solid walls and windows to let the sun in. The lowest roost is a foot off the floor, which allows for wind blockage.
This really doesn’t need to be a separate post, but I didn’t want to combine it with my solar tire tub post since I consider that a failure.
My father-in-law gave me these feeders, so I decided to use them in the initial phase of the coop build. My thought was to build a PVC feeder system that we could add feed from outside the coop. This was because roosters are mean to little girls.
Now, we no longer have a rooster and I’ve grown to like the door feeders. Having to open the door to feed the chickens is a bit more work. And a time or two a chicken has escaped, as referenced in my aviary post; however, at this point I’m no longer interested in perusing a PVC solution .
As a bonus item, here’s my solution for providing calcium for the chickens. I like the idea of providing a second feeder that they can get the calcium at-will instead of adding it directly to their feed. For this I repurposed a broken brooder waterer and an old brooder feeder base I picked up. The plastic waterer was cracked and not holding water, so I cut open the top to be able to fill it from the top, and drilled two holds for the hanger. A scrap piece of house wire inserted into two drilled holes acts as a hanger.
Recently I realized I didn’t do a post on my solar tire waterer and that it’s on the outline for my initial build. In my opinion it was a failure and I guess why I overlooked it. But, I want others to be able to learn from both my successes and failures so here goes.
I researched ways to keep water from freezing and the tire idea intrigued me so I built one. I thought I had an ace up my sleeve, I’ll explain.
So I got a tire and put a board across the bottom for the pan to sit on. This was to insulate the pan from the ground. The instructions said to fill the tire with insulating material, plastic seemed to be the most common material so I filled the tire with old tarp scraps. I got a black plastic oil pan that fit the tier pretty well and I was off to the races.
And my ace in the hole? One of our small blue-ice bottles, unfrozen obviously. I saw people putting a dark ball in the water to move the water and attract heat, thus helping to keep it from freezing. If figured if my “ball” was also partly filled with salt water, which freezes at a lower temperature, it would help keep the water from freezing even more.
The results. The chickens roosted on the tire during the day, frequently butt side toward the water, and made a mess in the water. It was hard to keep the water clean. The tire setup did help keep the water from freezing, a little. It was fairly easy to dump frozen ice out of the pan or to melt it with hot water. The blue ice bottle seemed to help, but I’m not sure if or how much better than just adding a ball.
Marshmallow seems to be my common companion
The end result was I finished the winter with it and moved back to a standard ground waterer as soon as I could. The tire was thrown in a corner, pan and all, and I didn’t touch it until I grabbed a picture the following February for the solar water post. It’s still sitting unused.
For a better solution, check out what I used last winter. This is the best solution I’ve found.
This was a part I didn’t plan out in great detail, but I’m used to that. Even the well thought out plans I made for this coop got modified as I built. Typically I’m building with various material, used and new, and I incorporate what I have to make what I want. I like to think I’ve developed pretty decent system around this building process.
Just so happens, I watched this video on being more productive the morning I was going out to work on the Aviary. It made me feel better about building the Aviary from just an idea in my mind. Early in the video, I like when he said “I think it’s easy to stand around and talk about how to do something better, when if you simply put your head down and went to work, it would be done, and well done, when discussion on the best possible method was just beginning to slow up enough for somebody to begin to pick up a tool. Now I’m overstating that, but productivity is important.”
I also, I enjoyed the Frost poem, and finally CS Lewis’s quote, “Two of a trade, never agree.” and his interpretation that Everyone does it different, so learn new things from that.
What’s Up? Chicken Butt. Laugh when you see it.
But on to the Aviary…
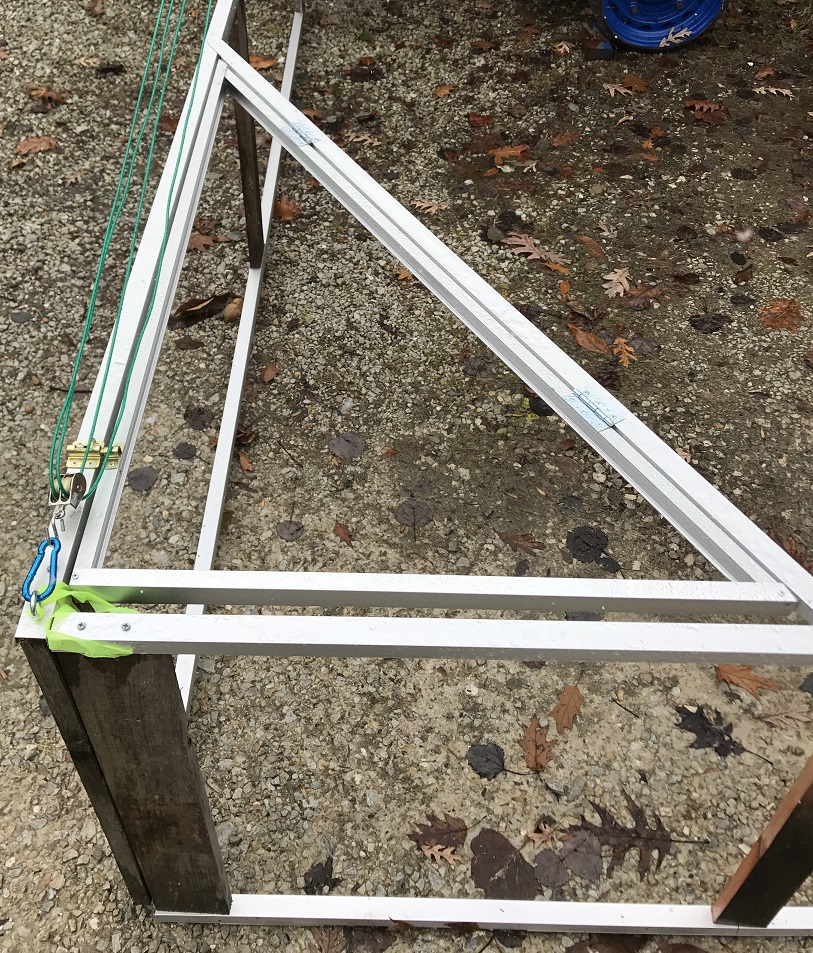
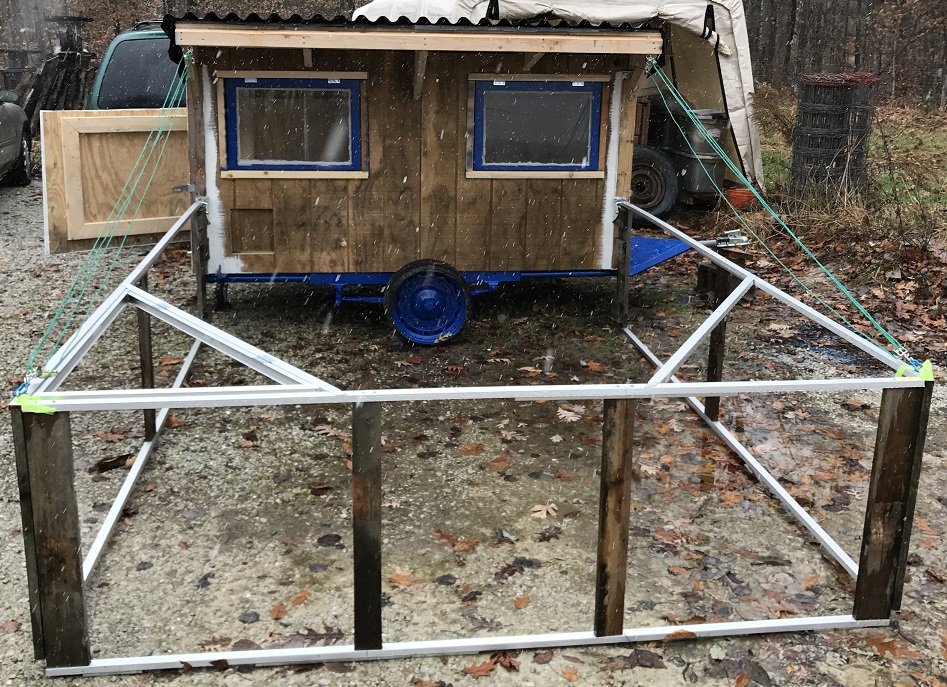
Building a coop on a trailer meant coming up with an aviary that can be lifted for movement. I don’t have permanent perimeter fencing around the pasture to keep and protect the flock, so an aviary is necessary.
The aviary is easily detachable at the pivot/hinge, made from a caster with the wheel removed. This is for three reasons. I may use the coop with portable fencing as some point and not want the aviary attached. The corners of the aviary drag when moving, so if I’m moving over large distances, removing the aviary makes the move easier. It’s also necessary for me to use the windows as access portals to remove chickens when they are roosting in the middle, removing the aviary gives me access to the windows.
Nice to have a friend around when you work
Most of the frame is made out of some scrap aluminum wire track I picked up. This helps keep it light. The wooden pallet boards are for extra strength at the corners and pivot point, and to make it easier to tie everything together. Chicken wire is zip tied to the frame and stapled to the wood where appropriate.
I turned one corner of the frame into a hatch. This mainly allows us to water the chickens. We’ve been using ground waterers in the warm months and my new solar heated waterer in the cold months. I recently setup a PVC nipple system, but the weather turned cold before I could try it out; more to come on that.
My helper with running the cable.
The initial plan was to use a pulley system attached to the aviary to raise and lower it like a drawbridge and attach a motor or winch to raise and lower it. Even though it’s pretty light, it a pretty hard pull to raise. This is due to the shallow angle of lift I have from the roof and that I used cheap pulleys. Even with double pulleys, it’s a struggle to lift by pulling the cables.
Currently, I raise the aviary by hand, prop it up with a bucket, then pull the slack out of the cable and tie it down, using a cleat hook on the inside. I’m thinking I may scrap the whole pulley system and just have one cable on each end that is right length to hold the frame up once I’ve raised it on the bucket.
I’ve been told I should have designed the coop so that the aviary drags behind the coop when I move it. This sounds like a good idea; however, it doesn’t make backing up easy and I’ve already built the coop. I do think a redesign is in order, I have some ideas, so more to come when I’m finished.
Yes, she’s outside. The devil escaped while filling the food.
 We still needed more brooder area, but I really didn’t want to dedicate more area to just brooders so I came up with the idea of fold up brooders that hang on the wall.
 I made two 2’x4′ hinged brooder boxes. The bottom is hinged to the wall so it folds down, the two sides fold into the floor, and the front is hinged to Fold under the bottom. The lid had hinge pins so you could take it off and hang it on the folded down brooder or store it someplace else.
 To support the front of the folding brooder, I hung chains from the rafters with S hooks on either end to unhook from the brooder and remove from the rafter to store the chains away.
 So, I decided to take them out and make a 4×4 in the back corner. A family member made a similar brooder to this one and gave me the idea. The idea is that it’s 4’x4’x1′ so you can make it out of one 4×8 sheet. I made mine a bit taller and added a strip of wire mesh, this was to give me a little more height for waterers and feeders, and I thought I might make more and stack them for transporting the full grown grown chickens, the latter never really panned out.
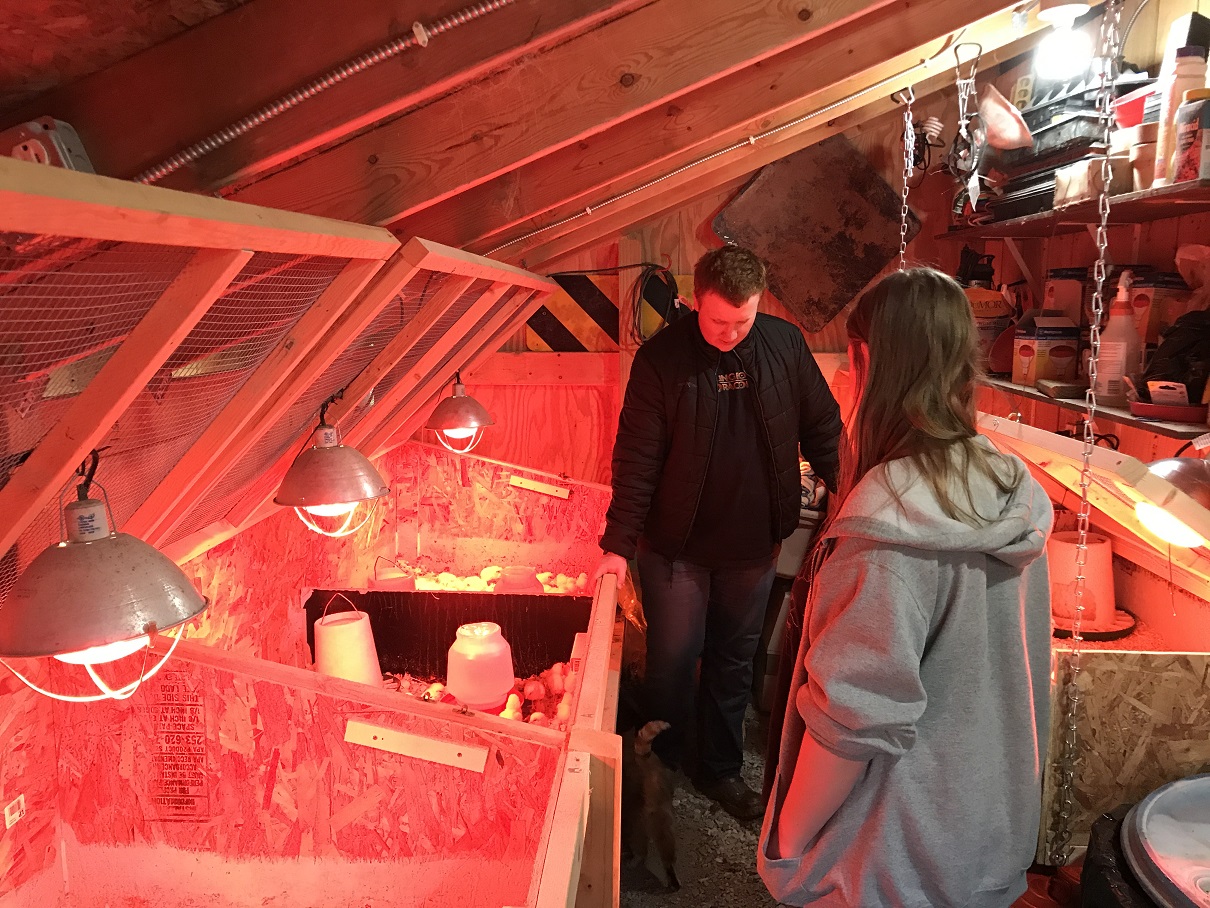


 Turns out I should have been more concerned about how secure the heat lamps were attached via the squeeze handle. One fell off and burned a hole in the floor of the trailer. Fortunately the conditions were right and it only smoldered a hold the size of a basketball instead of starting a fire. Unfortunately I cannot find my picture of the hold. After that I fastened the lights securely to the lid, which looked pretty ominous from outside the tent.
 The down side of the trailer was running off an extension cord, how deep the trailer was for reaching onto it, and we outgrew it once we started raising more than 100 birds at a time.
 Our very first brooder box was thrown together with a lamp and a plastic tote for 20 guinea fowl we bought. But for the meat chickens, I needed something better and bigger. I converted a pallet crate into a brooder. I enclosed the crate on the outside with 2×4 wire fence to keep predators from breaking in. I used some scrap composite wood flooring for the floor, I was a little short so there were a couple places I filled in with scrap wood. The crate didn’t have a top or lid, so I used a regular pallet with 2×4 fence attached for the top. It wasn’t attached, but was heavy enough critters couldn’t move it.
 I lined the inside with pink 1/2″ foam board insulation. On the sides I attached some scrap Formica sheets to protect the foam board from being pecked and eaten, it didn’t protect all the way to the top, but that was only a problem when I temporarily hosed a grown bird in the brooder. I had a piece of foam board that covered almost the complete top, then I sat the pallet top/lid on to of that.
 An attached light to the side and a waterer and feeder and it was ready for chickens. This worked pretty good. But we quickly outgrew it, I think the max was about 30-35 birds.
 Since the last Monday in May is a bit of a sneak and just snuck in on the last day, I thought a I’d post this picture. One of these chickens is a sneak, it’s not like the others. Due to a shipping issue we received a few layers this year with our regular Brothers order. Can you find the layer in this picture?
 I’ve been very pleased with ISA Browns. They are gentile, except we don’t seem to have good luck with Roosters; I’ve been told meanness is common in the light colored roosters. The egg production has been great. Longevity seems to be on par with what I’d read, 2 years being the peak for egg laying.