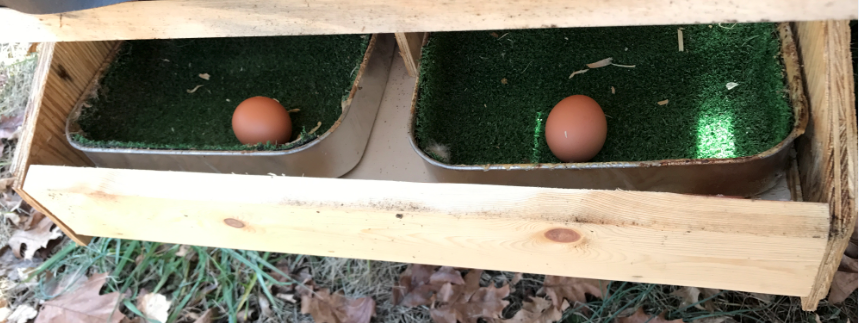
 I cover my initial build of the boxes, including covering the paint trays, for the A-frame here. As I mention, I really like this type of box. And to follow-up from my first post, yes the new ISA Brown flock is consistently laying only in the boxes as I had hoped and expected.
The boxes for this coop are completely on the outside of the coop. This gives me more room on the inside of the coop for roosting and waste/droppings management. I put the boxes level with the floor. I’m getting bedding shavings in the trays, which can prevent eggs from rolling down. I’m not sure if higher tray would fix the issue, but I’m planning to move to a mesh floor without any shaving anyway, so the issue should resolve itself with the new floor.
 The dimension of the boxes are mainly to accommodate the paint trays, but I think are good for any box. I typically do not oversize my boxes, especially in height. I’ve read that keeping the boxes smaller and shorter discourages “parties” in the boxes that lead to droppings in the box. So far that’s not been an issue in any of my boxes. Additionally I use an old table cloth to make a divider to give the hens more privacy, which they really seem to like.
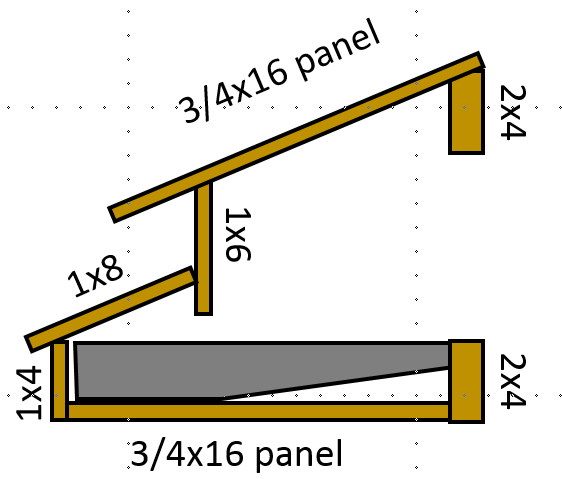
 I started by marking the ends according to the blueprints, putting each board on the marks to ensure I had the right dimensions, then cutting out the end shape. I then cut all the horizontal boards to the proper length. I used standard 1″ & 2″ sizes and laid out the paint tray on the boards to ensure proper dimensions before I cut them. The larger floor and roof I used scrap OSB and a an old shelf board I had on hand.
 I took the roof angles from the ends used them to ripped an angle on the 3 boards that meet the roofs. I could have just left them square and lowered them to the level of the roof, but I like the way the angle looks.
Then I sat the ends upright and started fastening the horizontal boards to the ends. I have a staple gun which makes building boxes like this much easier. It could probably be done without it, but I’ve come to rely on how well the staples work in edges of narrower pieces of wood.
I slid the paint trays in to view the heights. The 1×6 that I used for the back of the nesting box did not go down as far as I liked. It gave the chickens too much room to access the bottom of the pan. I ripped a spare board in half and used it to add to both boxes.
I cut and stapled the center in place. I have a staple gun which makes building boxes like this much easier. It could probably be done without it, but I’ve come to rely on how well the staples work in edges of narrower pieces of wood. I also ripped the appropriate angle on the board that covers the egg area so it sits flush on the hinge side, but did not attach it yet.

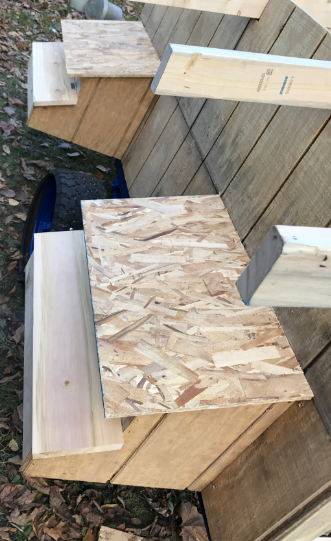 Next I fastened the boxes to the frame using carriage bolts in the top to hold the weight then wood screws at the bottom to hold the box against the frame. The frame had a lip that was perfect to rest the box on and use a clam to hold it in place while I fastened it.
Finally, I attached the roof sections. The top one I just stapled down, the bottom one is hinged so t raises for gathering eggs. Since I used OSB, the top roof has tar paper for now and will get a either shingles or a metal roof. The bottom roof/door is a 1×8 and will just get stained.
