Chicken Tractor – for layers and broilers

As I’ve mentioned in my Chicken Tractor Guide, you can use the chicken tractor design for layers.  So this summer and fall we’ve used our idle chicken tractors to house the new flock of layers while the old layers are in the A-frame coop and being phasing out.

Layer Boxes

Since this was temporary, I did not fasten the layer box to the back wall, but you could easily make a light weight set of 2-3 boxes to hang off the back wall.  Instead we used a double box I made out of scrap 2x wood for another project.  It’s heavy but works good.


Tractoring

Optimal moving depends on the stocking density.  For our 8 birds I’d say about every 3-5 days.  We’ve gone as longer during busy spells, leaving the ground looking like a post-apocalyptic movie scene.  I reconciled staying in one place so long with the fact that using good feed and the pasture has plenty of time to recover before next year.

Their foraging area is much smaller than the A-frame; however, that can be mitigated with more frequent moving.  Also, I’ve already experienced that this lighter breed can fly over the chicken wire fence we use for the A-frame.

A final note. This ISA Brown flock really dug into the soil much more than my previous breeds leaving many deep holes when we removed the tractor.  I say deep, but the deepest was about 4-5 inches.  They seem to digging shallower holes as time passed, which may be a factor of us moving them more frequently or just age.


Supplemental roofing for the tractor


Since we have roosting poles already in our tractors, we only had one real issue, the tarps.  The tarps are medium duty and will typically last until the fall, sometimes longer, unless you have birds resting on them as we do.  Last year it was the crows that tore up the tarps.  This year it’s our flock of Guinea fowl.  Check out what a week of roosting can do to a tarp.


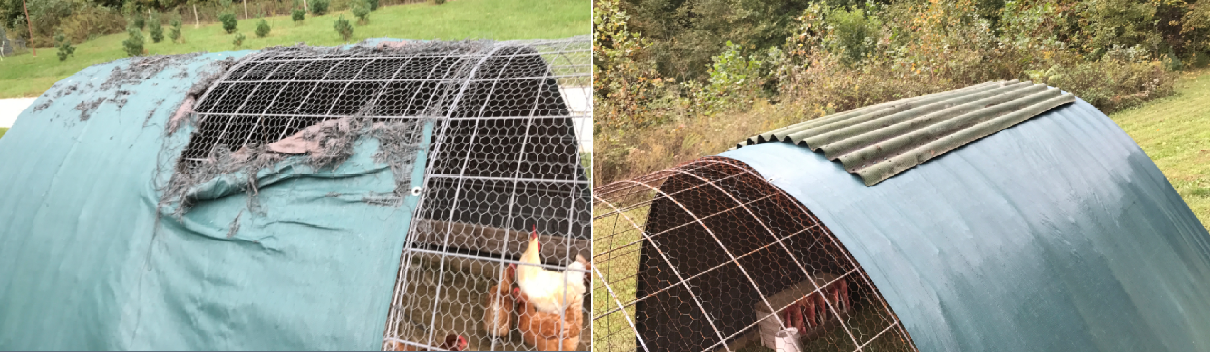
Fortunately I had an old piece of roofing laying around that I could attach to the top.  The boys just held some scrap pieces of wood on the inside of the coop that I fasten the roof to with screws.  This will protect the tarp and ensure a dry area underneath for the food dispensers.


Winter

October came and I decided not to move the chickens to the A-frame.  A chicken escaped the tractor during feeding and we caught her that night perched on the fence that keeps my Rainbow flock contained around the A-frame.  It’s really nice having them in the tractor, not needing to open and shut the coop each day and not worrying about them flying over the fence or aerial predation.

The cold of winter is my biggest concern.  I would want some better protection than the tarp and windbreak.  These are hearty birds and I’m think I could design a suitable shelter area in the tractor; however, snow is problematic for moving and requires some more thought.


The future of the layer flock

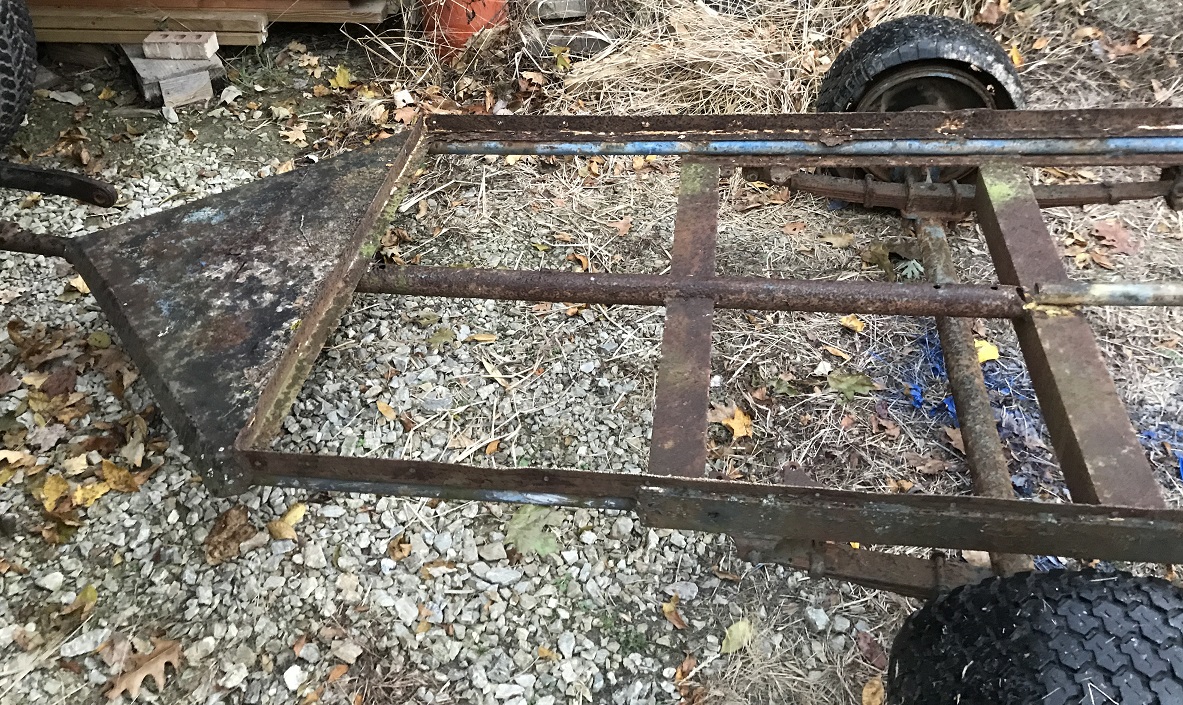
This experiment got me thinking about building a new chicken coup on a trailer frame and incorporating the best feathers of the A-frame, chicken tractor, and more.   Something very portable, versatile, and low maintenance.

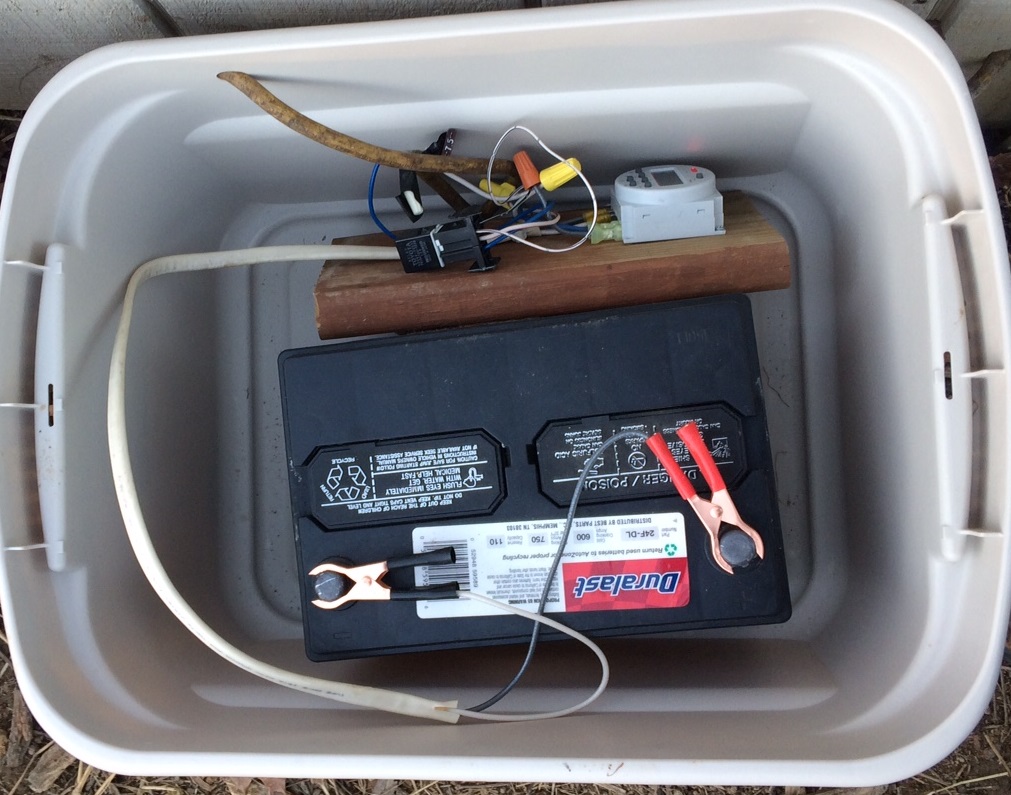
Keep an eye out for the results of my new coop idea.  I’ll add a link to the new post here when it’s ready.  Until then, here’s a teaser.

Here’s the link.

-Jason

Dual-purpose Chickens – 10 – Moving the coop update

In fall of 2014 I decided I wanted to raise some dual-purpose chickens.  My focus is on a breed that lays good eggs which can be incubated to raise “panfry” broilers, pre-Cornish-Cross size meat birds.  So how about an update on how I move the coop.


I tried to keep the size of the coop minimal so that it could be easily moved.  It’s still heavy and challenging to move.  My initial thought was to add permanent retractable wheels to one end and add some sort of a trailer type tongue to the other end for lifting an pulling.  Due to the weight, the tongue never happened.  Instead I still used the retractable wheels, but also put a sledge under the opposite “tongue” end and pulled it like a sled.


This wasn’t optimal.  The coop was too heavy for the retracting mechanism I made for the wheels.  It was also hard to lift the coop to put the sledge under the other end to drag it with.  Additionally, in the spring I had to use the tractor to move it because the garden tractor would get stuck, #1 The Coop.

So  I scrapped the contraption I made for the extendable wheels and  decided to use temporarily attached wheels instead.  I scavenged two more wheels from  the front of a dead riding lawn mower.  For axils, I use 8″ bolts that are the same diameter as the original wheel axils.  I drilled holes through the coop’s 4×4 bottom frame and just slide the wheels and bolds right on.  I added some spacers between the wheel and wood to prevent rubbing.

This works well.  Our winter area can get mucky, as you can probably tell by the picture to the right; however, the wheels still allow us to pull/push the coop by hand.  A small scrap piece of  chain added to one end helps us to pull or allows us to use the garden tractor for longer distance hauls.


The main downside of this method is that it requires at least two people to tip the coop and put the wheels on.  You could use a lever or jack to raise each side, but since I have two boys, it takes just a few minutes to tip the coop each way and add the wheels.

-Jason

Dual-purpose Chickens – 9 – Suplemental Light

In fall of 2014 I decided I wanted to raise some dual-purpose chickens.  My focus is on a breed that lays good eggs which can be incubated to raise “panfry” broilers, pre-Cornish-Cross size meat birds.  So, how do I provide supplemental light for consistent laying?


The 3 breeds I’ve raised so far,  Buff Orpingtons, Delaware, and Rainbows, are sensitive to the amount of “daylight” they get in relation to egg laying.  In the seasons when the days are shorter, they stop laying.  I’ve heard some breeds are not as sensitive and will keep laying, but these breeds slowed down and almost stopped on me before I added light to extend their “day”.


120Since I do want year round laying, I have to supplement the daylight with artificial light.   When the coop is near an electrical outlet, it’s easy enough to use a standard multi-time timer to power a CFL bulb in the coop.  However, we normally only bring the coop near an outlet in the cold part of winter and the birds still need supplemental light in the fall and spring when no outlets are near the coop.


toteTo solve this, I built a DC light box.  For the light,  I ordered a 12VDC LED bulb that plugs into a standard receptacle.  I took the plug off a hanging lamp and stripped the wires to attach them to unit.  I purchased a $10 DC timer that has 16 programmable on/off times.  And I alternate deep cycle batteries for the power supply.


I followed the instructions to hook up the timer; however, the switch on the timer wouldn’t handle the amperage of the light if I ran it through the timer switch.  So instead, I ran a car relay off the timer switch and wired the light through the relay.  I added a fuse in as well, mainly because I already had the female spade connector cramped on and also wanted an easy disconnect in that spot anyway.  It may not be pretty, but it works.


lightTo run the light into the coop, I disconnect the lamp wire and feed it through a hole I drilled in the coop and another hole in plastic tote that houses all the electronics.

This setup works pretty good.  I have two light cycles programed, one in the morning and another one at night.   I can get at least 5 days off one battery charge running 4-6 hours of light a day.  Below are the descriptions and links to the bulbs and timer I used for your reference.

-Jason


(Pack of 2) 5w E26 LED Bulbs, 12 Volt, Warm White, Round Shape, 40w Equivalent, Solar Powered LED Bulbs, Off Grid LED Bulbs

FAVOLCANO CN101 DC 12V 16A Digital LCD Power Programmable Timer Time Switch Relay

Dual-purpose Chickens – 8 – Winter Water

In fall of 2014 I decided I wanted to raise some dual-purpose chickens.  My focus is on a breed that lays good eggs which can be incubated to raise “panfry” broilers, pre-Cornish-Cross size meat birds.  So, how do I keep the water from freezing?

One of banes of winter is frozen livestock water.  In the past, we’ve use 3 plastic 1 gallon waterers and rotated them throughout the day, bringing the frozen  ones in to thaw.  This was not an optimal solution.


I did some searching and was intrigued by an idea of using a tire to accumulate solar heat, and straw and a board inside the tire as insulation.  However, that would not work around here once the temperatures dropped well below freezing.


The idea I settled on was to use a concrete block with a light bulb inside, especially since the coop was going to be close to a power source.  It was easy to make.  Just an extension cord, a plugin light receptacle, a cooking tin, and a concrete block.  Put the cord, receptacle , and light bulb together and slid them into the concrete block.

base    light

To keep the block sitting level, either chisel a grove in the concrete block or sit the block on two pieces of wood and run the cord in-between the two pieced of wood.

Grove

And cover with a tin pan, to keep moisture away from the light.  Although I have metal waterers, I’m using the plastic ones as I think they handle the water freezing better.

waterer

I’m using a 60W bulb an it has worked pretty good.   So far this year,  most days stayed above 20 degrees , but  a few days were close to zero.  These days produced some frozen “rings” higher up in the waterer;  however, the tray stayed unfrozen and the chickens had unfrozen water to drink.    One thing to watch out for is that when the water gets close to being out, the waterer is lighter and easy to knocked off.

-Jason

Dual-purpose Chickens – 7 – What’s next?

rainbowIn fall of 2014 I decided I wanted to raise some dual-purpose chickens.  The main focus was on incubating my own birds to raise as “panfrys”, traditional meat birds frequently used in pan frying.  So where do I go from here?


So the questions I still have are what breed(s) do I want to continue working with and what size flock do I want.


For the breed, I’m not done trying different breeds.  I’m still looking for meet and eggs.  I’ve read that modern breeders are mostly focused on ‘show bird’  traits of the bird’s breed, and not on the functionality of the bird, such as egg production and size.  So, this year, I’m going to try buying my dual purpose birds from the hatchery I use for the meet birds.  The breed is called Rainbow and no two birds look alike.


As for the size of the flock, I’m still undecided for the long run.  A lot depends on where I want to go with these birds.  I think this year, I’ll stick to my a flock of 9-10 plus a rooster.  That way I won’t need to build a bigger coop.


The flock size brings us to the main question we get asked. “are you going to sell eggs”.  The answer is I don’t know.  It’s a possibility; however, this year it’s definitely going to be along the lines of a “when available” adjunct to us selling our chickens.  If we build a bigger coop, incorporate some egg only breed(s), and figure out some portable lighting for the coop, I’ll look more seriously at selling eggs in the future.

-Jason

Dual-purpose Chickens – 6 – In Summary

In fall of 2014 I decided I wanted to raise some dual-purpose chickens.  The main focus was on incubating my own birds to raise as “panfrys”, traditional meat birds frequently used in pan frying.  So how did 2015 go?


Overall I got what I expected.  Layers producing at around 60% egg to chick ratio and broilers weighed 3lbs dressed; both good foragers.  The main learning point of this experiment was the evaluation of breeds.


My Delaware chickens caused me much distress.  It seemed they all ate eggs.  Because of this, it was hard to judge egg production.  I’m  going to give them the benefit of the doubt and say it was equal, even though my gut tells me it was less.   And the final straw was a psychotic rooster.


I am pleased with the Buff Orpington hens.   To date, I’ve not found them to be egg eaters and they have a steady egg production at about 60%.  The one drawback is that I’ve still not been completely successful in breaking my broody hen.  That would be a bonus if I didn’t have an incubator, but since I do, it’s just a nuisance.


Overall, I see why Buff Orpington is a more popular homestead breed.  I’ve seen several people praise the Delaware breed, which is why I tried them, but my experience wasn’t favorable.  Of the two, I choose Buffs.

-Jason

Dual-purpose Chickens – 5 – Where’s the ‘beef’?

In fall of 2014 I decided I wanted to raise some dual-purpose chickens.  The main focus was on incubating my own birds to raise as “panfrys”, traditional meat birds frequently used in pan frying.  So how did the “panfrys” do?

IMG_0435

They were good foragers, which IMHO adds to the taste.  I don’t have hard numbers on how much they foraged vs feed,  but they were very light on the feed compared to normal meat birds.


The birds were an average of 2lb dressed weight at 13 weeks and 3lb average dressed weight at 16.  That compares to the size of 1950s US Broiler Performance.  Next year I’ll try and get hard numbers on the feed ratio.


One limitation is that I averaged 20 chicks per incubation cycle.  Since I don’t do a lot of processing myself and the processing place is 70 miles away, it’s better to have larger quantities.  It’s feasible to raise two cycles together; however, to get a minimum of 3lb dressed weight, the older cycle will be 19 weeks old.  Roosters fights may be a problem at that age.


I plan on continuing research into the dual breeds for meat.  Three pounds is an ok size, especially for a tasty bird.  Hatching our own birds cuts out some costs and I’ll work harder next year to get good numbers on the feed ratios to determine what the actual costs per pound are.

-Jason

Dual-purpose Chickens – 4 – Eggs

In fall of 201IMG_10844 I decided I wanted to raise some dual-purpose chickens.  The main focus was on incubating my own birds to raise as “panfrys”, traditional meat birds frequently used in pan frying.  Now I want eggs.


In between my incubation sessions, we were getting 6-7 eggs average a day from the 9 hens.  We had built up  a rotation of almost 8 dozen eggs in the fridge when we started having issues.


First I noticed some eggs were broken.  I determined it was a chicken pecking eggs, but which one?  While I was trying to figure out how to catch the egg eater, first one, then two of the Buff Orpington hens went broody on me.  At first they were in the nesting boxes, but as I kept kicking them out of those, they took up corners in the coop.  I managed to dissuade one of them by continually kicking her out, but the other was to stubborn.


In the mean time, I thought I had found my egg eater.  I saw a Buff running around with a broken egg shell.  I separated her, but by now between the broody hens taking all the eggs and the egg eater we were only getting 1-2 eggs a day.  This went on for almost 6 weeks while I “studied” the birds and waited for a chicken tractor to be freed so I could start isolating the birds to get to the bottom of what was going on.


The Buff I separated wash sharing the tractor with my dual-purpose meat birds.  However, she was rejoined the flock after two weeks as the loss of eggs had not lessoned and she started laying in the tractor without pecking the eggs.  The birds that were in the tractor with her graduated, but we restocked the tractor with Brother’s M chickens and I did not want to the layer hens with the Brother’s meat birds.  Finally we emptied the chicken tractors; however, we were leaving for vacation in a week.  I didn’t want to complicate things for my caretaker, so almost two months passed with little to no eggs.


When we returned from a vacation, I immediately separated the Delaware and Buffs by putting the Buffs in an empty tractor.  Within a week the buffs started laying 2-3 eggs again while the Delawares produced none.  So I started introducing Delaware hens with the Buffs to identify the egg eater.  The first one I introduced ran past me and started pecking the Buff eggs as I was trying to gather them.  Found her!  The other two were introduced 3 days apart and we did not loose any more eggs.


But now, I was losing daylight and the birds were not laying well.  I moved the coop up by the house and installed a light on a timer.  Production picked up, until… more pecked egg.  This time I noticed a Delaware hanging out in the coop and separated her.  No missing eggs for a week.  Then …. More pecked eggs.  I took the third and last Delaware out of the flock, one had disappeared during the summer, and now had just 5 Buffs.


Months later and still no pecked eggs.  The 5 Buffs are producing an average of 3 eggs a day.


-Jason

Dual-purpose Chickens – 3 – Incubation

In fall of 2014 I decided I wanted to raise some dual-purpose chickens.  The main focus was on incubating my own birds to raise as “panfrys”, traditional meat birds frequently used in pan frying.  So let’s do some hatching.


Spring was rocking and rolling.  The nine hens were producing 6-7 eggs on average and it didn’t take me long to fill all 27 slots in my incubator.  I had purchased an INCUVIEW incubator off a recommendation from TSP Podcast 1373.  I really like this incubator as it’s almost “set it and forget”.  Periodic checking the humidity and straightening the rows of eggs are all that’s needed.  The last 10 days of my 5th run went unattended while we were on vacation.

IMG_0097IMG_0082

The Delaware/Buff mix produced a 74% hatch rate.  Having never hatched chickens before we spend hours watching the chicks work their way out of the eggs.


Then off to the brooder to be raised like the other meat birds.  This part of my plan went smoothly.

IMG_0098


-Jason

Dual-purpose Chickens – 2 – The flock

In fall of 2014 I decided I wanted to raise some dual-purpose chickens.  The main focus was on incubating my own birds to raise as “panfrys”, traditional meat birds frequently used in pan frying.  So I need some chickens.


After doing some research, I decided to try 2 breeds, Delaware and Buff Orpington.  I was really partial to the Delaware breed as they were initially bread to be a meet bird, but were quickly overshadowed by the current Cornish-X breeds.  However, I’d raised some Buff Orpingtons the year before.  I liked them so decided to try both.

buff Delaware

I purchased 4 hens and 2 roosters of each, along with 2 guinea hens that I also wanted for hatching eggs.  That gave me 8 new layers, plus and extra leftover Buff hen from 2014.  Having two of each rooster would allow me a chance to choose a well behaved rooster of either breed.  By spring I had decided to keep a Delaware rooster based on  having local resources to get more Buffs and the desire to really give the Delaware breed a try.


In early spring, the guineas decided to gang up on a hen.  Ganging up is apparently typical behavior for guineas, but given my limited number of hens, I was unwilling to risk losing birds so the young guineas became dinner.  I local store also started carrying guinea chicks to replace our dwindling free range flock, so I wasn’t too concerned about not having eggs for hatching.


So by the end of spring, I had my established flock, a Delaware rooster with 4 hens and 5 Buff hens.  I was ready to hatch some eggs.


-Jason